Studies
Introduction
A study is a collection of input data folders, settings, and an output folder. Specifically, a study consists of a Study Name associated with one or more data set folders (at least one SDTM Folder or ADaM Folder must be specified) and zero or more settings, along with a unique Output Folder.
Most JMP Clinical reports require that you specify a study before execution. The chosen study is automatically updated with the output data sets created and the setting that is run. A metadata folder for each study provides a central location for tracking all the reports that have been run, in both the _processinfo.sas7bdat data set and the StudyLog.txt file. A notes folder similarly contains study comment files.
Note: Metadata, notes, and other saved settings are stored in your user home folder. In Windows 10, this is typically C:\Users\<your user name>\AppData\Local\SAS\JMPClinical\17\JMPC\. On the MAC, this is typically /Users/<USERID>/Documents/JMPClinical17/.
See Adding and Manipulating Studies for more information.
Adding and Manipulating Studies
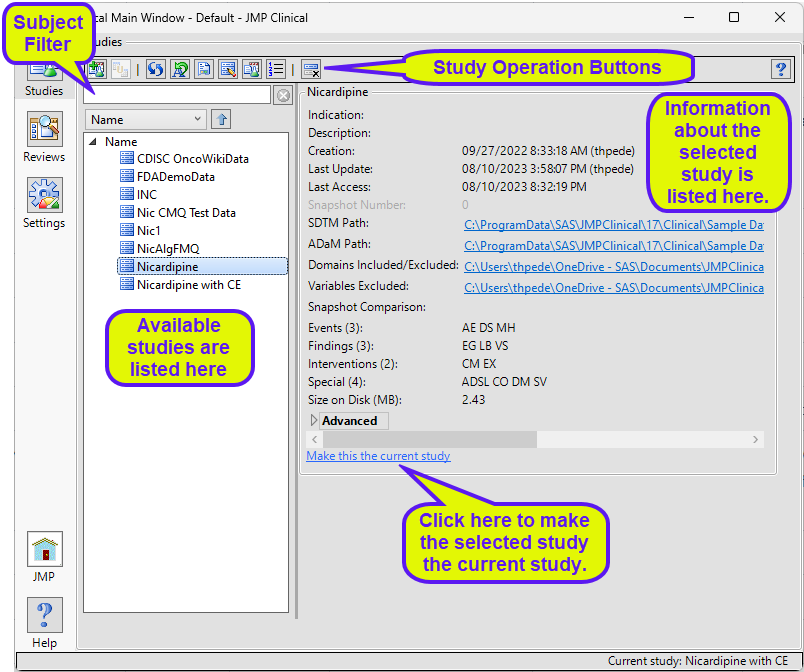
All study additions and manipulations are done on the Studies tab shown below:
Note: For instructions on how to add the Nicardipine example study that ships with JMP Clinical, see Add Study...
Available Studies
All of the registered studies available to you are listed here. Studies can be sorted by various criteria in ascending or descending order.
| 8 | Click to select a study. Use -click to select multiple studies. |
Note: For a study to be shown here you must have read-access to both the original study data folders and a valid study metadata object file.
Study Information
Information about the selected study is shown in the panel on the right side of the window. This includes the date the study was created, when it last updated and when it was last accessed. Additionally, the location of the study data within your file structure is shown along with a list of the domains that make up your study data. In the Nicardipine study shown above, there are 3 events domains (AE, DS, and MH), 3 findings domains (EG, LB, and VS) 2 interventions domains (CM and EX), and three special domains (ADSL, DM, and SV).
JMP Clinical can read data from individual domains as well as multiple domains where the study data is split among multiple domains.
Study Operations
Use these buttons to add, manipulate, or delete registered studies.
Add Study: Click  to use Add Study...
Combine Studies: Click  to combine two studies using Combine Studies . Note: This option remains unavailable unless two studies are selected.
Refresh Study Metadata: Click  to update the metadata file for the selected study. Users upgrading from 17.x to 17.2 must use this option to refresh their studies.
Rename a Study: Click  to rename a study.
Snapshot History: Click  to use Snapshot History to generate a summary report of the snapshot history for the currently selected study
Update Study with New Snapshot: Click  to update the selected study with a new snapshot. See Update Study with New Snapshot for more information. Note: This option is available only if the Enable Future Snapshot Comparisons option was checked when you added the Study.
Set Study Preferences: Click  to globally set custom study-level attributes, subject-level preferences, analysis preferences for each CDISC class of reports, preferences for calculating study days, as well as preferences for advanced operations. See Set Study Preferences for more information.
Set Value Ordering in Studies: Click  to use Set Value Order and Color in Studies to specify the order and color of values within variable specific plots, such as histograms, and tables, as well as the order of value-comparison plots and tables within output.
Delete Studies: Click  to delete the selected study. After a study is deleted, its notes and reviews folders remain where they were. The log and result files are moved to \ProcessResults\ directory and the study folder under studies is deleted. Note: If the KeepDeletedStudiesNotesAndReviews system preference is activated on Manage Configurations (this preference is Off by default), all notes and reviews are deleted as well.
Refreshing Studies
Occasionally, you may need to update your studies. This may be after you have updated the study data or when you have updated JMP Clinical to a newer version. Follow the instructions below, depending on what you have done.
After updating the study data:
To refresh an updated study
| 8 | After updating the study data, open JMP Clinical and click on the Studies tab. |
| 8 | Click on the study to be refreshed. |
| 8 | Click to refresh the study. |
After updating JMP Clinical
| 8 | Install/Update JMP Clinical. |
Note: If you install JMP C 17.2 from a full installer, refer to the JMP Clinical 17 Installation Instructions for your operating system. If you install from an updater, refer to the Instructions for Updating JMP Clinical 17 to 17.X. Both guides can be found here.
| 8 | Open JMP Clinical and open the Studies tab |
| 8 | Select a study and click to refresh that study. Repeat for all of the studies. |
| 8 | Select one of studies as the Current study. |
| 8 | Click on the Settings tab and then click to open the The Manage Configurations... Window. |
| 8 | Navigate to the Report Management section and click . |
| 8 | Close the The Manage Configurations... Window. and then close JMP Clinical. |
| 8 | Reopen JMP Clinical and proceed as normal. |