Creating A JMP Clinical Custom Report
JMP Clinical contains a wide variety of different reports that enable you to analyze much of the data generated over the course of clinical trials. These include analyses of demographic information, safety data, findings, interventions and events, as well as other data. Should you need to perform a more specialized analysis, JMP Clinical provides a mechanism for users with JSL coding experience to create their own custom reports.
Note: Expertise in JSL programming is required for creating custom reports.
The following information will help you create a custom report.
Report Locations
A report can be placed in any of the three locations below. Refer to the JMP Clinical Main Window > Settings > Configuration > Manage Configurations... > Paths panel and check the Show advanced path options box to view the resolved path values for the path keys corresponding to these locations.
| • | /install/clinical/processlibrary |
| • | /user/clinical/processlibrary |
| • | A registered addin location |
If placing the report in /install/clinical/processlibrary, it will appear in the report selector window after restarting JMP Clinical. The other two locations do not require a restart and will appear after opening the report selector window.
Report Filenames
Create a JSL file whose name is a valid filename. Valid filenames are composed of letters and numbers. The only special character allowed is the underscore ("_") character. The extension should be “.jsl”.
Report Sections
Header Section
Define information about the report in this optional section. None of this information is required. Use elements of the following script. Substitute the values below with actual values.
processNS:label = "Your Report Name";
processNS:labelSkeleton = "Your {{^1}} Report Name with a Placeholder for Dynamic Renames";
processNS:reportSelectorTab = 1;
processNS:drillDown = 0;
processNS:cdiscClass = "Your Report Category";
processNS:icon = "C:\Users\userid\Desktop\YourReportIcon.gif";
processNS:documentation = "https://www.yourreportdocumentationurl.htm";
processNS:description = "This is a description of what the report does.";
If a processNS:label value is specified, it will be used as the report title in the report selector window and the report tab in Review Builder.
Specify a process:labelSkeleton value if you would like report runs to dynamically change the title of the report. (See Renaming a Report (Dynamically) for more information.)
Specify processNS:reportSelectorTab = 1; if you would like the report to be visible on the report selector window, or processNS:reportSelectorTab = 0; if you would like to hide it.
processNS:drillDown is not currently used but might be used in future versions of JMP Clinical.
Specify a processNS:cdiscClass to categorize the report, allowing it to be grouped with other reports of the same CDISC Class on the report selector window (when sorting by CDISC Class only).
Specify processNS:icon to place an icon of your choice to the left of the report title, on both the report selector window and the report tab in Review Builder.
Specify processNS:documentation if you have an .htm, .html, or another browser-compatible file containing documentation for your report. If specified, the URL of that page will be shown when selecting the report in the report selector window (if the Settings > Review Options > "Show report documentation on report selector" option is checked), and when clicking the help button for that report in Review Builder.
Specify processNS:description content describing the report, to be shown on report selector (if the Settings > Review Options > "Show report descriptions on report selector" option is checked) and on report results, Create Static Report, and Create Live Report (if the Settings > Review Options > "Show report descriptions on report results" option is checked).
Requirements Section
Content specified in the optional processNS:requirements associative array is used to validate whether the report can run on the current study. If the report passes the requirements specified here, information about domains and variables meeting the requirements is returned in an objRefNS:requirementsReturn associative array within the report code. Reports that utilize this associative array guarantee that the analysis uses the same variables that users expect. If the report fails the requirements, the report will appear on the report selector with an asterisk ( * ) after its title when Show reports unsatisfied by current study is checked (or will not show up at all if not checked) and an error message describing the deficiencies will be shown instead of the usual report output when the report is run.
processNS:requirements = [
domain1 => {{required variables}, {optional variables}, [variable notes]},
domain2 => {{required variables}, {optional variables}, [variable notes]},
…
];
Domains specify some combination of required or optional variables (and variable notes).
Required variables must exist in the specified domains for the report to run.
Optional variables do not affect whether the report can run but affect the analysis and/or display of results if present.
Variable notes are optional comments that provide additional details about how particular variables are used by the report. Use a JSL associative array structure to specify one or more notes (e.g., ["EXAMPLEVARA" => "For labeling points"]). If present, these notes can be viewed by users through the Check Variable Requirements > Options interface by moving "Variable Notes" to an Outline or Tabular role.
Essentially all of the requirements section is optional – even processNS:requirements itself.
processNS:requirements can also be an empty associative array ([=>]), contain domains with no required or optional variables, or contain no variable notes.
Domain Requirements
Domains can be specified either as explicit domains or domain wildcards. The required/optional state of domains is dictated by the required/optional specifications of the underlying variables, as well as whether an explicit domain or domain wildcard is specified.
Explicit domains should be expressed using two-letter domain codes, where applicable. Where ADaM domains exist, they will be given priority over SDTM domains, and will be the ‘chosen’ domain for each. Every explicit domain specified in the requirements will be tested to determine if the report is considered runnable. For example, specifying requirements for the EG domain tells the system that the variable requirements for either ADEG or EG must pass for the report to be considered runnable.
Domain wildcards, in contrast, tell the system to replicate the requirements for every applicable domain in the study, yet only require that at least one (or zero) domain(s) from that wildcard pass the variable requirements. For example, _ONE_OR_MORE_NUMERIC_FINDINGS_ might create requirements for the EG, LB, and VS domains, but only LB passes the specified requirements. In that instance, the report still passes the overall requirements, so the report is considered runnable.
Domain Wildcard Definitions
You may use any of the keys for factory domain wildcard definitions shown below in your reports.
"_ONE_OR_MORE_ADVERSE_EVENTS_" => getDomainListOfNames(["name" => {{"ADAE", "AE"}, "CONTAINS"}]),
"_ZERO_OR_MORE_ADVERSE_EVENTS_" => getDomainListOfNames(["name" => {{"ADAE", "AE"}, "CONTAINS"}]) || {"_NONE_"},
"_ONE_OR_MORE_ALL_" => getDomainListOfNames(),
"_ZERO_OR_MORE_ALL_" => getDomainListOfNames() || {"_NONE_"},
"_ONE_OR_MORE_DEMOGRAPHICS_" => getDomainListOfNames(["demographicsFlag" => 1]),
"_ZERO_OR_MORE_DEMOGRAPHICS_" => getDomainListOfNames(["demographicsFlag" => 1]) || {"_NONE_"},
"_ONE_OR_MORE_DEMOGRAPHICS_EX_" => getDomainListOfNames(["name" => {{"ADSL", "ADDM", "DM", "ADEX", "EX"}, "CONTAINS"}]),
"_ZERO_OR_MORE_DEMOGRAPHICS_EX_" => getDomainListOfNames(["name" => {{"ADSL", "ADDM", "DM", "ADEX", "EX"}, "CONTAINS"}]) || {"_NONE_"},
"_ONE_OR_MORE_EVENTS_" => getDomainListOfNames(["class" => "Events"]),
"_ZERO_OR_MORE_EVENTS_" => getDomainListOfNames(["class" => "Events"]) || {"_NONE_"},
"_ONE_OR_MORE_EVENTS_EXCEPT_ADVERSE_" => getDomainListOfNames(["class" => "Events", "name" => {"AE", "!="}, "Name" => {"ADAE", "!="}]),
"_ZERO_OR_MORE_EVENTS_EXCEPT_ADVERSE_" => getDomainListOfNames(["class" => "Events", "name" => {"AE", "!="}, "Name" => {"ADAE", "!="}]) || {"_NONE_"},
"_ONE_OR_MORE_FINDINGS_" => getDomainListOfNames(["class" => "Findings"]),
"_ZERO_OR_MORE_FINDINGS_" => getDomainListOfNames(["class" => "Findings"]) || {"_NONE_"},
"_ONE_OR_MORE_NUMERIC_FINDINGS_" => getDomainListOfNames(["class" => "Findings", "numericFlag" => 1]),
"_ZERO_OR_MORE_NUMERIC_FINDINGS_" => getDomainListOfNames(["class" => "Findings", "numericFlag" => 1]) || {"_NONE_"},
"_ONE_OR_MORE_CHARACTER_FINDINGS_" => getDomainListOfNames(["class" => "Findings", "characterFlag" => 1]),
"_ZERO_OR_MORE_CHARACTER_FINDINGS_" => getDomainListOfNames(["class" => "Findings", "characterFlag" => 1]) || {"_NONE_"},
"_ONE_OR_MORE_INTERVENTIONS_" => getDomainListOfNames(["class" => "Interventions"]),
"_ZERO_OR_MORE_INTERVENTIONS_" => getDomainListOfNames(["class" => "Interventions"]) || {"_NONE_"},
"_ONE_OR_MORE_ONCOLOGY_" => getDomainListOfNames(["name" => {{"ADRS", "RS", "ADTR", "TR"}, "CONTAINS"}]),
"_ZERO_OR_MORE_ONCOLOGY_" => getDomainListOfNames(["name" => {{"ADRS", "RS", "ADTR", "TR"}, "CONTAINS"}]) || {"_NONE_"},
"_ONE_OR_MORE_SPECIAL_" => getDomainListOfNames(["class" => "Special"]),
"_ZERO_OR_MORE_SPECIAL_" => getDomainListOfNames(["class" => "Special"]) || {"_NONE_"},
"_ONE_OR_MORE_CLINICAL_EVENTS_" => getDomainListOfNames(["name" => {{"ADCE", "CE"}, "CONTAINS"}]),
"_ZERO_OR_MORE_CLINICAL_EVENTS_" => getDomainListOfNames(["name" => {{"ADCE", "CE"}, "CONTAINS"}]) || {"_NONE_"},
"_ONE_OR_MORE_RS_SV_" => getDomainListOfNames(["name" => {{"ADRS", "RS", "ADSV", "SV"}, "CONTAINS"}]),
"_ZERO_OR_MORE_RS_SV_" => getDomainListOfNames(["name" => {{"ADRS", "RS", "ADSV", "SV"}, "CONTAINS"}]) || {"_NONE_"}
Variable Requirements
Variables can be specified as either explicit variables or variable wildcards.
Explicit variables should only be directly specified when there is no alternate variable which could substitute for them, there is no difference between SDTM and ADaM naming conventions for that variable, and/or you plan on doing the checking for applicable alternate variables yourself. For example, if "EXMPL" is the only variable that could possibly satisfy your analysis, then you may specify it explicitly. If on the other hand, "VEXMPL", "LBEXMPLV" or "EXMPL01V" could also work, then you should strongly consider specifying a variable wildcard instead.
Variable wildcards are a convention by which requirements can be stated generically yet allow the system to return to you the list of explicit variables that satisfy that wildcard. This frees you from much of the burden of manually testing for all possible explicit variables in your code and allows you to utilize the wildcard in either data preparation code or in some cases, directly within a platform call. Variable wildcards can have any of the following forms:
| • | --EXMPL – Where the two-letter domain code substitutes for --. |
| • | EXMPxxL – Where a treatment period integer substitutes for xx. |
| • | _EXMPLE_ – Where a complete definition can be specified. For example: |
| • | {{"VEXMPL","EXMPLxxV"}} – If VEXMPL exists, choose it; otherwise, if EXMPLxxV exists, choose it. |
| • | {{"s:<someStudyMethodCall>()~(someFallbackRegexToDisplayIfRequirementsFail)"}} – If the set of potential explicit variables cannot be easily predicted by name alone, it is possible to directly call a method that scans for other study metadata attributes to arrive at the full explicit set. |
| • | As you will see in the Variable Wildcard Definitions section, definitions can be recursive, which allows for fewer duplicated definitions in the codebase, especially when a core definition is reused across multiple definitions. For example, "_A_"'s definition can reference {{"_B_","_C_"}}, which might resolve to {{"BX", "BY", "CX", "CY"}}. |
In the main report code, you will be able to reference the above wildcards as keys when obtaining the returned (resolved) requirements.
The first list within each domain requirement contains the required variables. The second list contains the optional variables.
Required Variables
Within the required variables list, the default logical operator is ‘AND’. In the ‘AND’ state, all variables must be present for the requirement to be satisfied. You may optionally introduce ‘OR’ conditions by specifying a nested list (i.e., adding a set of curly braces within the list), and even add subordinate ‘AND’ conditions within the ‘OR’ conditions by specifying even more deeply nested lists. These conditions allow for detailed tracking of present, chosen, missing, and absent variables in requirementsReturn. For example, assume A-H represent variables and that the following list was specified for the required variables:
{"A", {"B", {"C", "D", "E"}, "F", "G"}, "H"}
This expression can be translated as follows:
A and (B or (C and D and E) or F or G) and H
You may specify the empty list ({}) to indicate that there are no required variables.
Optional Variables
To allow for easier specification by report writers, optional variable processing currently ignores the logical operator state of the optional variables list. (Otherwise, almost every optional variable would need to be specified in a separate list so that one missing optional variable would not cause the entire list of optional variables to fail.) This simplified form allows for tracking of present and absent variables only.
You may specify the empty list ({}) to indicate that there are no optional variables and to return the domain table with only the requirements. Alternatively, you may specify Empty() to indicate that all variables beyond the required variables are optional, and to return the domain table with all columns (even those not specified anywhere in required or optional lists). Note: The Main Window > Settings > Set Study Preferences > Advanced > Preserve all input data set columns in reports preference, if checked, overrides the discarding of columns that were neither specified as required nor optional. If unchecked, any columns not mentioned in the required or optional lists will be discarded from the table.
Variable Wildcard Definitions
You may use any of the keys for factory variable wildcard definitions shown below in your reports.
"_ABLFL_" => {{"ABLFL", "--BLFL"}},
"_ADTM_" => {{"ADTM", "ADT", "--DTC"}},
"_JMPC_ADTM_" => {{"JMPC_ADTM", "JMPC_ADT"}},
"_ADY_" => {{"ADY", "--DY"}},
"_AENDTM_" => {{"AENDTM", "AENDT", "--ENDTC"}},
"_JMPC_AENDTM_" => {{"JMPC_AENDTM", "JMPC_AENDT"}},
"_AENDY_" => {{"AENDY", "--ENDY"}},
"_ALL_" => {{"d:getVariableListOfNames()~(+)"}},
"_ALL_ACN_" => {{"s:getAEACNVariables()~(ACN*|AEACN*)"}},
"_ALL_AREL_" => {{"s:getAERELVariables()~(AREL*|AEREL*|REL*)"}},
"_ALL_JMPC_ACN_" => {{"s:getJMPCAEACNVariables()~(JMPC_ACN*|JMPC_AEACN*)"}},
"_ALL_JMPC_AREL_" => {{"s:getJMPCAERELVariables()~(JMPC_AREL*|JMPC_AEREL*|JMPC_REL*)"}},
"_ANRHI_" => {{"ANRHI", "--STNRHI"}},
"_ANRIND_" => {{"ANRIND", "--NRIND"}},
"_ANRLO_" => {{"ANRLO", "--STNRLO"}},
"_AREL_" => {{"AREL", "--REL"}},
"_ASEV_" => {{"ASEV", "--SEV"}},
"_ASTDTM_" => {{"ASTDTM", "ASTDT", "--STDTC"}},
"_JMPC_ASTDTM_" => {{"JMPC_ASTDTM", "JMPC_ASTDT"}},
"_ASTDY_" => {{"ASTDY", "--STDY"}},
"_ATOXGR_" => {{"ATOXGR", "--TOXGR"}},
"_ATOXGRSEV_" => {{"_ATOXGR_", "_ASEV_"}},
"_ATPT_" => {{"ATPT", "--TPT"}},
"_ATPTN_" => {{"ATPTN", "--TPTNUM"}},
"_AVAL_" => {{"AVAL", "--STRESN"}},
"_AVALC_" => {{"AVALC", "--STRESC"}},
"_AVISIT_" => {{"AVISIT", "VISIT"}},
"_AVISITN_" => {{"AVISITN", "VISITNUM"}},
"_CAT_" => {{"PARCAT1", "--CAT"}},
"_COMPLFL_" => {{"COMPLFL", "COMPFL", "COMPLT", "COMPLETED"}},
"_ALL_CQxxxNAM_" => {{"s:getCustomMedicalQueriesVariables()~(CQ*NAM)"}},
"_ENDDATECENSORINGMTTE_" => {{"_ENDDATECENSORINGLDRD_", "_ENDDATECENSORINGSRED_", "_ENDDATECENSORINGDOLST_", "_ENDDATECENSORINGDOEOP_"}},
"_ENDDATECENSORINGONCO_" => {{"_ENDDATECENSORINGLRAD_", "_ENDDATECENSORINGSRED_", "_ENDDATECENSORINGDOLST_", "_ENDDATECENSORINGDOEOP_"}},
"_ENDDATECENSORINGLDRD_" => {{"DSSTDTC"}},
"_ENDDATECENSORINGSRED_" => {{"RFENDTC"}},
"_ENDDATECENSORINGDOLST_" => {{"TRTEDT", "RFXENDTC"}},
"_ENDDATECENSORINGDOEOP_" => {{"EOSDT", "RFPENDTC"}},
"_ENDDATECENSORINGLRAD_" => {{"RSDTC", "RSDY"}},
"_JMPC_ENDDATECENSORINGMTTE_" => {{"_JMPC_ENDDATECENSORINGLDRD_", "_JMPC_ENDDATECENSORINGSRED_", "_JMPC_ENDDATECENSORINGDOLST_", "_JMPC_ENDDATECENSORINGDOEOP_"}},
"_JMPC_ENDDATECENSORINGONCO_" => {{"_JMPC_ENDDATECENSORINGLRAD_", "_JMPC_ENDDATECENSORINGSRED_", "_JMPC_ENDDATECENSORINGDOLST_", "_JMPC_ENDDATECENSORINGDOEOP_"}},
"_JMPC_ENDDATECENSORINGLDRD_" => {{"JMPC_ASTDTM", "JMPC_ASTDT"}},
"_JMPC_ENDDATECENSORINGSRED_" => {{"JMPC_RFENDTM", "JMPC_RFENDT"}},
"_JMPC_ENDDATECENSORINGDOLST_" => {{"TRTEDT", "JMPC_RFXENDTM", "JMPC_RFXENDT"}},
"_JMPC_ENDDATECENSORINGDOEOP_" => {{"EOSDT", "JMPC_RFPENDTM", "JMPC_RFPENDT"}},
"_JMPC_ENDDATECENSORINGLRAD_" => {{"JMPC_ADTM", "JMPC_ADT", "JMPC_ADY"}},
"_ENRLFL_" => {{"ENRLFL", "ENRL", "ENROLLED"}},
"_FASFL_" => {{"FASFL", "FULLSET"}},
"_GROUPLEVEL_" => {{"_MEDDRA_", "_NONE_"}},
"_GROUPLEVELDC_" => {{"_MEDDRA_", "_NONE_"}},
"_ITTFL_" => {{"ITTFL", "ITT"}},
"_MEDDRA_" => {{"--TERM", "--TRT", "--MODIFY", "--LLT", "--DECOD", "--SCAT", "--HLT", "--HLGT", "--BODSYS", "--CAT", "--CLAS", "--SOC"}},
"_MEDDRA2_" => {{"--DECOD", "--TERM", "--TRT", "--LLT", "--HLT", "--HLGT", "--BODSYS", "--SOC"}},
"_PARAM_" => {{"PARAM", "--TEST"}},
"_PARAMCD_" => {{"PARAMCD", "--TESTCD"}},
"_POPULATION_" => {{"_SAFFL_", "_COMPLFL_", "_ENRLFL_", "_FASFL_", "_ITTFL_", "_PPROTFL_", "_RANDFL_", "ALSBXSFL", "ALSBFL"}},
"_JMPC_POPULATION_" => {{"JMPC_SAFFL", "JMPC_COMPLFL", "JMPC_ENRLFL", "JMPC_FASFL", "JMPC_ITTFL", "JMPC_PPROTFL", "JMPC_RANDFL", "JMPC_ALSBXSFL", "JMPC_ALSBFL"}},
"_PPROTFL_" => {{"PPROTFL", "PPROT"}},
"_RANDFL_" => {{"RANDFL", "RAND", "RANDOMIZED", "RANDOM"}},
"_RFLAG_" => {{"d:getRflagVariableDefinition()~"}},
"_SAFFL_" => {{"SAFFL", "SAFETY"}},
"_SCAT_" => {{"--SCAT"}},
"_JMPC_STARTDATECENSORINGMTTE_" => {{"_JMPC_STARTDATECENSORINGSRSD_", "_JMPC_STARTDATECENSORINGDOFST_"}},
"_JMPC_STARTDATECENSORINGONCO_" => {{"_JMPC_STARTDATECENSORINGSRSD_", "_JMPC_STARTDATECENSORINGDOFST_"}},
"_JMPC_STARTDATECENSORINGSRSD_" => {{"JMPC_RFSTDTM", "JMPC_RFSTDT"}},
"_JMPC_STARTDATECENSORINGDOFST_" => {{"TRTSDT", "JMPC_RFXSTDTM", "JMPC_RFXSTDT"}},
"_TERMLEVEL_" => {{"_MEDDRA_"}},
"_TERMLEVELDC_" => {{"_MEDDRA_"}},
"_TREATMENT_" => {{"TRTxxA", "ACTARM", "TRTxxP", "ARM"}},
"_TREATMENTCROSSOVER_" => {{"ACTARM", "ARM", "TRTxxA", "TRTxxP"}},
"_TREATMENTEMERGENT_" => {{"TRTEMFL", "--TRTEM"}},
"_TREATMENTSTARTDATE_" => {{"TRTSDTM", "TRTSDT", "TRxxSDTM", "TRxxSDT", "RFXSTDTC", "EXSTDTC", "RFSTDTC"}},
"_TREATMENTENDDATE_" => {{"TRTEDTM", "TRTEDT", "TRxxEDTM", "TRxxEDT", "RFXENDTC", "EXENDTC", "RFENDTC"}},
"_ALL_TRxxSDTM_" => {"TRxxSDTM"},
"_ALL_TRxxSDT_" => {"TRxxSDT"},
"_ALL_TRTxxA_" => {"TRTxxA"},
"_ALL_TRTxxP_" => {"TRTxxP"}
Processing objRefNS:requirementsReturn metadata in processNS:runReport()
A common data preparation step involves obtaining values from the objRefNS:requirementsReturn associative array. Most importantly, you should know that any requirement specification that fails for the overall report will automatically prevent the report from running and will instead result in a user-friendly error message in the results section of the report that describes the insufficient domains and/or variables. You may also choose to perform additional checking of data (e.g., for variable values or constructs that are more complex than what the default requirement checking is currently doing), and if the checking fails, to issue the following call to prevent the rest of the report from running (and to issue a user-friendly error of your choice in the results section):
processNS:fatalError("…some error message…");
Assuming that the overall report requirements pass, you may obtain values from any of the following keys of objRefNS:requirementsReturn:
| • | “domains”: An associative array where keys are two-letter domain codes |
| • | “datatable”: The data table reference for the domain, or Empty() if not available |
| • | “error”: An integer indicating domain success: 0 if requirements pass, >0 if requirements fail |
| • | “notes”: An associative array of additional notes from the report writer about variables in the domain |
| • | (someVariableName) => (someNote) |
| • | “optional_absent”: A list of explicit variable names that were specified as optional and not found in the study |
| • | “optional_absent_wild”: An associative array of optional variable wildcards for which no variable was found in the study |
| • | “optional_chosen”: IGNORE |
| • | “optional_chosen_wild”: IGNORE |
| • | “optional_missing”: IGNORE |
| • | “optional_missing_wild”: IGNORE |
| • | “optional_present”: A list of explicit variable names that were specified as optional and found in the study |
| • | “optional_present_wild”: An associative array of optional variable wildcards for which variables were found in the study |
| • | “optional_requested”: A list containing the original request for optional variables. It may be a list or Empty(). |
| • | “required_absent”: A list of explicit variable names that were specified as required and not found in the study |
| • | “required_absent_wild”: An associative array of required variable wildcards for which no variables were found in the study |
| • | “required_chosen”: A list of the explicit required variables that were selected for use from the logical expression |
| • | “required_chosen_wild”: An associative array of required variable wildcards for which variables were selected for use from the logical expression |
| • | “required_missing”: A list of explicit required variables that were responsible for causing the logical expression to fail |
| • | “required_missing_wild”: An associative array of required variable wildcards for which no variables could satisfy the logical expression, causing the logical expression to fail |
| • | “required_present”: A list of explicit variable names that were specified as required and found in the study |
| • | “required_present_wild”: An associative array of required variable wildcards keys and the explicit variable names (values) that are found in the study |
| • | “required_requested”: A list containing the original request for required variables. It is normally a list. |
| • | “domains_wild”: An associative array of domain wildcards, whose values are the following. |
| • | “fail”: A list of explicit domain names for which variable requirements failed. |
| • | “pass”: A list of explicit domain names for which variable requirements passed. |
| • | “present”: A list of all explicit domain names resulting from the domain wildcard in the study, irrespective of whether their variable requirements passed or failed. |
“error”: An integer indicating overall success: 0 if requirements pass, >0 if requirements fail
To reiterate the terminology for variable requirements:
| • | Present: Exists in the study. (Required should generally not use this. Optional should.) |
| • | Chosen: Exists in the study and is picked by the logical expression. (Supported by required. Not supported by optional.) |
| • | Missing: Does not exist in the study and is responsible for the logical expression failing. (Supported by required. Not supported by optional.) |
| • | Absent: Does not exist in the study. (Required should generally not use this. Optional should.) |
To illustrate this more clearly, consider the following example where a study contains variables A, B, and D only:
| Logical Expression | Present | Chosen | Missing | Absent |
|---|---|---|---|---|
| (A and B and C and D) | (A and B and D) | - | (C) | (C) |
| (A and B) or (C and D) | (A and B and D) | (A and B) | - | (C) |
| (A and (C or E) | (A) | - | (C or E) | (C and E) |
The following is an example requirements request, requirements return, and requirements return reference:
// Example requirements request
processNS:requirements = [
"_ONE_OR_MORE_DEMOGRAPHICS_" => {{"SITEID"}},
"_ONE_OR_MORE_NUMERIC_FINDINGS_" => {{"USUBJID","DOMAIN","_TESTCD_","_TEST_","_STRESN_"},
{"--STRESU","_STNRLO_","_STNRHI_","--NRIND","_VISITNUM_","_VISIT_"}}
];
// Example requirements return (omitting domains other than VS for brevity)
objRefNS:requirementsReturn =
["domains" =>
[...<domains other than VS>...,
"VS" =>
["datatable" => Empty(),
"error" => 0,
"notes" => [=> ],
"optional_absent" =>
{"ANRLO", "VSSTNRLO", "ANRHI", "VSSTNRHI", "VSNRIND", "AVISITN", "AVISIT", "VISIT"},
"optional_absent_wild" =>
["_STNRHI_" => {"ANRHI", "VSSTNRHI"},
"_STNRLO_" => {"ANRLO", "VSSTNRLO"},
"_VISIT_" => {"AVISIT", "VISIT"},
"_VISITNUM_" => {"AVISITN"},
"--NRIND" => {"VSNRIND"},
"--STNRHI" => {"VSSTNRHI"},
"--STNRLO" => {"VSSTNRLO"}],
"optional_chosen" => {},
"optional_chosen_wild" => [=> ],
"optional_missing" =>
{{"ANRLO", "VSSTNRLO"}, {"ANRHI", "VSSTNRHI"}, "VSNRIND", {"AVISIT", "VISIT"}},
"optional_missing_wild" =>
["_STNRHI_" => {{"ANRHI", "VSSTNRHI"}},
"_STNRLO_" => {{"ANRLO", "VSSTNRLO"}},
"_VISIT_" => {{"AVISIT", "VISIT"}},
"--NRIND" => {"VSNRIND"},
"--STNRHI" => {"VSSTNRHI"},
"--STNRLO" => {"VSSTNRLO"}],
"optional_present" => {"VSSTRESU", "VISITNUM"},
"optional_present_wild" =>
["_STNRHI_" => {},
"_STNRLO_" => {},
"_VISIT_" => {},
"_VISITNUM_" => {"VISITNUM"},
"--STRESU" => {"VSSTRESU"}],
"optional_requested" =>
{"VSSTRESU", {"ANRLO", "VSSTNRLO"}, {"ANRHI", "VSSTNRHI"}, "VSNRIND", {"AVISITN",
"VISITNUM"}, {"AVISIT", "VISIT"}},
"required_absent" => {"PARAMCD", "PARAM", "AVAL"},
"required_absent_wild" =>
["_STRESN_" => {"AVAL"},
"_TEST_" => {"PARAM"},
"_TESTCD_" => {"PARAMCD"}],
"required_chosen" => {"USUBJID", "DOMAIN", "VSTESTCD", "VSTEST", "VSSTRESN"},
"required_chosen_wild" =>
["_STRESN_" => {"VSSTRESN"},
"_TEST_" => {"VSTEST"},
"_TESTCD_" => {"VSTESTCD"},
"--STRESN" => {"VSSTRESN"},
"--TEST" => {"VSTEST"},
"--TESTCD" => {"VSTESTCD"}],
"required_missing" => {},
"required_missing_wild" => [=> ],
"required_present" => {"USUBJID", "DOMAIN", "VSTESTCD", "VSTEST", "VSSTRESN"},
"required_present_wild" =>
["_STRESN_" => {"VSSTRESN"},
"_TEST_" => {"VSTEST"},
"_TESTCD_" => {"VSTESTCD"},
"--STRESN" => {"VSSTRESN"},
"--TEST" => {"VSTEST"},
"--TESTCD" => {"VSTESTCD"}],
"required_requested" => {"USUBJID", "DOMAIN", {"PARAMCD", "VSTESTCD"},
{"PARAM", "VSTEST"}, {"AVAL", "VSSTRESN"}}
]
],
"domains_wild" =>
["_ONE_OR_MORE_NUMERIC_FINDINGS_" =>
["fail" => {},
"pass" => {"EG", "LB", "VS"},
"present" => {"EG", "LB", "VS"}
]
],
"error" => 0
];
// Example requirements return reference (looping over domain dom)
Column(it, objRefNS:requirementsReturn["domains"][dom]["required_chosen_wild"]["_TESTCD_"][1]) << Set Name("TESTCD");
| • | You can view and debug the values returned by using one of the following calls in your report: |
| • | show(objRefNS:requirementsReturn); // raw |
write("\!N" || jg:studiesObj[objRefNS:StudyName]:formatDomainVariablesSpecAssoc(objRefNS:requirementsReturn, objRefNS:FullAPName, 0, 1)); // formatted
Immediately after the report is run, all objRefNS:requirementsReturn datatables are automatically closed.
Main Report Section
The core report processing code should be placed in the required processNS:runReport() function. This function should be declared as {Default Local}. It may contain nested function definitions, if they are used only for the current report; otherwise, it may contain function calls to external files.
Although there is great flexibility in how the report could be structured, it is good practice to place includes of other libraries (where applicable) and data preparation steps near the beginning of processNS:runReport().
Including Files
To include a source code file, simply use the Include() statement. As the path specified within Include() will not be displayed to the user, it is not necessary to use ConvertFilePath() on it first. Any of the following forms can be used:
| • | Include(jg:getPath("/install/clinical/jslfiles/", "DomainDistribution.jsl")); |
| • | Include("$CLINICAL_HOME/JSLFiles/DomainDistribution.jsl"); |
| • | Include(jg:jmpLSDir[3] || "\JSLFiles\DomainDistribution.jsl"); |
Widgets
Widgets are user interface controls that affect the data processing and display details of the report. They can be public or private.
Public Widgets
Public widgets are visible on the report's user interface (unless a dependency exists to hide them when some other widget's value is selected).
Factory Public Widgets
Factory public widgets are those public widgets that JMP Clinical uses in its standard (shipped) set of reports. These widgets typically have a corresponding preference in Set Study Preferences that controls the widget's starting value when a report is added through the report selector.
To add factory public widgets to the report, it is recommended that you use the functions defined in ..\JSLFiles\ProcessClass.jsl that have names of the form "make...Widget". These functions automatically handle some important steps for you, such as registering the widget references for proper downstream processing (e.g., loading/saving review templates). You should reference them in your report code using the processNS:make...Widget(...) form. All of these functions support the following arguments.
| • | returnInputContainerReference |
| • | 0: Do not return a reference to the inputContainer. (Choose this if necessary to construct in data prep code.) <DEFAULT> |
| • | 1: Return a reference to the inputContainer. (Choose this for the most compact form, for inline use within another displaybox.) |
| • | script |
| • | empty or 0 : Does not set a listener script. <DEFAULT> |
| • | expression : Is used as the custom script. Be sure to wrap the script with the correct number of Expr()s (normally three). |
| • | runScriptInitial |
| • | empty or 0 : Does not run the script when the widget is first drawn. |
| • | 1 : Runs the script when the widget is first drawn. |
| • | prependIndex |
| • | Do not specify this parameter or specify it as Empty(). |
The default arguments are good starting points. The value you use for 'returnInputContainerReference' is mostly determined by whether you decide to declare widgets before you append them into their final display container or whether you do so inline with the final display container. The 'script' value is determined by whether that widget needs to update something on the report or not. The 'runScriptInitial' argument instructs the script to be run when the widget is first drawn; it is less often needed. You can ignore the 'prependIndex' argument, which is necessary for the Set Study Preferences feature, which supports constructing multiple copies of each widget at the same time for multiple studies.
There are other arguments that are used by some, but not all, widget constructor functions. They include:
| • | appendDomainClass: Allows reuse of the same widget constructors for both Events and Interventions. |
| • | collapseAllExceptDomain: Specifies automatic hiding of variants of this widget for domains other than the currently selected domain. |
To create an "Event Type" widget that automatically reruns the report upon its option being changed, you can issue the following code within the data preparation section:
processNS:makeEventTypeWidget(0,
Expr(Expr(Expr(
processNS:rerunReport();
)))
);
Later in the code, where you organize the collection of widgets to display on the report, you can reference this widget with the following:
// Place in the Options' "Data" outline; second argument 0 starts the outline as open, 1 starts it as closed
processNS:appendDataOptions(
VListBox(
(objRefNS:eventcb):inputContainer
), 0
);
// OR place in the Options' "Display" outline
processNS:appendDisplayOptions(
(objRefNS:eventcb):inputContainer
);
Custom Public Widgets
Custom public widgets are public widgets that can be heavily customized, with few built-in assumptions about data processing or dependencies. Custom widgets are not offered on Set Study Preferences.
To add custom public widgets to the report, use the processNS:makeWidget() function. You must pass one argument into the function that is an associative array of key-value pairs used for construction options.
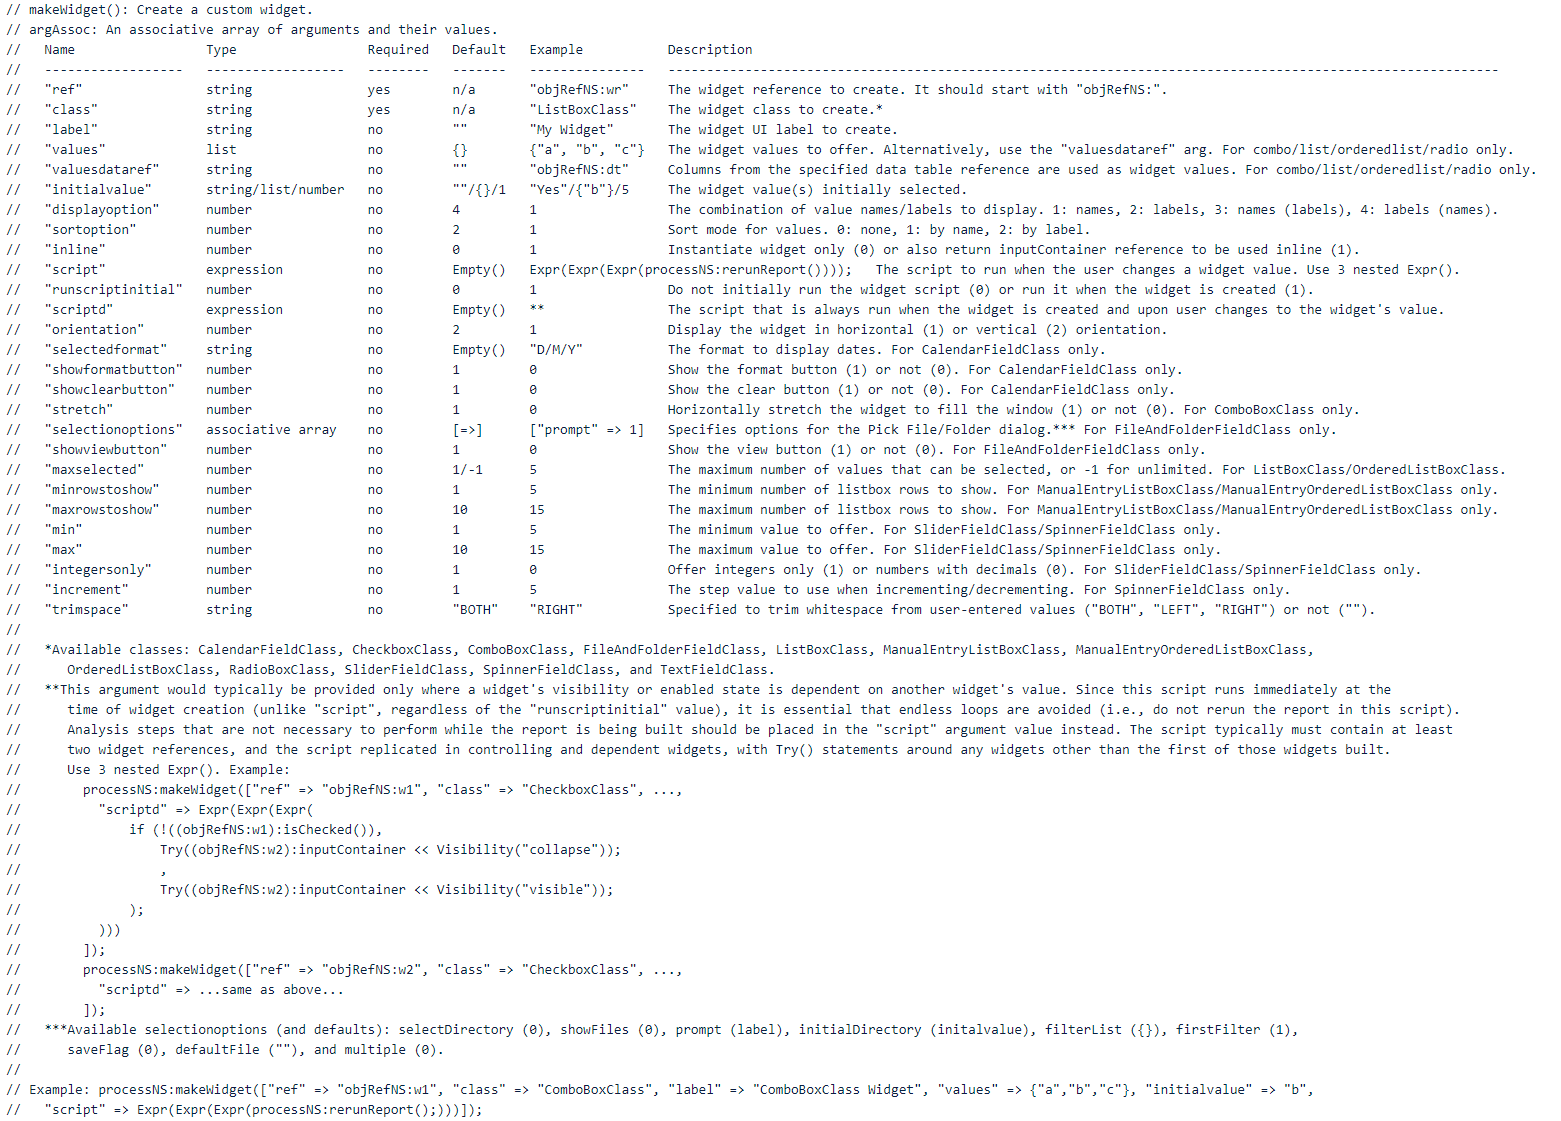
To create a custom ComboBoxClass widget offering the values "a", "b" and "c", with "b" selected by default, and with the report rerun whenever the user changes a value, issue the following code within the data preparation section.
processNS:makeWidget(["ref" => "objRefNS:w1", "class" => "ComboBoxClass", "label" => "ComboBoxClass Widget", "values" => {"a","b","c"}, "initialvalue" => "b", "script" => Expr(Expr(Expr(processNS:rerunReport();)))]);
Later in the code, where you organize the collection of widgets to display on the report, you can reference this widget with the following:
// Place in the Options' "Data" outline; second argument 0 starts the outline as open, 1 starts it as closed
processNS:appendDataOptions(
VListBox(
(objRefNS:w1):inputContainer
), 0
);
// OR place in the Options' "Display" outline
processNS:appendDisplayOptions(
(objRefNS:w1):inputContainer
);
Getting the Value From (or For) a Public Widget
As long as the widget has already been created (even if not yet attached to a displaybox) in your report, it is suggested to use jg:getWidgetValue(widgetReference = "...") to obtain the current value of a widget. This function handles both built-in and namespace-style widgets and guarantees that the value returned will be valid for the widget. For example, objRefNS:currentPopulation = jg:getWidgetValue("objRefNS:popcb") assigns the current population value to the objRefNS:currentPopulation variable.
If the widget has not already been created and it is necessary to obtain the value for which the widget should be set to once it is created, you can use processNS:getInitialWidgetValue(widgetReference = "", defaultValue = Empty(), preferenceName = ""). If a template is being used, its value will take priority; otherwise, if a study preference exists, its value will be used; otherwise, a defaultValue will be used. For preferenceName, Empty(), "", or 0 indicates to not use a preference when determining the initial value. A 1 indicates to use the widgetReference name as the preference name. Any non-empty string indicates to use that string as the preference name. This function is already used internally within the widget constructor functions. The following example obtains the initial value supplied by passing in a default value and flag to use the widgetReference as the preference name: objRefNS:currentPopulation = processNS:getInitialWidgetValue("objRefNS:popcb", jg:studiesObj[objRefNS:StudyName]:getDefaultPopulationVariable(1, 1), 1).
A note on terminology: Assuming that the widget constructor has set up both an internal and display string for every item in its options list:
The option name or value is normally what you should work with in your code. In addition to the above function calls, you can call the namespace class method directly like so after the widget has been instantiated: value = (objRefNS:<YourWidgetReference>):getValue();Less commonly, there might be situations where obtaining the option label or alternate value in your code is useful. You can obtain that directly (where applicable to the widget type) like so after the widget has been instantiated: alternateValue = (objRefNS:<YourWidgetReference>):getValueAlternate();
SPECIAL PUBLIC WIDGET VALUES
A few widget values denote special conditions, such as a choice that does not correspond to a literal variable or value. They are described below.
| Condition | Example | Name(Value | Label (Alternate Value) | Recommended way to obtain or test for this name (value) | Recommended way to obtain or test for this label (alternate value) | ||||||||||||||||||||||||||||||||||||
|---|---|---|---|---|---|---|---|---|---|---|---|---|---|---|---|---|---|---|---|---|---|---|---|---|---|---|---|---|---|---|---|---|---|---|---|---|---|---|---|---|---|
| Null or "None" |
|
_NONE_ | <None> | jg:getNullPreferenceStringInternal() | jg:getNullPreferenceStringDisplay() | ||||||||||||||||||||||||||||||||||||
| Other Conditions (More Widget-Specific) |
|
|
|
Use the literals in 'Name' column | Use locale:get() (for same-session matching) to test one language, or locale:getall() (if values are saved to metadata and a language switch could have occurred) to test every supported language, with the same xid used to construct the widget option labels. See the widget constructor function. | ||||||||||||||||||||||||||||||||||||
| Specified Below |
|
_SPECIFIEDBELOW_ | jg:getSpecifiedBelowPreferenceStringInternal() | jg:getSpecifiedBelowPreferenceStringDisplay() |
Because these names do not vary across locales, it is suggested that you rely on the name, rather than the label, when testing for widget values.
Another special value that you might encounter when working with preferences or study/domain/variable objects (but not widgets accessors directly) is Empty(). This value usually indicates that something exceptional occurred – for example, the preference name does not exist, something went wrong when initializing study preferences, etc. When retrieving or testing values directly from preferences or study metadata objects, it is safest to include an !IsEmpty(...return value...) condition first to ensure that an exceptional event did not occur.
Private Data Widgets
A special type of widget called a private data widget, is always invisible on the user interface and allows report writers to track and retrieve any number of report attributes for use in the current and subsequent runs of the report, using an associative array data structure. For instance, this can be used to retain user preferences about nonstandard custom controls or graph customizations. Only one copy of this widget per report is ever necessary (and supported).
To add a private data widget to the report:
| 1 | Call processNS:makePrivateDataWidget();. |
| 2 | Obtain its initial value by calling objRefNS:privateData = processNS:getAllPrivateData();. |
| 3 | Add any content you would like to track to the objRefNS:privateData associative array. |
| 4 | Save the content back to the private data widget using processNS:setAllPrivateData(objRefNS:privateData);. |
For example:
processNS:makePrivateDataWidget(); // creates a hidden textfield widget whose default value is "[=>]"
objRefNS:privateData = processNS:getAllPrivateData(); // objRefNS:privateData now contains an associative array
show("loaded:", objRefNS:privateData);
if (!Contains(objRefNS:privateData, "runHistory"),
objRefNS:privateData["runHistory"] = {};
);
InsertInto(objRefNS:privateData["runHistory"], AsDate(Today()));
show("updated:", objRefNS:privateData);
processNS:setAllPrivateData(objRefNS:privateData); // objRefNS:privateData is written back into the textfield for templates/reruns
Renaming a Report (Dynamically)
Report titles can be made dynamic (responsive to widget values or some other event during the report run). The following conditions must be met:
| 5 | The user has not customized the report title (by typing a new title directly on the report tab, by renaming through Manage Tabs... > Rename Report, or by saving such a title in a review template). (Note: Titles can be reset to default (non-user-customized) titles through Manage Tabs... > Reset Report Title.) |
| 6 | For domain- or substring- level renaming, processNS:labelSkeleton* must be defined in the report header section, and it must contain a word placeholder for each desired substitution. For example, processNS:labelSkeleton = locale:get("XDistribution_Text");, where "XDistribution_Text" is defined in English as "{{^1}} Distribution". The first supplied domain or substring will replace "{{^1}}". |
| 7 | For domain-level renaming, valid domain(s) must be supplied. |
*Of course, a generic title (processNS:label, such as processNS:label = locale:get("EventsDistribution_Text");) must also be supplied for use in Report Selector (as dynamic titles are undesirable there).
The following methods are available for renaming within report code (in processNS:runReport()):
| Method | Purpose | Prerequisites | Examples | Notes | ||||||||||||
|---|---|---|---|---|---|---|---|---|---|---|---|---|---|---|---|---|
| processNS:renameReportTitleDomain(d) | Update the report title with specified domains in the report title's skeleton, honoring configuration display preferences for domains. |
|
processNS:renameReportTitleDomain(objRefNS:domain); processNS:renameReportTitleDomain({objRefNS:domain1, objRefNS:domain2}); |
Used by most Events, Interventions, and Findings reports. | ||||||||||||
| processNS:renameReportTitleSubstring(s) | Update the report title with specified substrings in the report title's skeleton. |
|
processNS:renameReportTitleSubstring(objRefNS:medQueryTypeLabel); processNS:renameReportTitleSubstring({objRefNS:value1, objRefNS:value2}); |
Used by Medical Query Risk Report. | ||||||||||||
| processNS:renameReportTitle(t) | Update the entire report title, regardless of the existence of a report title skeleton. |
|
processNS:renameReportTitle("Example Report Title") |
Might be useful for custom reports, or for reports requiring multiple patterns of dynamic titles. Other tips:
|
Rerunning a Report
The Example Widget Construction section included the call to rerun a report within the widget constructor's listener script, but note that you can issue the following call anywhere in your report where it makes sense to do so:
processNS:rerunReport();
Specifying Auto-run and Manual Run Options
By default, factory reports operate in an auto-run ON manner. Specifically, those widgets that require a report rerun will automatically trigger a rerun when the user changes a widget option value.
For reports where users frequently change multiple options or for reports that simply take a long time to run (especially on large studies), it can be valuable to offer an auto-run toggle and manual run button ("run widgets"). To set this up, do the following things in processNS:runReport():
| • | Construct the "run widgets" using processNS:makeRunWidgets(defaultChecked = 1|0). A defaultChecked value of 1 specifies that auto-run should be in effect by default and a manual run button will be initially invisible, while a value of 0 specifies that the report will not automatically run when first added (unless overridden by a template) and a manual run button will be initially visible. (To create the widget displaybox container inline, specify a 1 for its second argument.) |
| • | Add the "run widgets" displaybox container reference to the options panel (if the "run widgets" have not already been constructed inline) using objRefNS:RunWidgets. |
| • | Add conditions where needed in the report code to prevent analysis code blocks from running when the report is loaded but not doing a true run (auto-run OFF and a manual run did not occur; code that builds widgets should still execute, to the degree possible), by wrapping analysis sections with if(processNS:shouldRunAnalysis(), ...analysis code...); |
The "run widgets" are shown in the blue ovals below:
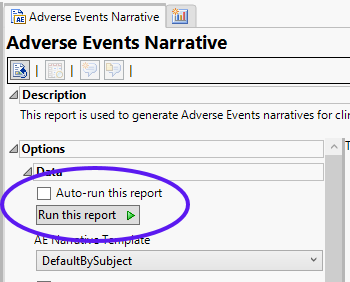

When auto-run is OFF, the report results panel becomes disabled when arerun-dependent widget option value change is made (to indicate that the results became 'stale').
At the moment that auto-run is switched ON, a rerun is automatically triggered (because of 'stale' results, or because the results do not yet exist) unless no other rerun-dependent widget option value changes have been made since the last run (as the results are still 'fresh').
Like all other ProcessClass widgets, auto-run state is saved to review templates.
Loading, Preparing, and Linking Input Data
Loading Data
**loadData() (assumes objRefNS:requirementsReturn is used?)
Removing Screen Failures from ADSL
**prepADSL()
Linking an Analysis Data Table to tadsl
Issue the following call to link an analysis data table to the tadsl.jmp data table. This allows the Review Subject Filter to filter the report results.
reportRefNS:linkAnalysisTableToADSLTable(objRefNS:your_data_table_reference); // example
Applying Value Order and Color Preferences to an Analysis Data Table
Issue the following call to apply Value Order and Value Color column properties to an analysis table (or tables):
jg:ApplyValueOrderToTables(EvalList({objRefNS:ae_adsl}), objRefNS:StudyName); // example
Changing Analysis Data Table Column Names to Labels
To the extent that SAS Labels are available, you can issue the following call to convert analysis data table column names to labels:
jg:setColumnJMPNamesToSASLabels(objRefNS:ae_adsl); // example
Registering a Data Table Reference
You should register any data tables that are to be kept open while the user interacts with the report, using the following call. Doing so will allow JMP Clinical to automatically close these tables when the user closes the report tab or review.
processNS:addDataTableReference("Custom Report Example ADSL Data", "objRefNS:in_adsl"); // example
Messaging
Requirements Failure Messages
If a requirements section is specified and the requirements are not satisfied, an automatic error message is shown, and the report will stop before processing any of the runReport code.
Adding a Custom Error Check
You can stop execution anywhere in runReport code with a condition and processNS:fatalError() call. The message you specify as the first argument will be printed to the report tab instead of its usual results.
if (someCondition,
processNS:fatalError("Cannot run this report because someCondition was not met.");
);
Sending a Note to the Log
To print a message to the JMP Log, issue the following statement.
processNS:note("Replace this string with a note of your choice.");
Creating a Report Filter
The following example creates a report filter by specifying the data table reference and list of columns to show in the filter.
if(length(objRefNS:tadslCols),
objRefNS:ReportDataFilterReferenceList = reportRefNS:createReportFilter(objRefNS:in_adsl, objRefNS:tadslCols);
// Do not display the filter histograms and bars.
objRefNS:rptfilter = objRefNS:ReportDataFilterReferenceList[2];
objRefNS:rptfilter << Show Histograms and Bars( 0 );
);
// Place the Report Filter in the Options Display panel.
processNS:appendDisplayOptions(
objRefNS:ReportDataFilterReferenceList[1]
);
Creating a Column Switcher
Controlling one platform
Some JMP platforms offer a built-in column switcher. This is the simplest way to add a column switcher if your report needs the switcher to control one platform only.
objRefNS:gb = Graph Builder(
Show Control Panel( 0 ),
Variables( X( Eval(objRefNS:columnNames[1]) ) ),
Elements( Pie( X, Legend( 3 ), Pie Style( "Ring" ) ) ),
Column Switcher( Eval(objRefNS:columnNames[1]), Eval(objRefNS:columnNames) )
);
Controlling multiple platforms
To add a column switcher that controls multiple platforms:
| • | define a switcher handler function |
| • | call objRefNS:createColumnSwitcher() with a data table reference, list of column names, and title |
| • | link each platform to the column switcher |
| • | append the column switcher to the "Display" options, and |
| • | set the column switcher handler using the switcher handler function |
The following example demonstrates these steps.
objRefNS:boxPlotColSwitcherHandler = Function( {currentColumn, nextColumn, switcher},
objRefNS:findingsTestToDisplay = (nextColumn << get name);
objRefNS:yAxisTitle = createAxisTitleForGraph( "Mean ", "", objRefNS:changeFromBaselineTitle, objRefNS:findingsTestToDisplay, objRefNS:normalizationOfLabMeasurementsValue);
objRefNS:boxPlotGB << SendToReport(
Dispatch( {}, "Y title", TextEditBox, {Set Text( objRefNS:yAxisTitle )})
);
objRefNS:boxPlotOB << setTitle( objRefNS:yAxisTitle ||" by "|| objRefNS:trtvar );
objRefNS:boxTabuOB << setTitle( "Summary Statistics for "|| objRefNS:yAxisTitle || " by Visit" || " by " || objRefNS:trtvar );
);
objRefNS:boxColSwitch = objRefNS:createColumnSwitcher(objRefNS:boxPlotDT, objRefNS:boxPlotColNames, objRefNS:colSwitcherTitle,1); // objRefNS:boxPlotDT is a data table reference
objRefNS:boxColSwitch["columnSwitcher"] << LinkPlatform(objRefNS:boxPlotGB); // objRefNS:boxPlotGB is a Graph Builder reference
processNS:appendDisplayOptions(
objRefNS:boxColSwitch["displayBox"]
);
objRefNS:boxColSwitch["columnSwitcher"] << LinkPlatform( objRefNS:boxPlotTabu ); // objRefNS:boxPlotTabu is a Tabulate reference
objRefNS:boxColSwitch["columnSwitcher"] << Make Column Switch Handler( objRefNS:boxPlotColSwitcherHandler );
Drill-Down Buttons
Built-in Drill-Down Buttons
To add a built-in drill down button and its content to a report, use the processNS:addDrillDowns() call, specifying a list of buttons as the first argument.
processNS:addDrillDowns({"ShowSubjects"});
Custom Drill-Down Buttons
To add a custom drill down button and content to a report, use the processNS:addDrilldown() call, specifying a button name, function, icon (optional), and selection minimum count (optional) as arguments.
processNS:addDrilldown(locale:get("ViewComments_Text"), NameExpr(objRefNS:viewComments()), "/install/clinical/documentation/icons/clinical/Note.png");
The processNS:addDrilldownContent() function can be used in the function argument of processNS:addDrilldown() to build the customized function. Arguments are name, content, a flag to replace content (optional), and a flag to show the docker (optional).
processNS:addDrilldown("Subjects in selection", function({}, {},
processNS:addDrilldownContent("Table Selections", TextBox(objRefNS:selections));
));
Specifying Content to Send to Static Reports
To selectively send content to Create Static Report, specify platform or displaybox references in a list, as shown in the example below.
processNS:defineStaticReportContent({objRefNS:db});
Specifying Content to Publish to JMP Live
Specify platform or displaybox references in a list that you would like to publish to JMP Live, as shown in the following example.
processNS:defineLiveReportContent({objRefNS:db});
Sample Custom Reports
Some custom report examples are shipped with JMP Clinical. They are located in the C:\ProgramData\SAS\JMPClinical\17\Clinical\SampleCustomReports installation folder on Windows and /Library/Application Support/JMP/17/Clinical/SampleCustomReports on the Mac. To view, edit, and experiment with them, it is recommended that you first copy these report files to one of the locations described in the Report Locations section, preferably /user/clinical/processlibrary. With JMP Clinical open, double-click on one of these files to open them in a JMP script window. After editing and saving the file, re-open report selector in Review Builder to add an updated copy of the report to the review to study its behavior.