This Add-In enables you to map column names in various file types, including .sas7bdat, .xls/.xlsx, .csv, .txt, or .jmp files, that may not be CDISC-compliant to variable names from SDTM and save them with proper file names and file extensions (.jmp) for the different data sets used by JMP Clinical.
8
To access this tool, click on the JMP Clinical Main Window to open the JMP Home Window.
8
Click Add-Ins > JMP Clinical Data Mapping Tool to open the tool.
The tool contains four main sections. The options for each section are described below:
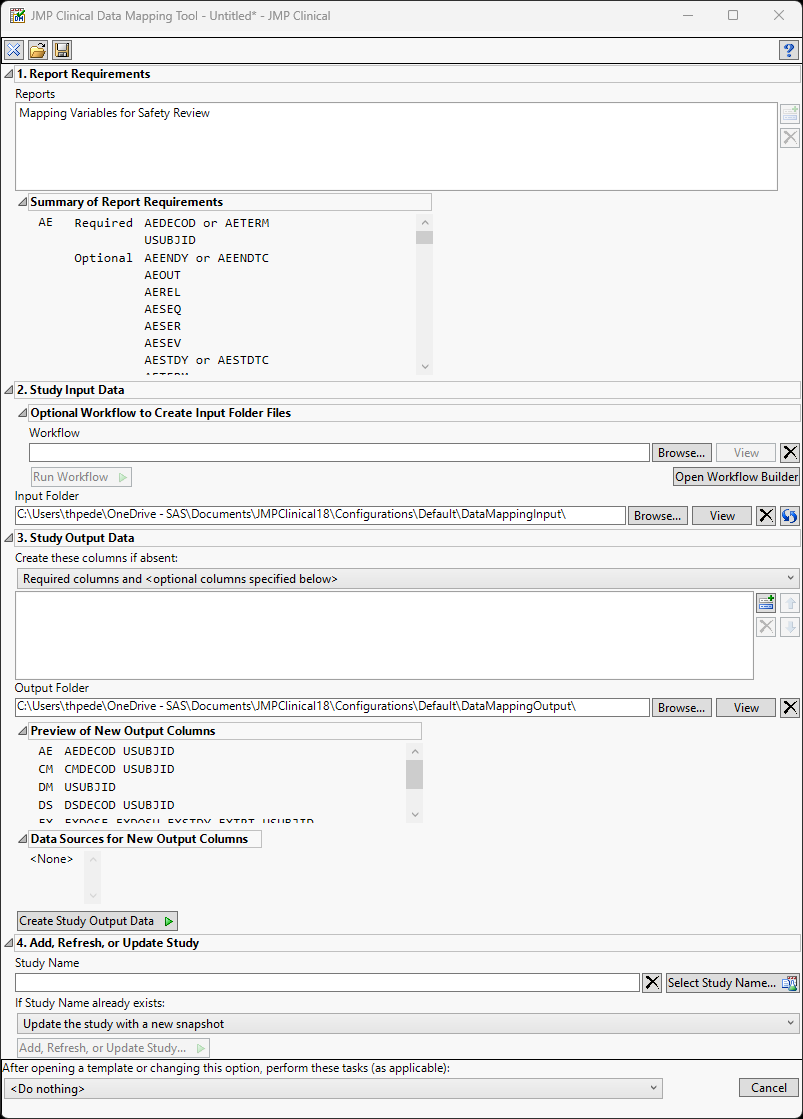
1. Report Requirements
Reports
Use this option to specify the JMP Clinical reports that you plan to use. Requirements from these reports are used to determine the study data that this tool needs to prepare.
•
Click to allow selection of "Mapping" reports. At the time of this writing, you must choose the "MappingVariablesForSafetyReview" report.
•
Click to remove selected reports.
Summary of Report Requirements
After at least one report is specified, the merged requirements are summarized here in three column format: domain, required/optional, and the required column name.
2. Study Input Data
Workflow
Use this option to specify a workflow. This option is used only if it is necessary to prepare the Input Folder data. For example, you may need to merge multiple files into one domain or transpose columns within a file.
•
Click to navigate to the workflow file.
•
Click to open and view the workflow file.
•
Click to delete the workflow from the field.
•
Click to run the selected workflow. This option is available only when a workflow has been specified.
•
Click to create a new workflow. This option is available only when the Workflow field is empty.
Input Folder
Use this option to specify a folder (currently an SDTM folder is expected) containing the data files needing to be mapped.
3. Study Output Data
Create these columns if absent
Use the drop down menu to specify which columns, if any, to create in the output data if the Study input data set does not already contain them.
•
Choose None if no new columns are needed.
•
Choose Required columns only to generate only the columns needed for the reports to run.
•
Choose Required columns and <optional columns specified below> to generate the columns needed for the reports to run as well as optional columns specified below. Selecting this option opens a list field to specify the desired optional columns. Click to open an Add window containing a list of option columns. Select the columns to add and click .
•
Click to delete selected columns from the list. Click or to move selected columns up or down in the column order.
Output Folder
Use this option to specify a folder (currently an SDTM folder is expected) where you want the mapped files to be placed.
Preview of New Output Columns
The domain and variable names for any new columns are summarized here. Existing columns are carried over, as is, and are not shown here. When no new columns are created, <None> is shown.
Data Sources for New Output Columns
This outline is shown only when there are columns listed in Preview of New Output Columns field. If new columns are created and Study Input Data has been specified and at least one column of the same type (character vs. numeric) exists in the same domain in study input data, a separate widget is shown in this section for each column to be created. The drop-down indicates which column to copy data from. Label and type are shown for the column to create and for the column to copy from. This information is gathered from the CDISC_variables.jmp table. In a few cases, explicit entries do not exist, so a guess is made using a more generic entry. <None> keeps the new column as a shell column.
Create Study Output Data
Clicking this button creates the output files. If files already exist in the specified folder, a prompt will appear to ask whether to cancel, overwrite files as needed, or clear the directory and create the new files. To prevent stray clicks from corrupting the wrong folder’s study data, Cancel is the default selection.
4. Add, Refresh, or Update Study
Study Name
You can either enter a new study name in the text box or click to select an existing study.
If Study Name already exists
Use the drop down option to either refresh the existing study with the Study Output Data or update the study with a new snapshot.
•
Choose Refresh the study to refresh the existing study with the Study Output Data. Important: To use the Refresh option, you must specify the existing study's SDTM Folder in the Output Folder field (because Refresh Study does not offer a dialog to change its folder paths). A prompt will appear that allows you to do this automatically, if necessary.
•
Choose Update the study with a new snapshot to open the Update Study with New Snapshot dialog. This enables you to update the study.
Add, Refresh, or Update Study...
Clicking this button automatically launches one of three study management operations (Add and Update open a dialog, either Add Study...or Update Study with New Snapshot, respectively, whereas Refresh just runs because it does not offer a dialog). This tool prepopulates the dialogs to the extent possible (study name, SDTM Folder, and Add Study's Advanced > Study Data > Anchor Date for Study Day Calculation (a best guess based on available input/output data)).
General Buttons
•
Click to clear all entries and reset the data mapping tool.
•
Click to browse to and open an existing data mapping template.
•
Click to save the current template.
After opening a template or changing this option, perform these tasks (as applicable)
This allows the template to be easily rerun without the need for users to manually click the various run/create/add buttons.
•
<Do nothing>: No automatic runs/creations occur.
•
(2) Run input workflow: Runs the optional input workflow only.
•
(2, 3) Run input workflow, create study output, and run output workflow: Same as (2) but also creates study output data.
•
2, 3, 4) Run input workflow, create study output, run output workflow, and launch Add/Refresh/Update Study: Same as (2, 3) but also launches the study management operation.
•
(2, 3, 4r) Run input workflow, create study output, run output workflow, and launch and run Add/Refresh/Update Study: Same as (2, 3, 4) but also automatically runs the study management operation.
Other notes:
•
The template name will have a * after it in the title bar when changes haven't been saved.
•
Only an SDTM-like-to-SDTM mapping is supported.
•
Cross-domain mapping is not supported. Variables/values cannot be mapped across domains for obvious reasons (records will not align).
•
Four folders are created by this tool within the path specified by installation.path.preferences' /user/clinical key:
 on the JMP Clinical Main Window to open the JMP Home Window.
 to allow selection of "Mapping" reports. At the time of this writing, you must choose the "MappingVariablesForSafetyReview" report.
 to remove selected reports.
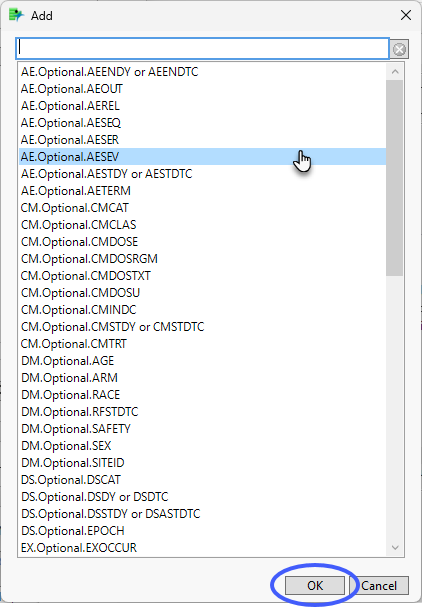
 or
or  to move selected columns up or down in the column order.
 to browse to and open an existing data mapping template.
 to save the current template.