 Design
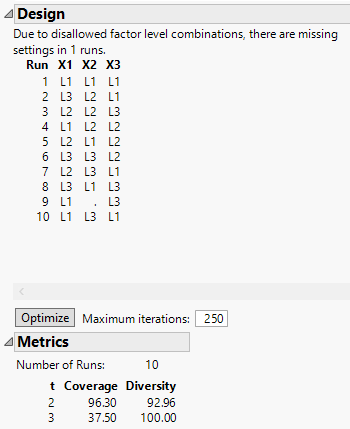
In the Covering Array window, when you click Make Design, the Design and Metrics sections appear. For designs that require extensive computation, a progress bar appears.
The Design section shows the covering array design that you have constructed. The first column lists a Run order. You might need to use the scroll bar to view all the runs. The remaining columns show factor settings for each run.
Optimize
Select Optimize to reduce the size of a design that was constructed by the Covering Array platform or that you have loaded using the Load Design red triangle option. Optimize is not available for designs constructed by the Covering Array platform that are known to be optimal. In particular, all unconstrained strength 2 designs for two-level factors constructed by the platform are optimal. Also, any unconstrained strength t design for t+1 factors is optimal for any t.
For more information about the algorithm, see Algorithm for Optimize.
Note: Optimize is time intensive, but can be run repeatedly to yield incrementally better designs.
Use the Maximum iterations option to specify a maximum number of iterations to be used in optimizing the design.
 Unsatisfiable Constraints
If a set of constraints prohibits the construction of a covering array where all required factor levels are represented, it is said to be unsatisfiable.
Example of Unsatisfiable Constraints
Consider a strength 2 design for three factors, each at three levels.
1. Select DOE > Special Purpose > Covering Array.
2. Next to Add N Factors, type 3.
3. From the Add Factor menu, select 3 Level.
4. Click Continue.
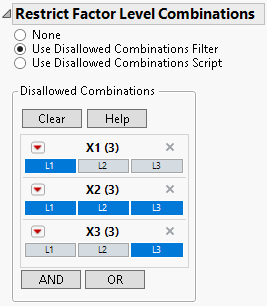
5. Select Use Disallowed Combinations Filter.
6. From the Add Filter Factors list, select all three factors and click the Add button.
7. Press Ctrl and select the following levels:
– For X1, select L1.
– For X2, select L1, L2, and L3.
– For X3, select L3.
Figure 20.12 Completed Restrict Factor Level Combinations Panel
Note: Setting the Random Seed in the next two steps reproduces the exact results shown in this example. When constructing a design on your own, these steps are not necessary.
8. Click the Covering Array red triangle and select Set Random Seed.
9. Enter 12345 and click OK.
10. Click Make Design.
Figure 20.13 Design and Metrics
A note beneath the Design section indicates that one run has a missing setting due to the constraints. That run is run 9. To ensure that the covering array has strength 2, the combination of X1 set to L1 and X3 set to L3 is required. But for these settings, the constraints prohibit all settings for X2.

