Design Generation
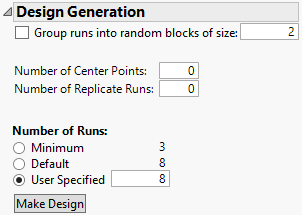
Use the Design Generation section to define blocking, center points, replication, and the number of runs in your custom design. Typically, the input area has two parts:
• Design structure options
• Number of runs options
Figure 4.23 Design Generation
Design Structure Options
Group runs into random blocks of size
(Not available if a blocking factor is specified.) To construct a random block design, enter the number of runs that you want in each block. When you specify the sample size, a factor called Random Block is created. Its levels define blocks of a size that is consistent with the block size that you entered, given the specified number of runs. If the number of runs is an integer multiple of the block size, the block sizes equal your specified value.
Number of Whole Plots
Appears when you specify a hard or very-hard-to-change factor. The factor Whole Plots corresponds to the very-hard-to-change factors (split-split-plot design), if there are any, otherwise to the hard-to-change factors (split-plot design). JMP suggests a value for the number of whole plots that maximizes the information about the coefficients in the model. Or, you can enter a value for the number of whole plots. See Numbers of Whole Plots and Subplots.
Number of Subplots
Appears when you specify a very-hard-to-change factor. The factor Subplots corresponds to the hard-to-change factors in the split-split-plot design. JMP suggests values for the number of whole plots and subplots that maximize the information about the coefficients in the model. Or, you can enter a value for the number of subplots. See Numbers of Whole Plots and Subplots.
Hard to change factors can vary independently of Very Hard to change factors
Select this option to create a strip-plot (also known as two-way split-plot or split block) design. This option creates a design where the hard-to-change factors are randomized within the levels of the very-hard-to-change factors. They are not nested within the very-hard-to-change factors.
Number of Center Points
Appears only if the design contains factors with a Continuous or Mixture factor type. Specify how many additional runs you want to add as center points to the design. A center point is a run whose setting for each continuous factor is midway between the high and low settings. See “Center Points, Replicate Runs, and Testing”.
If a design contains both continuous and other types of factors, center points might not be balanced relative to the levels of the other factors. Custom Design chooses the center points to maximize the D-, I-, A-, or alias efficiency of the design.
Number of Replicate Runs
Specify the minimum number of replicate runs that you want to add to the design. This does not replicate the entire design, but chooses the optimal design points to replicate. The resulting design can have more replicate runs than specified. See “Center Points, Replicate Runs, and Testing”.
Note: Replicate runs are identified by the custom design algorithm in addition to the specified number of Center Points. A replicate run could be an additional center point.
Number of Runs Options
Minimum
A lower bound on the number of runs necessary to avoid failures in design generation. When you select Minimum, the resulting design is saturated. There are no degrees of freedom for error.
Note: If you select the Minimum number of runs, there is no error term for testing parameter estimates. This choice is appropriate only when the cost of additional runs is prohibitive.
Default
Suggests the number of runs. This value is based on heuristics for creating a balanced design with at least four runs more than the Minimum number of runs.
User Specified
Specify the number of runs that you want. Enter that value into the Number of Runs text box. This option enables you to balance the cost of additional runs against the potential gain in information.
Number of Runs
This is the only option that appears when a covariate factor with Changes set to Easy is specified. The number of runs shown is the number of rows in the data table associated with your covariate or covariates. You can specify a smaller number of runs. In that case, the covariate runs that are selected optimize the design criterion.
Make Design
Once you have completed the Design Generation section, click Make Design. Custom Design generates the design, presents it in the Design section, and provides evaluation information in the Design Evaluation section. Notice the controls in the Model and Alias sections are disabled. Use the Back button to change model or alias terms. The Output Options panel also appears, enabling you to create the design table.
Note: Sometimes several designs can optimize the optimality criterion. When this is the case, the design algorithm might generate different designs when you click the Back and Make Design buttons repeatedly.
