JMP Live Help
Create visualizations with your data in JMP and share your analyses or data as posts in JMP Live. Anyone viewing these posts has the interactive capabilities of JMP to explore your data.
Find out more about these JMP Live topics:
Publish JMP Content
Create your reports in JMP and publish them as posts in a JMP Live space. You can also publish data tables directly to JMP Live. Space and folder access determine how people can interact with your content.
For details about how to publish from JMP, see Share Reports to JMP Live in the JMP Online Help.
About JMP Live
In JMP Live, all content is contained in a space.
You can open content from any of these locations:
|
–
|
Home contains all reports in spaces and folders that you have permission to access.
|
|
–
|
Spaces contains the spaces that you are a member of.
|
Figure 1.1 Report in a Space and Folder (Grid Format)
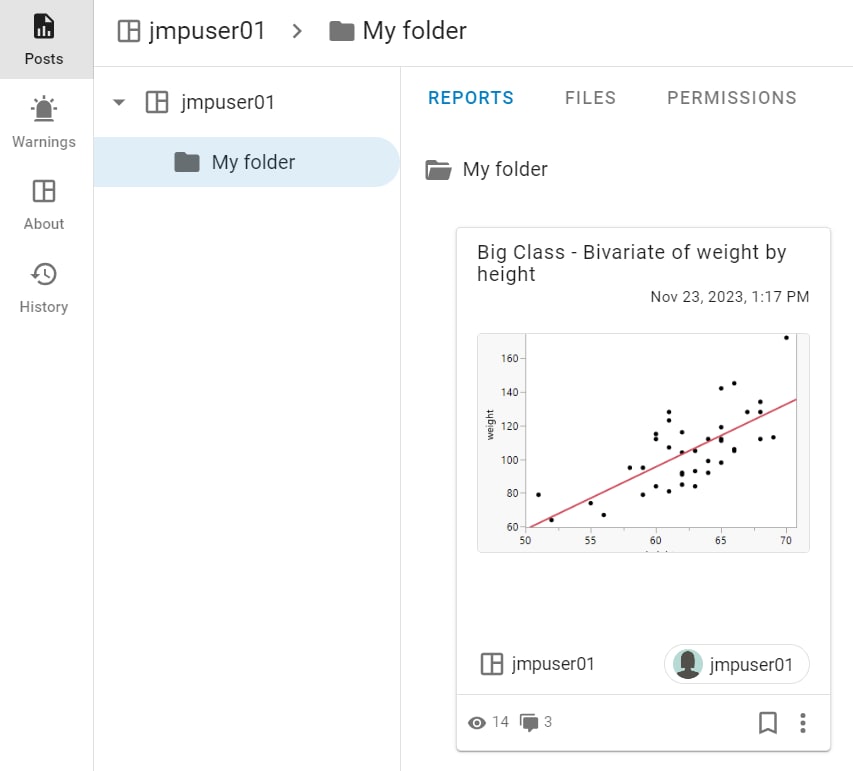
Note: You can show report summaries as a grid or a list. See Change the Summary Format.
On the report summary, you see the title, when the report was last updated, the space the report is in, the user who published the report, how many views or comments the report has, and more.
To see more details about a report or data post, click More  > Details. Or, within a post, click Details
  .
.
 > Details. Or, within a post, click Details
  .
.JMP Live Spaces
In JMP Live, all posts and folders are contained in a space:
|
•
|
When you first log in to JMP Live, a personal space is created for you which you can publish to. In your personal space, you can create folders, and edit, replace, or delete your posts.
|
Tip: To quickly access your personal space, click your user icon > My personal space.
|
•
|
The posts and folders that you see depend on which spaces you have permission to access, either individually or indirectly through or group membership (which is controlled by JMP Live administrators).
|
|
•
|
Spaces are created by JMP Live administrators or users with administrative permission on all spaces in JMP Live.
|
|
•
|
What you can do in a space or folder depends on the permissions you have in the space or folder. See Types of Space Permissions.
|
|
•
|
Permissions to spaces are controlled by a JMP Live administrator or JMP Live users who have administrative access to a space. See Update Users or Permissions.
|
Find out what you can do in JMP Live spaces:
Create or Delete a Space
JMP Live administrators can create or delete spaces, or they can give a user permission to manage all spaces in JMP Live. In this case, you see an Admin page where you can create or delete spaces.
Create a Space
|
1.
|
At the top, click Admin > Spaces
 . . |
|
2.
|
Click Create space
 . . |
|
3.
|
Give the space a name, a unique space key, and an (optional) description. See About Space Keys.
|
|
4.
|
Click Save.
|
|
5.
|
At the bottom, you can add users and groups to the space.
|
About Space Keys
|
•
|
A space key is a unique identifier for a space.
|
|
•
|
Space keys appear in the URL of the space.
|
|
•
|
A space key can contain only letters and numbers.
|
|
•
|
Space keys can be used to identify the space to publish to when using JSL. When editing a space key, keep in mind that space keys are used in URLs and for JSL scripting. Updates might cause issues in scripts and with stored links.
|
Delete a Space
Deleting a space permanently deletes all reports and data within the space.
|
1.
|
At the top, click Admin > Spaces
 . . |
|
2.
|
Click Delete Space.
|
Update Users or Permissions
In spaces where you have administrative access, you can update users or their permissions to access content.
To access permissions, add, or delete users:
|
1.
|
Click Spaces and click a space.
|
The Posts  page opens.
|
2.
|
Click the space name or a folder in a space.
|
Permissions on folders are inherited from the parent item (folder or space), unless you set custom permissions. See Set Custom Permissions on a Folder.
|
3.
|
Click the Permissions tab.
|
Tip: If you do not see Permissions, you do not have administrative access to the space or folder. To request administrative access, contact an administrator listed on the About  page for the space.
 page for the space.
|
4.
|
(Optional) To add users or groups to a space, enter the new group or user and click Add.
|
|
5.
|
(Optional) To change permissions, select or deselect permissions. Or, click Select All or Deselect All.
|
Note: View permission is a minimum requirement for any user or group and is not removable.
|
6.
|
(Optional) To remove a user or group from a space, click Remove
 . . |
Note: Removing a user or group removes their permission to the space and its folders. However, if a user or group is part of another group that has permission to access folders in the space, they retain that permission.
Types of Space Permissions
View
User can view posts in the space or folder. The user must also be enabled. See Manage Users.
Download
User can download data tables and scripts or can download report posts or entire folders as JMP Projects in the space.
Contribute
User can publish new posts and edit, replace, or delete posts in the space or folder. User can also create folders. To create posts, the user also needs permission to publish content. See Manage Users.
Data Admin
User can manage data tables (update, upload, refresh, assign credentials, create an import script, set a refresh schedule) in the space or folder.
Data Import
User can upload data that is not in a JMP format to JMP Live, which is converted into a JMP data table.
Tip: Before a user can import data, a Data Admin must set the update method and create a script. See Create an Import Script.
Space Admin
User can manage members or groups in a space by adding or removing them or changing their permissions.
Folder Admin
User can add or remove members or groups and change their permissions in the folder.
Open Content in a Space
You can open folders, report posts, or data posts in spaces where you have View permission.
In a space, click Posts  , then:
|
•
|
Click a folder to open it.
|
|
•
|
Click the Reports tab to see all report posts in the folder or space. Click a report post to open it.
|
|
•
|
Click the Files tab to see all data posts, report posts, and any subfolders in the folder or space. Click a data or report post or folder to open it.
|
For more details, see Open a Post.
Add Folders to a Space
You can add any number and level of folders to spaces where you have Contribute permission.
|
1.
|
In a space, click Posts
|
|
2.
|
At right, click Create folder
|
|
3.
|
Add a title.
|
|
4.
|
(Optional) Add a description.
|
|
5.
|
Click Create.
|
|
•
|
Folder permissions are inherited from the space, unless you set custom permissions on the folder. See Set Custom Permissions on a Folder.
|
|
•
|
Folders in spaces are sorted alphabetically ascending by title.
|
Update a Folder’s Details
You can update the title, description, or image thumbnail for folders where you have Contribute permission.
|
1.
|
In a space, at left, click Posts
|
|
2.
|
Click a folder.
|
|
3.
|
At the top, click Details
 . . |
|
4.
|
To change the title or description:
|
|
a.
|
Click Edit
 . . |
|
b.
|
Enter your text.
|
|
c.
|
Click Save.
|
|
5.
|
To change the image thumbnail:
|
|
a.
|
Hover over the thumbnail and click Change Thumbnail.
|
|
b.
|
Go to an image on your computer and click Open.
|
Move a Folder
You can move folders where you have Contribute permission. You can move folders within spaces, but not between spaces.
|
1.
|
In a space, at left, click Posts
 . . |
|
2.
|
Click a folder.
|
|
3.
|
At the top, click More
 > Move folder. > Move folder. |
|
4.
|
Choose the space that you want to move the folder to.
|
Tip: You can choose a folder in the destination space to nest the folder under, or create a new folder by clicking Create folder  .
.
|
5.
|
Click Move.
|
Set Custom Permissions on a Folder
You can set custom permissions on folders where you have Folder Admin permission.
|
1.
|
From a space, click Posts
|
|
2.
|
Click a folder.
|
|
3.
|
Click Permissions.
|
Tip: If you do not see Permissions, you do not have Folder Admin permission. To request permission, contact an administrator on the About  page for the space.
 page for the space.
|
4.
|
Click Apply Custom Permissions.
|
You can do any of the following:
Remove access
Next to a user or group, click Remove  .
.
 .
.
Note: Removing a user or group removes their permission to the folder and any subfolders. However, if a user or group is part of another group that has permission to access the folder, they retain that permission.
Change access
Next to a user or group, update the access permissions.
You can also change access permissions for a member of a group that has access to the folder. For example, say that a group has permission to view the folder, but you want to give a group member permission to contribute to the folder. At the bottom, enter the member’s user name and click Add, and then update their individual permissions.
Note: You cannot grant permission to a subfolder unless the user or group has at least View permission to the parent folder.
|
5.
|
(Optional) To remove custom permissions and revert to the parent folder or space permissions, click Remove Custom Permissions.
|
Delete a Folder
|
1.
|
From a space, click Files.
|
|
2.
|
Next to a folder, click More
 > Delete folder. > Delete folder. |
|
3.
|
Click Confirm.
|
See Details About a Space
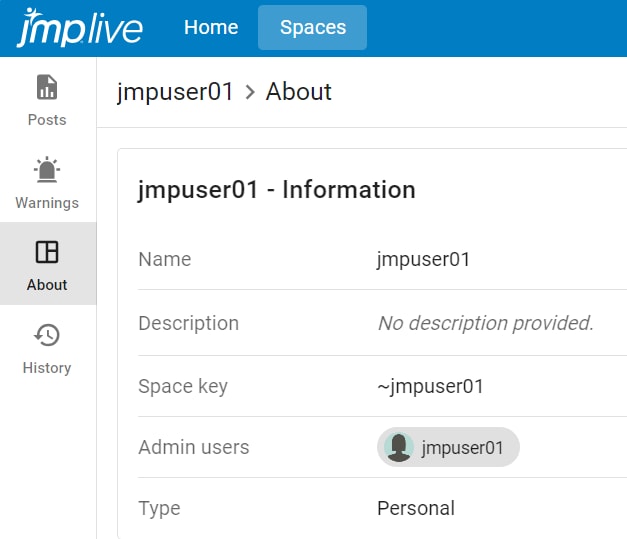
For spaces that you have access to, you can see details, such as a description of the space, the space key (for scripting), the space administrators, and attributes.
In a space, click About  .
.
Figure 1.2 Details About a Space
See Control Chart Warnings in a Space
You can see all posts that have active control chart warnings in a space.
|
1.
|
Open a space.
|
|
2.
|
At left, click Warnings
|
|
3.
|
At the bottom of a report thumbnail, click Warnings
 to see details about the warnings in the report. to see details about the warnings in the report. |
For more information, see Control Chart Warnings in Graphs.
See the History of a Space
For spaces where you have administrative access, you can see the history of the space and any folders in the space, which includes access changes and changes to posts.
|
1.
|
In a space or a post, click History
|
|
2.
|
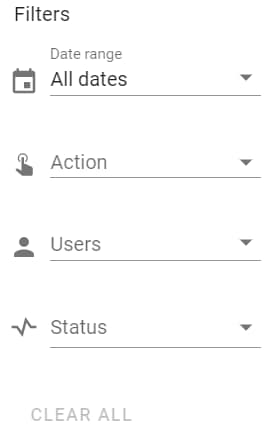
You can browse all history, or limit your search using the filters.
|
Figure 1.3 Filter Options in History
|
3.
|
In the filters, enter any combination of dates, actions, users, and whether the action succeeded or failed.
|
|
4.
|
(Optional) Next to an action, click Details
|
JMP Live Posts
Find out what you can do with JMP Live report or data posts:
Tip: See also JMP Live Data.
Open a Post
You can open posts in places where you have View permission.
|
•
|
To open a report post from the Home page, click a report title.
|
|
•
|
To open a report or a data post from a space:
|
|
1.
|
At left, click Posts
 . . |
|
2.
|
Click a folder.
|
|
3.
|
Click a report title in the Reports tab. To open a data post, click the Files tab and click a data title.
|
Figure 1.4 Report Post in a Space and Folder
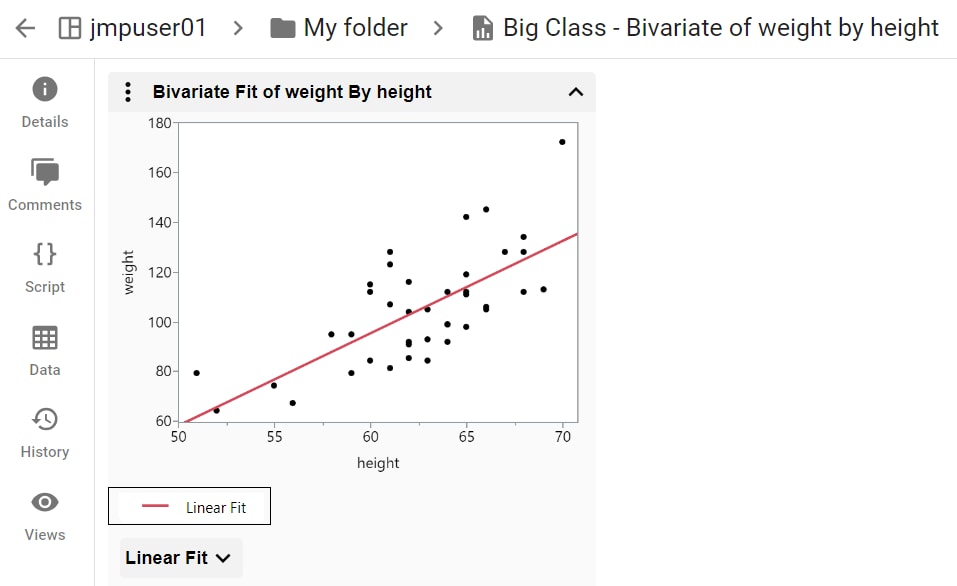
Depending on your permissions, in addition to seeing details, adding comments, viewing the history, and seeing who has viewed the data, you can:
|
•
|
View, copy, or download the JSL script that creates the report.
|
|
•
|
Access data associated with the report post.
|
Open a Post in JMP
You must have Download permission to the post and a JMP Live connection set up in JMP.
From a post, click Open in JMP  . The content is downloaded to your machine and opens in JMP as a JMP Project. See Download Posts as JMP Projects.
 . The content is downloaded to your machine and opens in JMP as a JMP Project. See Download Posts as JMP Projects.
See All of Your Posts
|
•
|
To see all of your report posts, click your user icon > Profile > Reports
|
|
•
|
To see all of your data posts, click your user icon > Profile > Data
 . . |
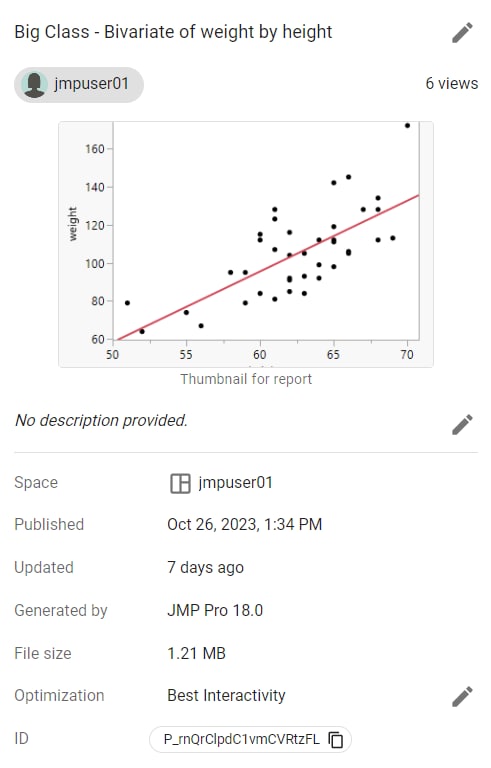
Update Post Details
You can update the title, thumbnail image, description, or settings for JMP Live posts. Updating a post’s details requires Contribute access.
|
1.
|
From a post, click Details
 . From a post summary, click More . From a post summary, click More  > Details. > Details. |
|
2.
|
Next to the section that you want to update, click Edit
|
Tip: In the post description, you can use these HTML tags: <a href= "target">, <b>, <em>, <i>, <strong>, and <u>.
|
3.
|
To change the thumbnail image, hover over the thumbnail and click Change Thumbnail.
|
Figure 1.5 Update a Post’s Details
Tip: See also Update a Folder’s Details.
Move a Post
You can move a post to a different folder in the same space or to a folder in a different space. Moving posts requires Contribute permission in both the original location and the new location.
Tip: For help with permissions, contact the space administrator. To find out who the space administrator is, click About  in a space.
 in a space.
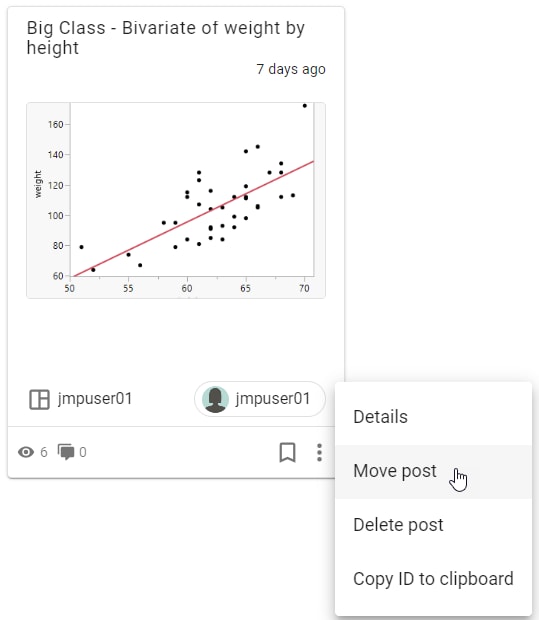
To move a single post in a space, click More  > Move post. However, if you want to also move the data associated with the post, see Move multiple posts at once.
 > Move post. However, if you want to also move the data associated with the post, see Move multiple posts at once.
Figure 1.6 Move a Post
Move multiple posts at once
|
1.
|
In a space, at left, click Posts
|
|
2.
|
Go to the folder that contains the posts that you want to move.
|
|
3.
|
Click the Files tab.
|
|
4.
|
Select the posts that you want to move.
|
|
5.
|
At the top, click Move selected items
|
|
6.
|
Choose the space (and folder, if applicable) to move the posts to. You can also create a new folder
 in the destination space. in the destination space. |
|
7.
|
Click Move.
|
Tip: See also Move a Folder.
Comment on a Post
You can see or add comments to JMP Live posts or folders. Viewing and adding comments requires View permission.
|
1.
|
In a post or folder, click Comments
 . . |
|
2.
|
Enter a comment or reply to an existing comment.
|
|
3.
|
(Optional) Type @ and choose a user’s name to mention them.
|
|
4.
|
Click Submit.
|
|
•
|
To edit or delete your comments, click More
 > Edit or Delete. > Edit or Delete. |
|
•
|
To delete all comments on a post you own, next to the number of comments, click More
 > Delete all. > Delete all. |
|
•
|
To format text, you can use keyboard shortcuts (such as Ctrl+B for bold, Ctrl+I for italics) or you can use markdown.
|
|
•
|
You can add a link to a comment.
|
|
•
|
To see how many user comments are on a post, in a post summary, a number appears beside the Comments icon
|
By default, you get a notification in these situations:
|
•
|
If someone adds or replies to a comment on a post that you own
|
|
•
|
If someone @ mentions you in a comment
|
|
•
|
If someone replies to a comment that you made
|
|
•
|
If someone deletes a comment that you made
|
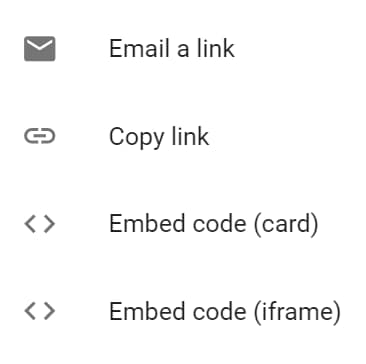
Share a Post
In a post, click Share  or if you do not see the Share icon, click More
  > Share.
 > Share.
You can share a post in any of these ways:
|
•
|
Email or copy a link
|
|
•
|
Copy embedded HTML code (for a web page)
|
Figure 1.7 Sharing Options
Bookmark a Post or Folder
|
•
|
In a post or folder, click Bookmark
|
|
•
|
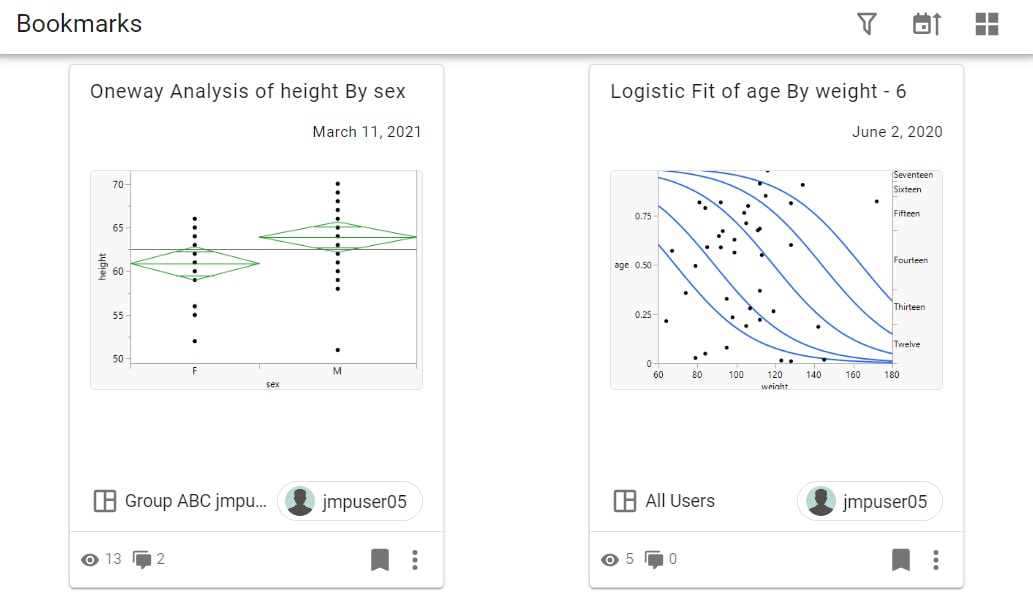
To see all your bookmarked posts and folders, at the top right, click Bookmarks
|
|
•
|
To remove a bookmark, click Unbookmark
 . . |
Figure 1.8 Example of the Bookmarks Page
Delete a Post
You can delete posts or folders where you have Contribute access. However, you cannot delete a data post if a JMP Live post is using the data.
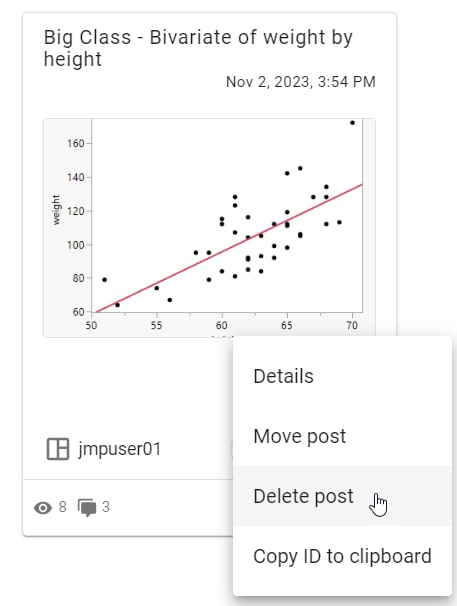
To delete a single JMP Live post or a folder from a post, space, or post summary, click More  > Delete post.
 > Delete post.
Figure 1.9 Delete a Post
Delete several posts or folders
|
1.
|
In a space, click Posts
|
|
2.
|
Go to the folder that contains the posts or folders that you want to move.
|
|
3.
|
Click the Files tab.
|
|
4.
|
Select the posts that you want to delete.
|
|
5.
|
At the top, click Delete selected posts
|
|
6.
|
Click Confirm.
|
Download Posts as JMP Projects
If you want to open several files from JMP Live in JMP, download the post and any related content (such as data) as a JMP project file. A project file keeps all of the post’s content in one tabbed window in JMP. Content associated with a post can include data tables, scripts, maps, or images.
You can download posts or folders that you published or where you have Download permission.
Download a folder or post as a JMP project file:
From a folder or a post, click More  > Download as JMP project.
 > Download as JMP project.
Download several posts as a JMP project file:
|
1.
|
From a space or a folder, click the Files tab.
|
|
2.
|
Select the posts that you want to include in the project.
|
|
3.
|
Click Download selected items
|
Note: If you cannot access download options, your JMP Live administrator might have disabled downloading.
For details about projects, see Work with Projects in the JMP Online Help.
See Who Has Viewed a Post
To see who has viewed a JMP Live post that you created:
|
•
|
From a post, click Views
 . . |
|
•
|
From a folder, click More
 > Advanced > View accesses. > Advanced > View accesses. |
You can see who accessed each post, when they accessed it, and the type of access (View or Download).
JMP Live administrators can view accesses on any content.
See the History of a Post
For posts that you have access to, you can see the history of the post, which includes data source changes and updates to the post.
|
1.
|
In a space or a post, click History
|
|
2.
|
You can browse all history, or limit your search using the filters.
|
Figure 1.10 Filter Options in History

|
3.
|
In the filters, enter any combination of dates, actions, users, and whether the action succeeded or failed.
|
|
4.
|
(Optional) Next to an action, click Details
|
Change the Summary Format
On the Home page or Spaces > Posts page, at the top right, click an icon to change the format of JMP Live report summaries:
|
|
The grid format shows cards with image thumbnails.
|
|
|
The list format shows a list with image thumbnails.
|
|
|
The compact list format shows a list with no image thumbnails.
|
Sort Posts
You can sort how posts appear in places like the Home page or in a space. Click Change sort order  and choose an option, such as alphabetical or newest.
 and choose an option, such as alphabetical or newest.
See Performance Metrics on a Report Post
From a post, at top right, click More  > Advanced > Display performance metrics. You can see how long it took the post to load, copy the metrics, or clear the metrics.
 > Advanced > Display performance metrics. You can see how long it took the post to load, copy the metrics, or clear the metrics.
Show Log Messages for a Report Post
In a JMP Live report post, you can click More  > Display log messages to see any error messages from the server, connection messages, and messages from the client.
 > Display log messages to see any error messages from the server, connection messages, and messages from the client.
Copy a Post ID for Scripting
From a post, at top right, click More  > Advanced > Copy ID to clipboard. You can also copy the post ID from the Details panel. The post ID is used for JSL scripting.
 > Advanced > Copy ID to clipboard. You can also copy the post ID from the Details panel. The post ID is used for JSL scripting.
Find out what you can do with JMP Live graphs:
See Data Values in Graphs
In a JMP Live report post, you can see information about data points in graphs or report calculations.
|
1.
|
Click or tap Identify Objects
 . . |
|
2.
|
Hover over or tap a data point or a calculation.
|
Figure 1.11 See a Data Point’s Values
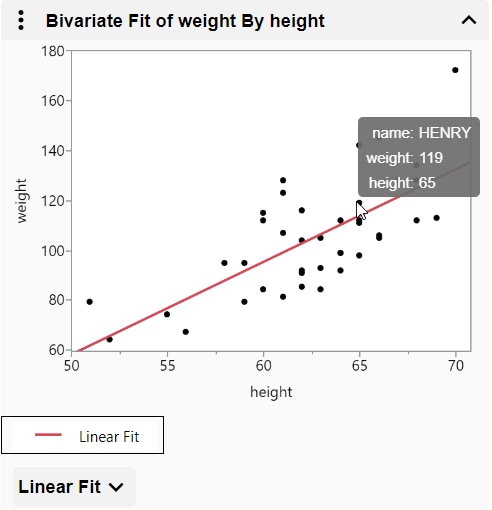
Figure 1.12 See an Explanation of a P-Value Calculation

|
•
|
To hide or show a report or graph, next to the title, click or tap the arrow.
|
|
•
|
If your report contains very large tables, use the page controls
 . . |
Select Data in Graphs
In a JMP Live graph, you can select data or zoom in on data.
How you select data in a JMP graph (points, bars, and so on) depends on whether you are on a computer or a mobile device. The default mode is to select a single data point.
|
On a computer
|
On a mobile device
|
|
|---|---|---|
|
Select or deselect a single data point
|
Click a data point.
|
Tap Select One Object
 then tap a data point. then tap a data point. |
|
Select or deselect multiple data points
|
Hold down the Shift key and click multiple data points.
|
Tap Select Multiple Objects
 then tap multiple data points. then tap multiple data points. |
|
Identify a single data point
|
Hover over a single data point.
|
Tap Identify Objects
 then tap a data point. then tap a data point. |
|
Select data points by brushing
|
Click and drag a rectangle over data points. Click and drag in the center to move the rectangle, or drag the corners to resize it.
|
Tap Select Multiple Objects
 then draw a rectangle over the data points. Drag the center to move the rectangle, or drag the corners to resize it. then draw a rectangle over the data points. Drag the center to move the rectangle, or drag the corners to resize it. |
|
Zoom
|
Click Magnifier
 and click a point or drag a rectangle. The center of the rectangle is now the center of the zoom area. and click a point or drag a rectangle. The center of the rectangle is now the center of the zoom area.To zoom out, double-click in the graph, or press Shift and click in the graph.
You can also use the scroll wheel on your mouse to zoom in and out. If you are not in Zoom mode, press Alt before zooming with the scroll wheel.
|
Tap Magnifier
 and pinch zoom. and pinch zoom. |
|
Pan in a graph
|
Click Grabber
|
Tap Grabber
|
|
Pan axes
|
Click the middle of an axis and drag.
|
Touch the middle of an axis and drag.
|
|
Scale axes
|
Click at either end of an axis and drag.
|
Touch either end of an axis and drag.
|
|
Return axes or graphs to their original state
|
Press Alt and double-click in the graph, or click More
 or or  > Reset all axes. > Reset all axes. |
Double-tap in the graph, or tap More
 > Reset all axes. > Reset all axes. |
Note: In interactive HTML, some graphs do not support panning and zooming. Panning and zooming is fully supported in JMP Live and JMP Public.
See Linked Data in Graphs
If your JMP Live report post contains multiple JMP graphs, when you select data in one graph, it is highlighted in all graphs.
Figure 1.13 Select Data in Linked Graphs
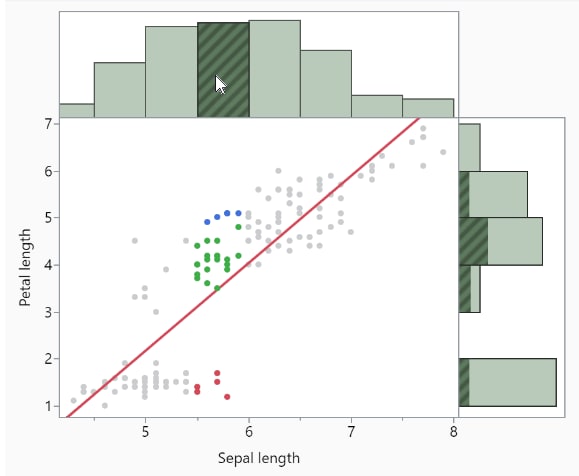
In this example, a histogram bar in the top graph is selected. The corresponding rows are highlighted in the scatterplot and in the marginal histogram.
Selecting data in a graph, legend, or report can highlight the corresponding data.
Figure 1.14 Select Data in a Graph to Highlight it in a Report
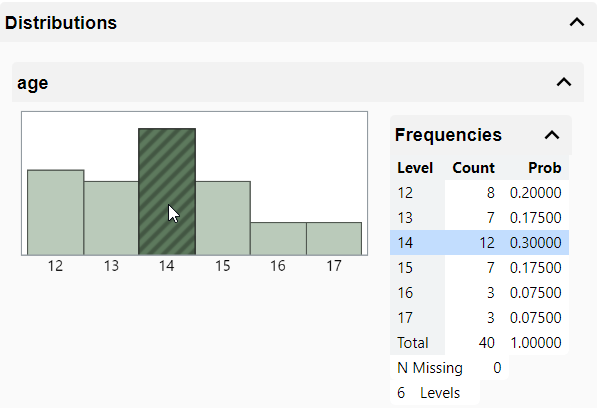
In this example, a histogram bar is selected. The corresponding data are highlighted in the Frequencies report. You can also select a row in the report to highlight the corresponding data in the histogram.
Exclude and Hide Data in Graphs
Once you have selected data in a JMP graph, you can exclude it from report calculations and hide it in graphs. Reports and graphs automatically update.
Figure 1.15 Report Menu Options
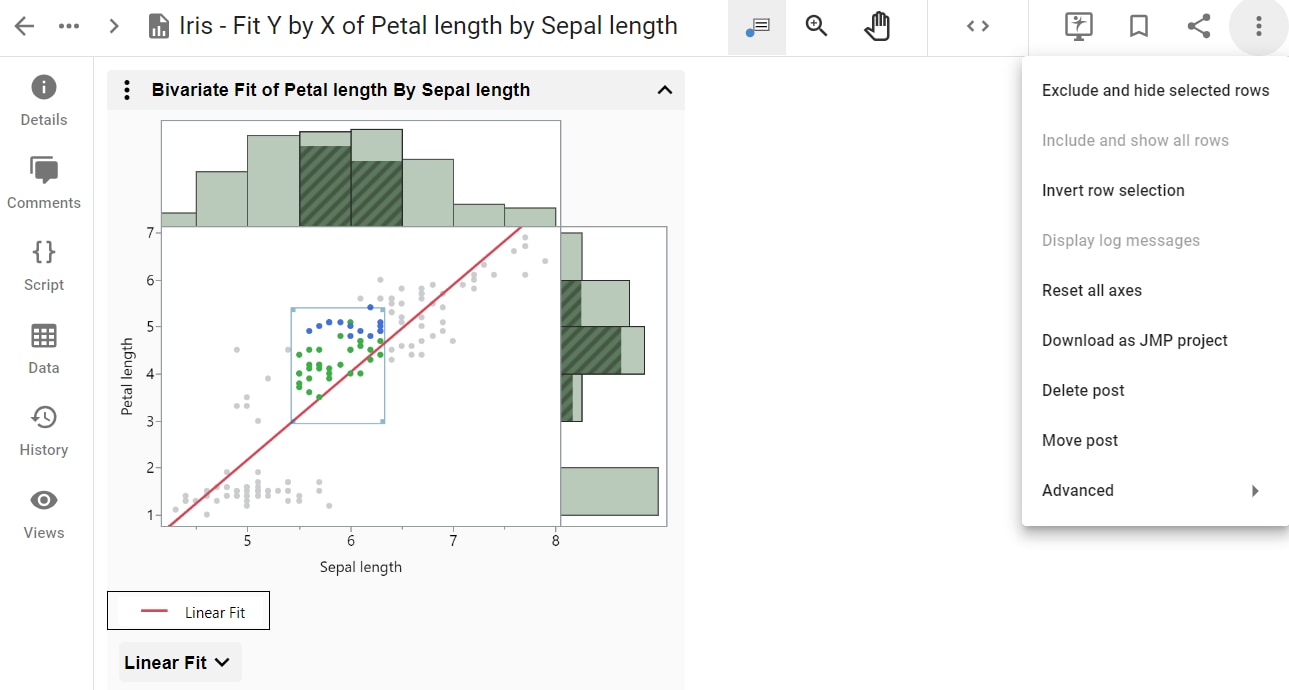
To exclude and hide data, right-click in the graph, or use the options in the More  menu on the right:
 menu on the right:
Note: If the report contains a Local Data Filter, most of these options do not appear, since you use the Local Data Filter instead.
|
•
|
Exclude and hide selected rows: Excludes and hides selected data.
|
|
•
|
Include and show all rows: Includes and shows any excluded or hidden data.
|
|
•
|
Invert row selection: Changes the current selection to the deselected data.
|
Filter Data in Graphs
If the original JMP report included a Local Data Filter, you can use the filter to focus on specific data and see the impact on JMP Live graphs and reports.
Figure 1.16 Filter Data in Graphs
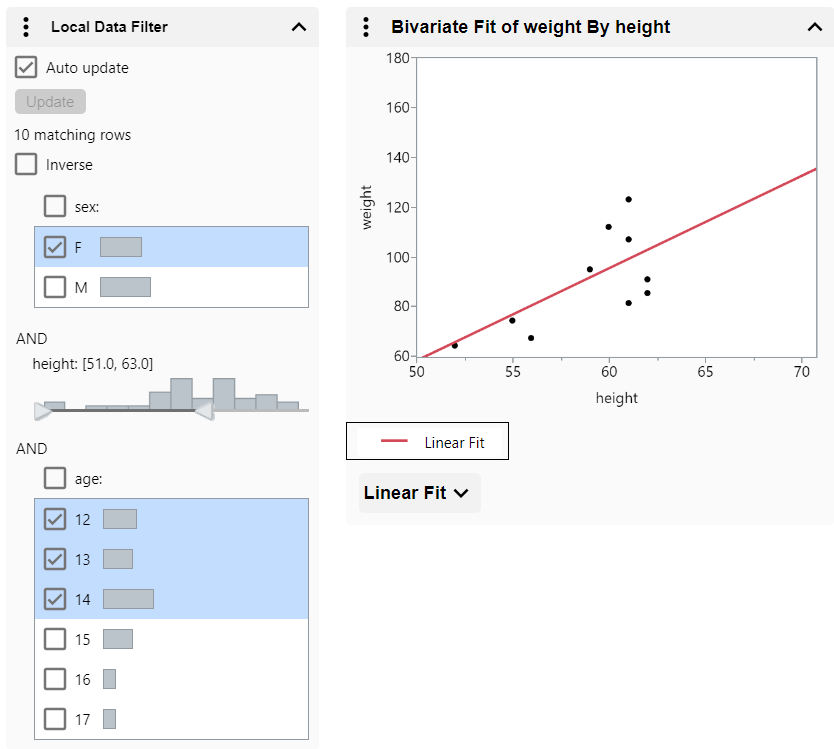
Tip: Selections that you make in the Local Data Filter are captured in the URL. You can copy and paste the URL to share your selections with others.
In this example, the filter choices are showing only females between 51 and 63 inches tall who are between the ages of 12 and 14.
Tip: If several categories are selected and you want to select a single category, click the category (not the check box).
Local Data Filter Options
Conditional Filtering
Limits the options in the Local Data Filter by condition. For more information about conditional data filters, see the Red Triangle Options for the Data Filter section in the JMP Online Help.
Note: This option does not appear if there is more than one OR group, or if the columns are not hierarchical.
Select filtered rows in graphs
Selects all filtered rows in graphs.
Show filtered rows in graphs
Shows all filtered rows in graphs.
Include filtered rows in calculations
(JMP Live and JMP Public only) Only filtered rows are included in report calculations.
Auto update
(JMP Live and JMP Public only) Enables automatic updates to the local data filter.
Inverse
Inverts currently selected filters.
Manually Update Data Filters
If a report is taking a long time to automatically update, you can manually update the data filter selections instead.
|
1.
|
Click Auto Update to deselect this option.
|
|
2.
|
Make your changes to the local data filter.
|
The graphs do not update as you make your changes.
|
3.
|
Click Update.
|
Switch Data Columns in Graphs
If the original JMP report included a Column Switcher, you can quickly analyze different variables without re-creating the analysis. When you choose a different variable in JMP Live, the analyses automatically recalculate using the new variable.
In this example, using Fisher’s Iris data, the JMP report post includes a Column Switcher and a Local Data Filter.
Figure 1.17 Initial Selections
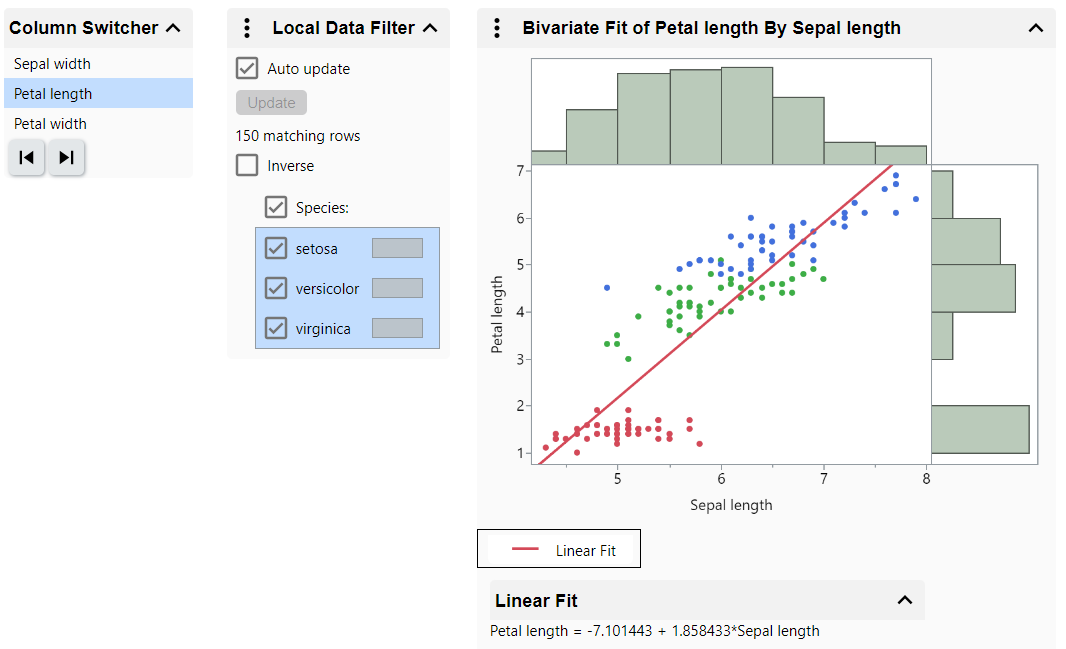
Initially, Petal length (the original column) is selected in the Column Switcher. All species are showing in the Local Data Filter. These selections are reflected in the graph and calculations.
Figure 1.18 Updated Selections
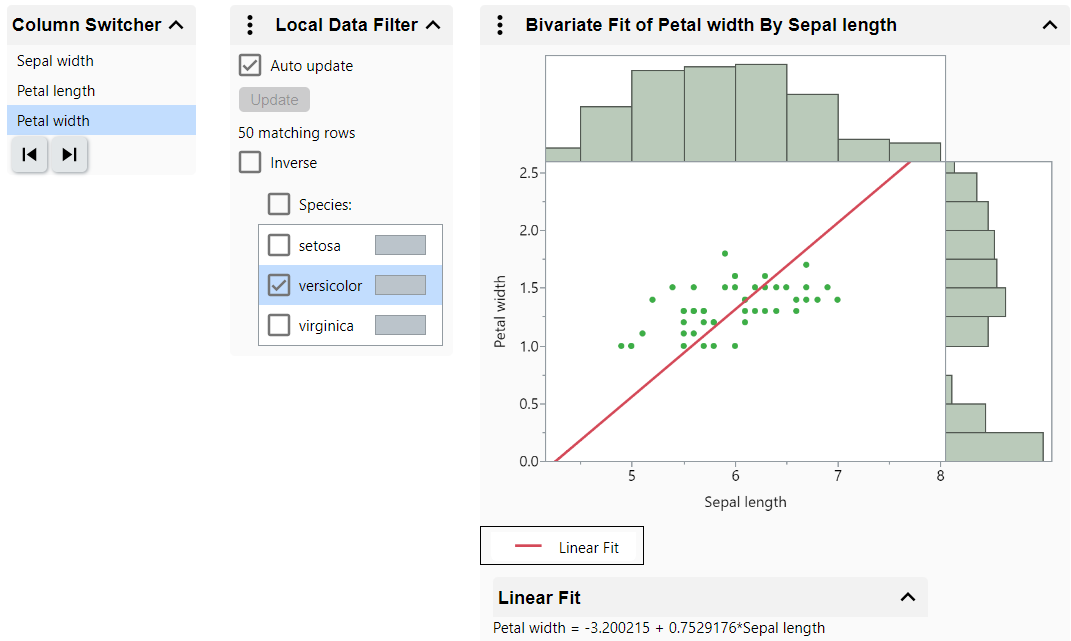
Here, Petal width is selected in the Column Switcher, and only the species versicolor is selected in the Local Data Filter. The graph and calculations update to reflect these selections.
Tip: Selections that you make in the Local Data Filter and Column Switcher are captured in the URL. You can copy and paste the URL to share your selections with others.
Control Chart Warnings in Graphs
JMP Live report posts containing control charts can generate notifications if there are control chart warnings. When you publish a JMP report post that contains a control chart, you can specify whether to enable warnings. You can also enable warnings from a JMP Live report post.
These people receive notifications:
|
•
|
The publisher of the post
|
|
•
|
Users who subscribe to warnings for a space, folder, or post
|
|
•
|
Members of groups where warning notifications are enabled and who have permission to view the post
|
Depending on individual settings, notifications appear in JMP Live and via email. Email notifications contain more detail about the warnings. See Manage Notifications.
Subscribe to warnings
|
1.
|
In a space, folder, or post containing control charts, click More
 > Subscriptions. > Subscriptions. |
|
2.
|
Click to subscribe to control chart warnings in a space, folder, or on a post.
|
Enable or disable warnings
Enabling or disabling warnings on posts requires Contribute permission.
|
1.
|
In a report post that contains a control chart, click Details
 or Warnings or Warnings  . . |
|
2.
|
Next to Warnings, click the switch to turn them on or off.
|
|
3.
|
(Warnings on only) If the report post has active warnings, choose whether to notify people about these warnings.
|
See details about warnings
|
1.
|
In a report post or from a thumbnail, click Warnings
 . . |
|
2.
|
You might need to click Expand to open the Warnings pane.
|
Figure 1.19 Example of Control Chart Warnings
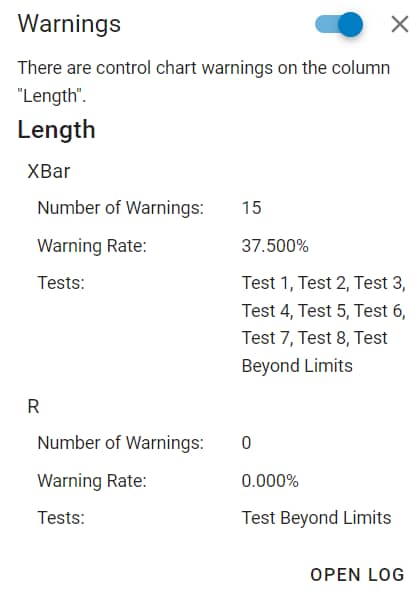
|
3.
|
(Optional) For more detailed information, click Open Log.
|
To copy the log information, click Copy  .
.
Note: If you filter data or change row states (for example, if you exclude or hide rows) control chart warnings are not triggered or updated in JMP Live. Any warnings in JMP Live appear as captured when the data was originally published.
Customize Graphs
Note: These customizations are temporary while you are in the JMP Live post.
To resize a graph in JMP Live, click and drag on the graph borders. You can also resize a scrollable report in a JMP Live dashboard.
Use the options in the More  menu to customize graph elements.
 menu to customize graph elements.
Figure 1.20 Change the Marker Size
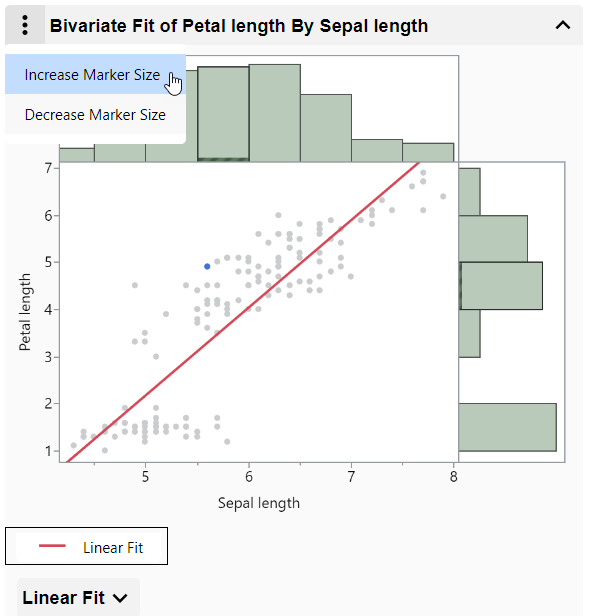
The options in this menu can vary depending on the type of graph or JMP platform. For example:
|
•
|
In scatterplots and histograms, you can change the marker size.
|
|
•
|
In profilers, you can reset the profiler to its original state, or re-scale the vertical axis to include the response.
|
|
•
|
In data filters, you can choose how you want to filter data.
|
|
•
|
In bubble plots, you can change the appearance of the bubbles, add a time label, or change the aggregation method.
|
|
•
|
In graphs and dashboards, you can resize graphs and dashboard panels.
|
|
•
|
In Distribution reports, you can access options for reports and variables
|
JMP Live Data
Find out what you can do with data in JMP Live:
Open a Data Table
|
1.
|
In a space or folder, click the Files tab.
|
|
2.
|
Click a data post
 . . |
Figure 1.21 Example Data Table
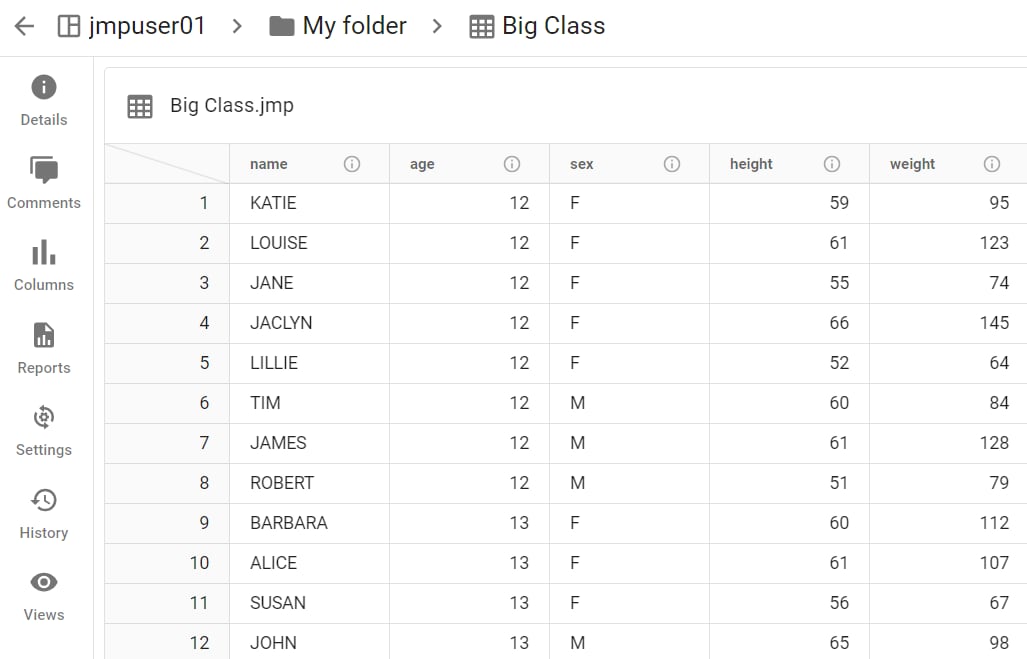
Depending on your permissions, in addition to seeing details, adding comments, viewing the history, and seeing who has viewed the data, you can:
|
•
|
Hide or show columns or see information for a column.
|
|
•
|
Access reports associated with the data post.
|
|
•
|
Change the settings for updating the data post. See Update Data.
|
Tip: See also JMP Live Posts.
Download Data or Scripts
Downloading data or scripts requires Download permission.
Download data from a report
|
1.
|
In a report, click Data
 . . |
|
2.
|
Next to the data table title, click More
 > Download > Download |
Download data from a data table
In a data table, click More  > Download data table.
 > Download data table.
Download scripts
|
1.
|
In a report, click Script
 . . |
|
2.
|
Click Download
|
|
3.
|
(Optional) To copy a script, click Copy
|
Change the Data Source
You can select another source of data to use in a JMP Live report. You need Contribute permission on the report post and Download permission on the data post that you want to change.
|
1.
|
From the report post that you want to update, click Data
 . . |
|
2.
|
Next to the data table title, click More
 > Change data source. > Change data source. |
|
3.
|
Under New Data, enter the data post name or choose a data post from the list.
|
Update Data
To update data in JMP Live, from a data post, click Settings  . Choose from these options:
 . Choose from these options:
|
•
|
Upload JMP data table—Click Update Data and go to the updated data table on your computer. Uploading data requires either Contribute or Data Admin permission.
|
|
•
|
|
•
|
Refresh Data
In JMP Live, you can refresh data using a script. Follow these general steps:
|
1.
|
In a data post, create a refresh script. See Create a Refresh Script.
|
|
2.
|
Create and assign any required credentials. See Add or Update Credentials and Assign Credentials.
|
|
3.
|
Test the refresh script. See Refresh Data on Demand.
|
|
4.
|
(Optional) Schedule the data to refresh at intervals. See Schedule a Refresh.
|
Tip: Once you create credentials, you can also Add or Update Credentials or See All Refresh Credentials.
Create a Refresh Script
Creating a refresh script requires Data Admin permission. Note the following:
|
•
|
Your connection string must specify the exact server, database name, and driver.
|
|
•
|
Your script must create and return a data table. Or, you can return a value of zero to not update the underlying data table.
|
|
•
|
Refresh scripts can connect to a database or Web API or can read files from allow directories to retrieve data. The script can also build the data itself.
|
|
•
|
Refresh scripts can also include JSL commands to perform actions on the data such as recoding and so on.
|
|
•
|
For JMP Live to connect to a database, the appropriate ODBC driver must be installed on the machines that host all the JMP sessions pools. The JMP session pool hosts also must be able to access the desired data source (consider firewall rules or other restrictions).
|
Create the Refresh Script
|
1.
|
In a space or folder, click the Files tab.
|
|
2.
|
Click a data post
 . . |
|
3.
|
Click Settings
 . . |
|
4.
|
For the update method, select Refresh data via script.
|
Figure 1.22 Refresh Data Using a Script
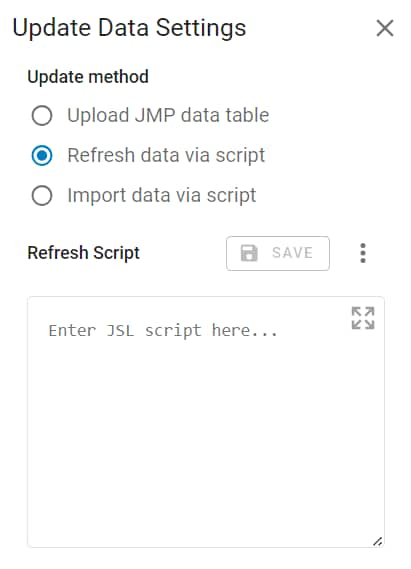
|
5.
|
Create the refresh script. See Example of a Refresh Script.
|
|
6.
|
Under Refresh Script, paste your refresh script.
|
|
7.
|
Click Save.
|
Add or Update Credentials
|
1.
|
At the top right, click your user icon > Settings.
|
|
2.
|
At left, click Credentials
|
|
3.
|
To update credentials:
|
|
–
|
Click Edit
|
|
–
|
To delete a credential, click Delete
|
|
4.
|
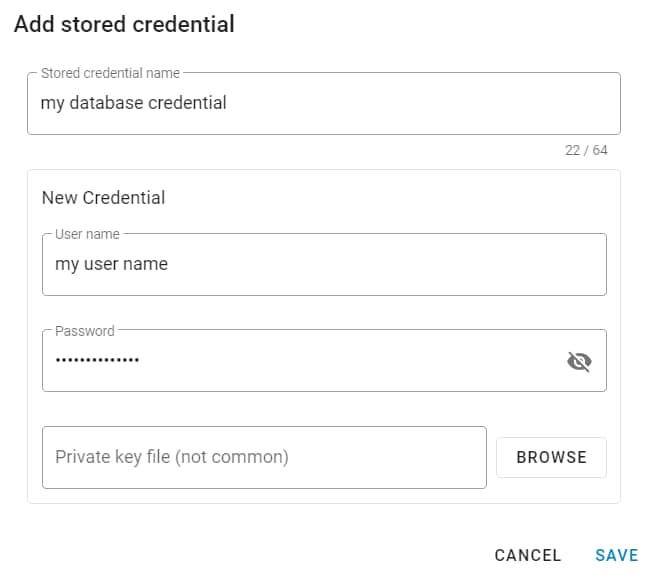
To add a new credential, click Add stored credential
|
Figure 1.23 Add Your Stored Credentials
|
5.
|
Name the credential.
|
Tip: Use a name that helps you identify the credential, such as the name of the database.
|
6.
|
Enter the user name and password for the credential.
|
|
7.
|
(Optional) Upload a private key file.
|
Depending on your data source provider, some authentication processes require the use of a private key file.
|
8.
|
Click Save.
|
Assign Credentials
If any JSL commands in your refresh script require credentials to access an external server or database, you can securely add and assign those credentials. In the refresh script, your credentials are represented by generic placeholders (%_PWD_% and %_UID_%) and are not visible. When the refresh script runs, the generic placeholders are replaced with the actual credentials.
|
1.
|
In a space or folder, click the Files tab.
|
|
2.
|
Click a data post
 . . |
|
3.
|
Make sure you have created a refresh script. See Create a Refresh Script.
|
|
4.
|
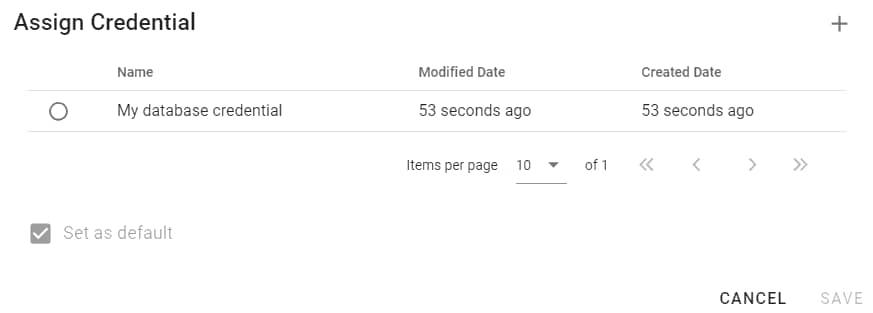
Under Assigned Credentials, click Assign.
|
Figure 1.24 Assign an Existing Credential
|
5.
|
To create a new credential, click Add stored credential
|
|
6.
|
(Optional) Click Set as default to make the credential available in the refresh script.
|
|
7.
|
Click Save.
|
Refresh Data on Demand
Refreshing data requires Contribute permission.
|
1.
|
In a space or folder, click the Files tab.
|
|
2.
|
Click a data post
 . . |
|
3.
|
Click Settings.
|
|
4.
|
Make sure you have created a refresh script. See Create a Refresh Script.
|
|
5.
|
If your data comes from a third party and uses credentials, make sure you create and store the credentials in JMP Live. See Assign Credentials.
|
|
6.
|
Click Refresh Data > Refresh.
|
Schedule a Refresh
Scheduling a refresh requires Data Admin permission. You can schedule data to refresh as frequently as every 5 minutes, or as infrequent as once per week. You can also have several schedules for a data post. For example, one schedule might be to refresh the data every Tuesday at 9pm, and another schedule might be to also refresh the data hourly every Friday from 8am until 5pm.
Note: Schedules are based on the time zone that your JMP Live server is in.
|
1.
|
In a space or folder, click the Files tab.
|
|
2.
|
Click a data post
 . . |
|
3.
|
Click Settings.
|
|
4.
|
Make sure you have created a refresh script. See Create a Refresh Script.
|
|
5.
|
If your data comes from a third party and uses credentials, make sure you create and store the credentials in JMP Live. See Assign Credentials.
|
|
6.
|
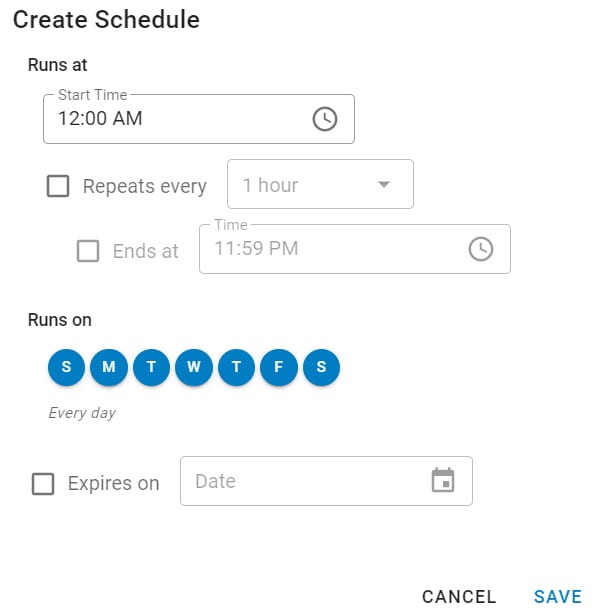
Next to Refresh Schedules, click Create.
|
Figure 1.25 Create a Refresh Schedule
|
7.
|
Select the following details:
|
|
–
|
Time for the refresh to start
|
|
–
|
Days of the week to run the refresh
|
|
–
|
(Optional) To repeatedly refresh data during a time period, specify how often to repeat the refresh and what time to stop refreshing the data.
|
|
–
|
(Optional) Set a date for the refresh to expire. The expiration date is inclusive, so the refresh expires at 11:59pm on the day.
|
|
8.
|
Click Save.
|
|
9.
|
Under Refresh Schedules, you can enable, edit, or delete a schedule.
|
Example of a Refresh Script
In the example script below, substitute the placeholders with your details.
dt = New SQL Query(
Connection(
"ODBC:DATABASE=placeholder;
DRIVER={placeholder};
PORT=placeholder;
PWD=%_PWD_%;
SERVER=placeholder;
UID=%_UID_%;"
),
QueryName( "placeholder" ),
Select,
From( Table( "placeholder", Schema( "placeholder" ) ) )
) << Run Foreground;
dt;
|
•
|
Do not replace PWD=%_PWD_% and UID=%_UID_%. These are wildcards for your password and user name to keep them encrypted. They are replaced with your assigned credentials when the script is run.
|
|
•
|
The settings in the Connection string vary depending on your setup.
|
|
•
|
If your data table was created using a data connector, you will likely want to remove the Driver( ... ) line, if any. That driver might not be on JMP Live, and when using a built-in configuration (a line like ID( "com.jmp.PLACEHOLDER" )), JMP will automatically try to find a suitable driver if one is not provided.
|
Tip: You can also use Query Builder to help create a refresh script. See the section on building SQL queries in the JMP Help.
See All Refresh Credentials
You can see all of your refresh credentials in JMP Live and any data tables that are using the credentials. At the top right, click your user icon > Settings > Credentials  .
.
Import Data
Importing data requires Contribute or Data Import permission. You can import data such as CSV or Microsoft Excel file. The file is converted into a JMP data table.
|
1.
|
In a space or folder, click the Files tab.
|
|
2.
|
Click a data post
 . . |
|
3.
|
At the top, click Import Data.
|
If the Import Data button is not active, a user with Data Admin permission needs to create the import script. See Create an Import Script.
|
4.
|
On your computer, open the data that you want to import.
|
|
5.
|
Click Reload to refresh the data.
|
Create an Import Script
Creating an import script requires Data Admin permission.
|
1.
|
From a data post, click Settings
 . . |
|
2.
|
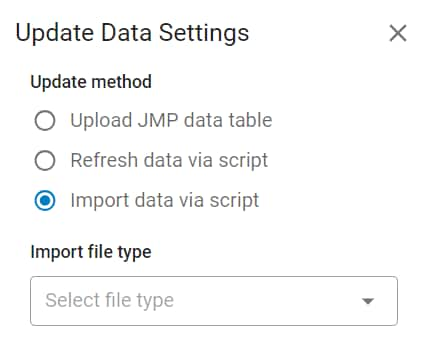
For the update method, select Import data via script.
|
Figure 1.26 Import Data Using a Script
|
3.
|
Select the type of file you want to import.
|
|
4.
|
Create the import script using JSL.
|
|
5.
|
Under Import script, paste your refresh script.
|
If your data table contains a source script, you can use it as a base (modifying it as required) or start with an empty script and paste your new refresh script.
Tip: Your import script must contain a %FILENAME% placeholder that replaces the file path. See Example of Importing Data.
|
6.
|
Click Save.
|
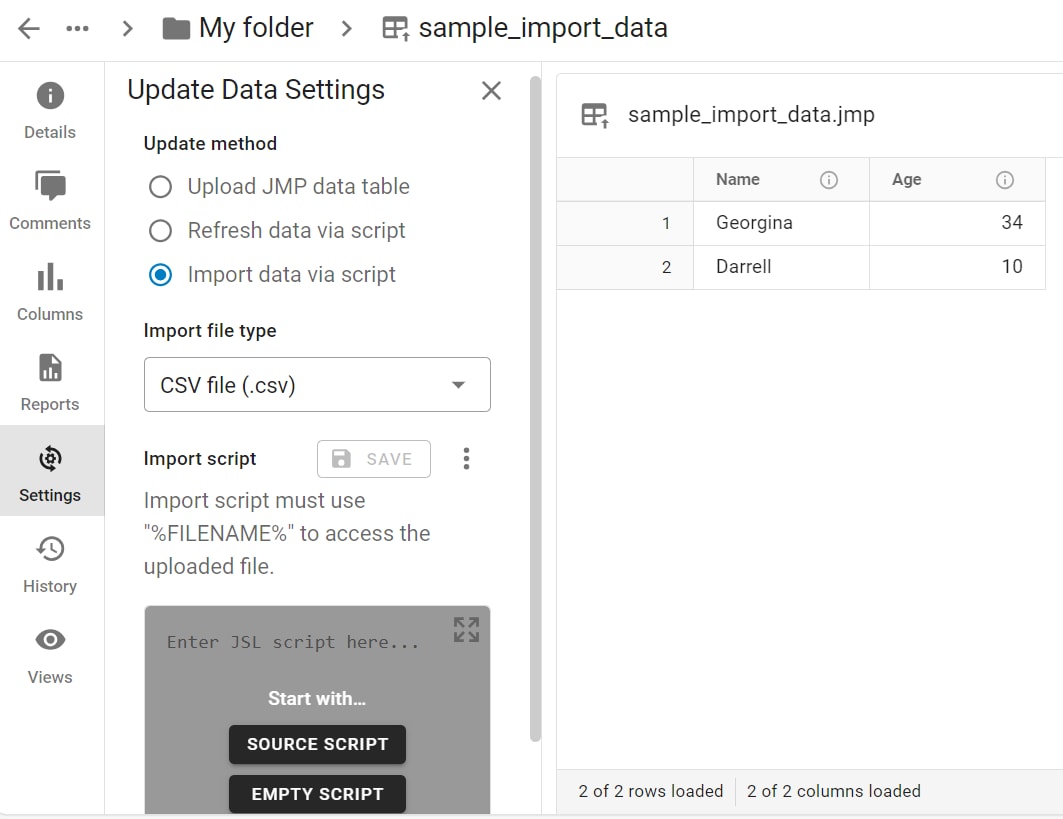
Example of Importing Data
In this example, you have a CSV file with names and ages. You open the file in JMP, which converts it to a JMP data table. You publish this JMP data table to JMP Live.
The data in the CSV file can change, so you want to update the data in JMP Live by importing the latest data from the CSV file.
|
1.
|
From the data post, click Settings
 . . |
|
2.
|
Select Import data via script.
|
|
3.
|
Select CSV file.
|
Figure 1.27 Importing Data from a CSV File
|
4.
|
(Appears only if the data table contains a source script) Click Empty Script.
|
|
5.
|
Paste a script such as this one:
|
Open(
"%FILENAME%",
columns(
New Column( "Name", Character, "Nominal" ),
New Column( "Age", Numeric, "Continuous", Format( "Best", 12 ) )
),
Import Settings(
End Of Line( CRLF, CR, LF ),
End Of Field( Comma, CSV( 1 ) ),
Treat Leading Zeros as Character( 1 ),
Strip Quotes( 0 ),
Use Apostrophe as Quotation Mark( 0 ),
Use Regional Settings( 0 ),
Scan Whole File( 1 ),
Treat empty columns as numeric( 0 ),
CompressNumericColumns( 0 ),
CompressCharacterColumns( 0 ),
CompressAllowListCheck( 0 ),
Labels( 1 ),
Column Names Start( 1 ),
First Named Column( 1 ),
Data Starts( 2 ),
Lines To Read( "All" ),
Year Rule( "20xx" )
)
)
|
6.
|
Click Save.
|
|
7.
|
Click Import Data.
|
|
8.
|
Open the updated CSV file on your computer.
|
|
9.
|
Click Reload.
|
Figure 1.28 Updated Data from CSV File
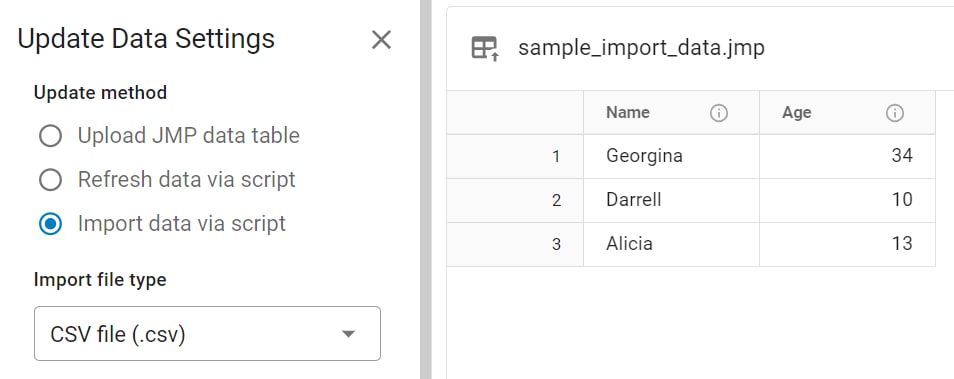
You can see that the data is updated and includes an additional name.
Restore the Previous Version
To revert your updates back to the previous version:
|
1.
|
In the top right corner, click More
 > Restore previous version. > Restore previous version. |
|
2.
|
Click Restore to confirm.
|
|
3.
|
Click Reload to update the data.
|
Search JMP Live
To search all of JMP Live for posts, users, or spaces, enter a keyword in the search box at top right. Click Posts, Users, or Spaces to see specific types of results.
Figure 1.29 Example of Searching by Keyword

Here are some things that you can do from the search results:
Posts
|
•
|
To open a post, click the title or image.
|
|
•
|
To open the post author’s profile, click their user name.
|
|
•
|
To open a space or folder, click the space or folder title.
|
|
•
|
To bookmark a post, click Bookmark
|
|
•
|
To copy the post ID for scripting, click More
 > Copy ID to clipboard. > Copy ID to clipboard. |
|
•
|
To move or delete a post that you own, click More
 > Move post or Delete post. > Move post or Delete post. |
Users
|
•
|
To open a user’s profile, click their user name.
|
Spaces
|
•
|
To open a space, click the space.
|
Use Filters in JMP Live Searches
You can use filters to narrow your searches on JMP Live posts or spaces.
Filter Posts
|
1.
|
Click Home.
|
|
2.
|
At the top right, click Filters
 . . |
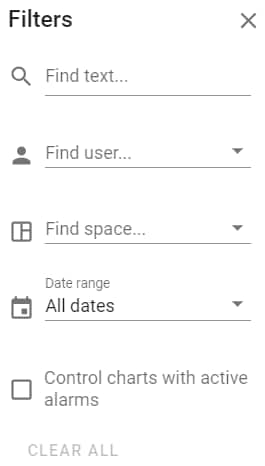
Figure 1.30 Filter Options on Posts
|
3.
|
Enter any combination of keywords, user or space names, or dates. You can also search for control charts that have active alarms.
|
|
4.
|
Click outside of the Filters pane to see the results.
|
|
5.
|
To stop filtering, click Clear All.
|
Filter Spaces
|
1.
|
Click Spaces.
|
|
2.
|
At the top right, click Filters
 . . |
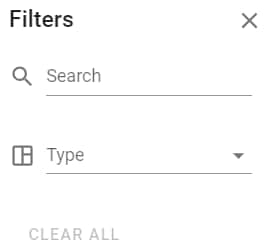
Figure 1.31 Filter Options on Spaces
|
3.
|
Enter keywords in the Search box. You can also select a space type.
|
|
4.
|
Click outside of the Filters pane to see the results.
|
|
5.
|
To stop filtering, click Clear All.
|
Update Your JMP Live Profile or Settings
You can update the following aspects of your profile or JMP Live settings:
Update Your Profile Picture or Display Name
|
1.
|
At the top right, click your user icon > Settings.
|
|
2.
|
Next to Avatar, click Edit
 > Upload new avatar or Reset to default. > Upload new avatar or Reset to default. |
|
3.
|
Next to Display Name, click Edit
 and enter and save your new name. and enter and save your new name. |
Note: Your display name might not be editable, depending on your JMP Live server’s authentication settings.
|
4.
|
(Optional) To see your profile updates, click View profile
 . . |
Figure 1.32 Edit Your Profile Picture or Display Name

Verify your account details
|
1.
|
At the top right, click your user icon > Settings.
|
|
2.
|
Verify your login name or the email associated with your account.
|
|
3.
|
(Local authentication method only) Verify or change your password.
|
Manage Notifications
Note: This section covers user notifications. For administrator notifications, see Manage Admin Notifications.
As a JMP Live user, depending on your notification settings, you can be notified about comments, changes to posts, changes to your access settings, control chart warnings, and more.
Open or Act on Notifications
To see your notifications, click Notifications  . From here, you can perform the following actions:
 . From here, you can perform the following actions:
|
•
|
To open the source, such as a post, click a notification.
|
|
•
|
To clear a notification, click More
|
|
•
|
To stop receiving notifications of a certain type, click More
|
|
•
|
To mark all notifications read, click Mark All as Read
|
|
•
|
To remove all notifications, click Clear All
|
|
•
|
To change your notification settings, click Settings
 . See Change Notification Settings. . See Change Notification Settings. |
|
•
|
To see all notifications in a larger window, click See All.
|
Change Notification Settings
Access your notification settings in either of these ways:
|
•
|
At the top right, click your user icon > Settings. At left, click Notifications
|
|
•
|
Click Notifications
 and click Settings and click Settings  . . |
Enable or disable notifications. If you enable a notification, choose how often you want to be notified.
Figure 1.33 Notification Settings
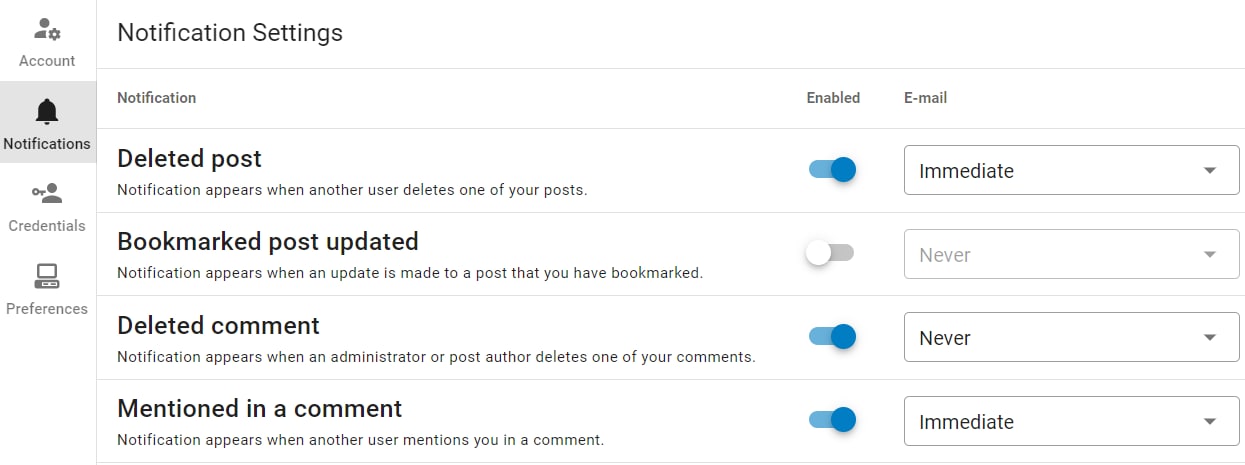
Tip: To sort notifications by ascending or descending order, click the arrow next to Notification.
Change Your Language
At the top right, click your user icon > Language and select a language.
Change the Theme to Dark or Light Mode
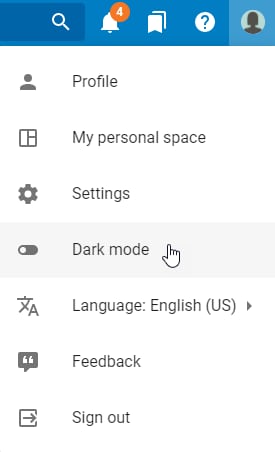
To change the theme from light mode to dark mode, at the top right, click your profile picture > Dark mode.
Figure 1.34 Change the Theme
Get an API Key for Scripting
Before you can use scripting to publish content to JMP Live, you might need an API key. (JMP Live administrators determine whether an API key is required for scripting.) An API key is unique for a user and a JMP Live server.
Caution: If you are updating an API key, it overrides the existing key. That means that any existing scripts that use the old key must be updated to use the new key.
|
1.
|
At the top right, click your user icon > Settings.
|
|
2.
|
Under API Key, click Generate New API Key
 . . |
You can also view your API key or copy it for inclusion in JSL scripts.
JMP Live Administrator Options
As a JMP Live administrator, you can do the following:
Review Server Information
To see details about your JMP Live server, click Admin > Server Information  .
.
On the Server Information page, you can see information about users, JMP sessions, version information, and more.
Server Settings
Server settings are read-only, but can be changed in the environment (.env) files, normally located here:
|
•
|
C:\Program Files\SAS\JMP Live\JMP Live
|
|
•
|
C:\Program Files\SAS\JMP Live\JMPPool
|
Note: For descriptions of all settings, see the env.example files.
If you want to change the default value of a setting, update the setting in the environment file. The environment files contain only exceptions to the default settings.
Instance Versions
Re-authorization required
Date on which re-authorization of JMP Pro is required. See Re-Authorize JMP Pro.
JMP Live version
Version of JMP Live that the server is running.
Build date
Build date for the JMP Live server.
Node version
Node version for the JMP Live server. Useful for troubleshooting.
OS version
Version of the operating system running the JMP Live server.
JMP Live license expiration date
Date on which the current JMP Live license expires.
Authentication Settings
Enable API key
Indicates whether the server API should be protected by an API key.
Authentication scheme
Authentication scheme that JMP Live uses. Possible values include keycloak, ldap, and local. This should be set once and never changed unless starting over with an empty database.
Cookie expiration time
Amount of time a session’s cookie is valid. The value must be five seconds or more.
Cookie SameSite policy
indicates the Cookie SameSite policy setting. A value of Lax means JMP Live content cannot be embedded in other applications. A value of None allows embedding to work if browser settings do not prevent it.
Session purge time
Amount of time before a session is purged.
SSL Settings
SSL certificate expiration date
Date on which the current SSL certificate file expires.
SSL public key file
Path to the .crt file. A .crt file is a digital certificate file that is used with a web browser to verify a secure website's authenticity.
SSL private key file
Path to the certificate key file. A certificate key file is a private text file used initially to generate a Certificate Signing Request. It is used later to secure and verify connections using the certificate that was created by that request.
SSL certificate authority file
Path to the certificate authority file. This file contains the public key signatures of the chain of signing authorities that have signed the SSL certificates.
Database Settings
The host, port, database name, user name, and SSL setting are configured during installation.
Maximum database connections (JMP Live)
Maximum number of concurrent database connections that any one instance of JMP Live attempts to sustain. The default value is 25.
Re-Authorize JMP Pro
After you install JMP Pro and JMP Live, you must authorize JMP Pro for the JMP Pool Service. After the initial authorization, you must re-authorize JMP periodically. You can find the date by which you need to re-authorize by in JMP Live under Admin > Server.
Tip: It is best to re-authorize during non-peak usage times. Re-authorizing might cause a short amount of pool downtime.
To authorize or re-authorize JMP Pro
|
1.
|
Log in to the machine running the JMP Pool Service:
|
|
–
|
If you are running the JMP Pool as a Windows service, log in as the user that activated JMP Pro. This should be the same user that is running as the Windows service.
|
|
–
|
If you are running the JMP Pool using the Windows command line, log in as the user that authorized JMP Pro.
|
|
2.
|
(Perform this step only if you are re-authorizing before the re-authorization date.)
|
|
a.
|
Navigate to the Windows registry. Click the Windows icon and type Registry Editor.
|
|
b.
|
Delete this folder from the registry: Computer\HKEY_CURRENT_USER\SOFTWARE\JMP\JMPPRO\18.0\License
|
|
3.
|
Open the jmp.exe file, installed here (by default): C:\Program Files\JMP\JMPPro\18.
|
|
4.
|
Follow the authorization prompts until JMP Pro opens, then you can close JMP.
|
|
5.
|
In JMP Live, click Admin > Pool. Click Terminate all
 to force all JMP sessions to reload. to force all JMP sessions to reload. |
Manage Admin Notifications
As a JMP Live administrator, you are notified in situations like these:
|
•
|
when a post fails to regenerate or refresh
|
|
•
|
when your JMP Live license expires
|
To see your administrative notifications, click Admin > Notifications  or Notifications
  > Admin. You can perform these actions:
 > Admin. You can perform these actions:
|
•
|
Click a notification to take action on it or see details.
|
|
•
|
Next to a notification, click More
|
Manage Users
To see and manage all JMP Live users, click Admin > Users  .
.
Click a user on the left to see details for that user, or search for a user in the Find user box.
For each user, you can change these aspects:
|
•
|
the user’s display name (if Active Directory is synchronized, this is not editable)
|
|
•
|
whether the user can access JMP Live (is enabled)
|
|
•
|
whether the user can publish content to JMP Live
|
|
•
|
whether the user is a JMP Live administrator
|
|
•
|
whether the user has administrative permissions on all spaces in JMP Live, which means they can create and manage spaces using the Admin page
|
|
•
|
whether the user can use an API key to publish JMP Live reports
|
If you are using Local authentication, you can also create a new JMP Live user. At the top right, click More  > Create local user.
 > Create local user.
To see the posts in a user’s personal space, in the top right corner, click Personal Space.
Remove a User
Removing a user does not remove their shared posts from JMP Live. The user’s content remains attributed to them unless you remove their personally identifiable information (PII), in which case their name is anonymized.
|
1.
|
Click Admin > Users
|
|
2.
|
Click Delete User.
|
|
3.
|
Choose whether to remove the user’s personal space and any PII.
|
Caution: This information is permanently deleted. This means you can no longer connect the user’s ID with their name, email, or anything else that personally identifies them.
|
4.
|
Enter Confirm in the box.
|
|
5.
|
Click Confirm.
|
|
•
|
If the user is part of an Active Directory synchronization, you should delete them in the Active Directory before deleting them in JMP Live. Otherwise, the user reappears at the next synchronization.
|
|
•
|
If you choose not to delete PII now, you can search for the deleted user and delete their PII later. Click More
 > Remove PII for previously deleted user. > Remove PII for previously deleted user. |
|
•
|
Previous records in the audit log might still contain PII, such as the user’s display name. You can delete all audit log records up to and including a specified date. See Remove All Records from the Log.
|
Add Users and Groups from Active Directory
As a Microsoft Active Directory administrator, you can sync JMP Live with your Active Directory structure to add users, groups, and group memberships to your JMP Live server. These users and groups are authorized to access JMP Live. You can continue to manage their access from your Active Directory.
To sync Active Directory groups to JMP Live
|
1.
|
Click Admin > Sync
 . . |
|
2.
|
Click Connection Settings.
|
|
3.
|
Enter your Active Directory server settings.
|
Figure 1.35 Example of Connection Settings for the Active Directory

|
4.
|
Click Test Connection to ensure that the settings are correct.
|
|
5.
|
Click Mappers.
|
Mappers tell JMP Live which Active Directory attribute to use for a particular JMP Live attribute.
|
6.
|
Enter the details that map your Active Directory attributes to JMP Live attributes.
|
Figure 1.36 Example of Mappers for the Active Directory

|
7.
|
Click Configuration.
|
|
8.
|
Click Add Groups for Import.
|
Figure 1.37 Add Active Directory Groups

|
9.
|
Enter text to search for the Active Directory groups that you want to add.
|
|
10.
|
Click Search.
|
|
11.
|
Select the groups that you want to add.
|
|
12.
|
Click Submit.
|
|
13.
|
Click Sync Now to perform the initial sync to get all users and groups.
|
Note: This process can take time depending on the size of the initial synchronization.
|
14.
|
(Optional) Schedule a periodic sync to keep groups and users in sync with any Active Directory changes:
|
|
a.
|
Click Edit.
|
|
b.
|
Turn on Periodic sync enabled.
|
Figure 1.38 Schedule an Active Directory Sync

|
c.
|
Choose a time and day(s) to do the sync.
|
|
d.
|
Click Save.
|
|
15.
|
(Optional) To see groups, change user permissions, or see results in the log:
|
|
–
|
Click Groups
|
|
–
|
See Manage Users
|
|
–
|
|
•
|
Any nested groups are also synchronized.
|
|
•
|
Avatars and display names are synchronized using mapper details.
|
|
•
|
If a sync is running, you cannot edit settings until it completes.
|
|
•
|
If a group is removed from the Active Directory, a sync also removes the group from JMP Live. The group deletion is recorded in the JMP Live audit log.
|
|
•
|
If a local group exists with the same name as an Active Directory group, the local group is overwritten with the Active Directory group.
|
Manage Groups
To see and manage all JMP Live groups, click Admin > Groups  .
.
Click a group on the left to see details for that group, or search for a group in the Find group box.
For each group, you can see the group name, description, and the group members. You can do any of these actions to a group:
|
•
|
edit the group name or description (not applicable for Active Directory groups)
|
|
•
|
enable or disable control chart warnings
|
|
•
|
delete the group
|
|
•
|
find members
|
|
•
|
add or remove members (not applicable for Active Directory groups)
|
Create a New Group
|
1.
|
Click Admin > Groups
|
|
2.
|
At the top right, click Create a new group
|
|
3.
|
Enter the group name.
|
|
4.
|
(Optional) Do any of the following actions:
|
|
–
|
Enter a description
|
|
–
|
Choose whether to send notifications for control chart warnings
|
|
–
|
Add users to the group
|
|
–
|
Add groups to the group
|
|
5.
|
Click Create.
|
Create and Manage Spaces
As a JMP Live administrator, you can create and manage spaces in JMP Live. See Create or Delete a Space.
You can delegate the management of spaces to other users in these ways:
|
•
|
Let a user create new spaces and manage all spaces in JMP Live by making them a space administrator. See Manage Users.
|
|
•
|
Let a user manage only a particular space by giving them Space Admin permission in the space. The user can add or remove members or groups and change permissions. See Update Users or Permissions.
|
Manage Settings
To change JMP Live settings as an administrator, click Admin > Settings  .
.
 .
.General Settings
Admin announcement
Enter an announcement that appears to all logged in users at the top of each page. The maximum number of characters is 280.
Admin e-mail address
Enter the JMP Live administrator’s email address.
No-reply e-mail address
Enter an email address from which to send automatic replies coming from JMP Live. Replies to this address are not monitored.
Tip: It is a good idea to add this email address to your safe senders list, so it doesn’t get sent to your spam folder.
Downloads prohibited
Choose whether to prevent users from downloading reports or data that they did not publish.
Note: Data that cannot be downloaded cannot be linked to reports by anyone except the person who published the data.
Anonymous access allowed
Choose whether anonymous users (people not logged in to JMP Live) can access JMP Live (on), or if a login is required (off). If you turn this option on, when someone sends a link to a JMP Live post in a space that gives View access to the Anonymous Visitors group, anonymous users can see the post on JMP Live.
Advanced Authentication Sync
Choose whether to automatically set user names and avatars with the values provided by your authentication service.
Debug classes
Log additional information when debugging issues with JMP Live support staff.
Report Settings
Auto-Regen max age days
Set the age of reports (in days) to be regenerated when the version of JMP Pro in the JMP Pool is updated. If set to zero, no more reports are added to the queue, but any existing reports in the queue are regenerated.
Regeneration frequency (seconds)
Set the number of seconds to wait between automatic HTML regenerations.
Prevent index page caching
Choose whether cache-control headers are passed with a post’s index file, which prevents a browser from caching the headers (on) or not passed (off).
Unique visit interval (seconds)
Set the number of seconds that must elapse before a user’s view of a post counts as an additional view of the post.
JMP Pool Settings
Max active JMP events
Set the maximum number of JMP events that can be in process at the same time. The valid range is from 1 to 8, but 3 or more is recommended.
Pool session allowed directories
List of directories on the pool server that refresh and import scripts can read from and write to. List one directory per line.
Pool session default memory limit (MB)
Maximum amount of memory that a JMP Pool session can use before it is terminated. Minimum value is 100 MB.
Pool session default maximum elapsed time (minutes)
Maximum elapsed time of a JMP Pool session before it is terminated. Minimum value is 1 minute.
Limits
User storage limit MB
Set the per-user limit on storage in megabytes. A value of zero means that there is no limit.
Maximum post size MB
Set the maximum size of an individual post in megabytes. This includes all uploaded assets, such as HTML files, thumbnail images, and data tables.
Maximum avatar size KB
Set the maximum size in kilobytes of a user’s profile picture.
Max publication rate (count)
Set the number of times a user is allowed to publish posts to JMP Live within the value specified in Max publication rate (minutes). A value of zero means that there is no limit.
Max publication rate (minutes)
Set the amount of time within which a user is allowed to publish, at most, the number of posts specified in the Max publication rate (count). A value of zero means that there is no limit.
Max replacement rate (count)
Set the number of times a user is allowed to replace posts to JMP Live within the value specified in Max replace rate (minutes). A value of zero means that there is no limit. If you specify a negative value, the Max publication rate (count) value is used.
Max replacement rate (minutes)
Set the amount of time within which a user is allowed to replace, at most, the number of posts specified in the Max replacement rate (count). A value of zero means that there is no limit. If you specify a negative value, the Max publication rate (minutes) value is used.
E-mail Settings
It is important to configure the SMTP settings in JMP Live so that you receive e-mail notifications as needed.
SMTP user
Set the user name for connecting to the SMTP server.
SMTP server address
Set the name of the SMTP server to use for sending email.
SMTP port
Set the port number to use for connecting to the SMTP server.
SMTP password
Set the password for connecting to the SMTP server.
Note: If you upgraded to JMP Live, you must re-enter your SMTP password.
SMTP ignore TLS
Choose whether the SMTP connection should ignore Transport Layer Security (TLS) (on) or not ignore TLS (off).
Reset all settings to the defaults
|
1.
|
At the top right, click Reset all settings
|
|
2.
|
Enter Reset.
|
|
3.
|
Click Confirm.
|
Monitor the Status of JMP Pools
In JMP Live, a JMP pool has a number of JMP sessions running on different ports. You can monitor the status of JMP pools and events in JMP pools under Admin > Pool  .
.
At the top, the summary statistics indicate:
|
•
|
How many JMP sessions are currently in use
|
|
•
|
How busy the sessions are, providing CPU and memory statistics
|
|
•
|
How many events are in the queue
|
The window refreshes automatically every 10 seconds.
Tip: To limit JMP sessions that consume too much memory or run for too long, go to Admin > Settings  . See JMP Pool Settings.
 . See JMP Pool Settings.
JMP Pool List
In the JMP Pool List, you can see who is using a pool and recycle or terminate any hanging sessions in a pool. Click the arrow beside the pool’s web address to see details. If a session is in use, you can see who is using it, when it was launched, and the JMP report or data associated with the JMP session.
If a session in a pool appears to be hanging, you have two options:
|
•
|
First, click Recycle
|
|
•
|
If Recycle does not work, click Terminate
|
To restart all sessions in a pool, click Recycle All or Terminate next to the pool’s web address.
JMP Event Queue
In the JMP Event Queue, you can diagnose issues in a pool and increase the event priority or terminate any hanging events. The JMP Event Queue includes active or pending JMP events across all pools. The queue is ordered by priority and the order in which events are processed.
If an event appears to be hanging, you have two options:
|
•
|
First, click Increase priority
 to a pending task so that it can be processed sooner. to a pending task so that it can be processed sooner. |
|
•
|
If increasing the priority does not work, click Cancel event
 to completely cancel the event. to completely cancel the event. |
Manage Stored Credentials
If you want to refresh data that comes from an external database and requires credentials, you can securely store those credentials in JMP Live.
To view, edit, or delete any credentials stored in JMP Live, click Admin > Credentials  .
.
 .
.Manage Refresh Schedules
To view, enable or disable, edit, or delete any scheduled data refreshes set up in JMP Live, click Admin > Schedules  .
.
 .
.By default, the list is sorted by which schedule runs next. Schedules that are actively running are highlighted.
Manage the Audit Log
The JMP Live audit log is a record that administrators can use to see user activity and troubleshoot issues. In the audit log, you can track changes that users make in JMP Live, such as publishing a post, deleting a post, creating a user, and so on. Click Admin > Log  to open the audit log.
 to open the audit log.
Search the Audit Log
To search the audit log by a specific action type, outcome, user, post, IP address, or date, click Filters  . Limit your search using any combination of these filters:
 . Limit your search using any combination of these filters:
|
•
|
Date range: Click All dates and choose a date, or click Custom to enter a specific date range.
|
|
•
|
Action: Click Action and select the actions that you want to search for.
|
|
•
|
Object ID: Click Object ID and enter a post, user, or group ID.
|
Tip: You can find the object ID at the end of the URL of a post, user, or group.
|
•
|
User: Click Users and select user names.
|
|
•
|
Space: Click Find space and enter a space.
|
|
•
|
Status: Click Succeeded or Failed.
|
|
•
|
IP address: Click IP address and enter an IP address.
|
|
•
|
Details: Click Details and enter text.
|
In the results, you can see when and by whom an action was performed. You can also perform these actions:
|
•
|
Click an Object ID to see the impacted post, group, or user.
|
|
•
|
Click a User to see the user’s profile associated with the action.
|
Remove Filters
To remove a filter, click x. To remove all filters, click Clear Filters.
Download the Audit Log
Click Download entries  to get a CSV file of the audit log. Before you download the audit log, it is recommended to limit the results by performing a search. If you have not limited the results, the Download button might be grayed out to prevent large downloads resulting in poor performance.
 to get a CSV file of the audit log. Before you download the audit log, it is recommended to limit the results by performing a search. If you have not limited the results, the Download button might be grayed out to prevent large downloads resulting in poor performance.
Remove All Records from the Log
Click Remove records  to clear all records from the audit log. Select a date and all audit log records prior to and including that date are removed.
 to clear all records from the audit log. Select a date and all audit log records prior to and including that date are removed.
Manage Post Accesses
See how many people have viewed JMP Live posts or downloaded data from posts on the JMP Live server. Click Admin > Views  .
.
 .
.Search Post Accesses
To search the accesses list by a user, access type, IP address, post, or date, click Filters  . Limit your search using any combination of these filters:
 . Limit your search using any combination of these filters:
|
•
|
User: Click Find user and select user names.
|
|
•
|
Access type: Click Access type and select View or Download.
|
|
•
|
IP address: Click IP address and enter an IP address.
|
|
•
|
Post ID: Click Post ID and enter the post ID.
|
Tip: You can find the post ID at the end of the URL of a post.
|
•
|
Date range: Click All dates and choose a date, or click Custom to enter a specific date range.
|
In the results, you can see when and by whom an action was performed. You can also perform these actions:
|
•
|
Click a post to open the impacted post.
|
|
•
|
Click a user to see the user’s profile associated with the access.
|
Remove Filters
To remove a filter, click x. To remove all filters, click Clear Filters.