Add Axial Points to a Design
Augment a design with axial and center points to augment a screening design in order to obtain a response surface design. This enables you to fit a response surface model to your data to optimize the settings of your factors with respect to your response.
This example augments an 8 run screening design with axial and center points.
1. Select Help > Sample Data Folder and open Design Experiment/Reactor 8 Runs.jmp.
2. Select DOE > Augment Design.
3. Select Percent Reacted and click Y, Response.
4. Select Feed Rate, Catalyst, Stir Rate, Temperature, and Concentration and click X, Factor.
5. Click OK.
6. Select Group new runs into separate block to add a blocking variable to the design.
7. Click Add Axial, enter 1 for axial value, 2 for number of center points, and then click OK.
8. Click Make Table.
9. From the Augmented Design table, select Rows > Color or Mark by Column.
10. Select Block, from Markers select Standard, and then click OK.
11. Select Graph > Graph Builder.
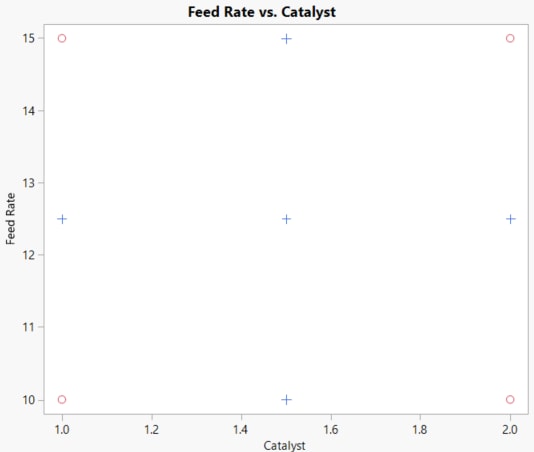
12. Drag Feed Rate to Y and drag Catalyst to X. Then click the smoother icon to remove.
Figure 6.17 Graphical View of the Augmented Design for Two Factors
The “+” points in the graph of Feed Rate versus Catalyst are the added axial and center points. The axial points are on the face of the design space. Increasing or decreasing the axial value in the augmentation of the design would move the axial points beyond or within the design space.
