Custom Transform Example
Let’s create a simple Custom Transform to multiply a value by 1,000. We embed the function definition inside Add Custom Functions().
Add Custom Functions(
New Custom Function(
"custom", // namespace in which new function resides
"x1000", /* function name. The completely scoped name is
"custom:x1000".*/
Function( {x}, x * 1000 ),// function definition
// optional message to enables this as a custom transform
<<Transform Category( 1 )
)
);
Running the above example writes “Deploying function: custom:x1000” in the JMP log. Search for this function in the Scripting Index to show that custom:x1000 is an existing function.
When you create a new formula column in a data table, the custom transform appears as shown in Figure 9.15.
Figure 9.15 Custom Transform in a Data Table
Custom Format Example: Multiplication
The last type of custom function is a custom format. You create custom formats using New Custom Function() and by specifying the Custom Format Category(1) message. Here’s an example that multiplies an input variable by 2 and also displays (x2) after the value. Note that, in this example, this function persists as a custom format and in the formula category “My New Category”. This allows you to use the format in a column formula or as a custom format.
/* add a New Custom Function, specifying it as a Custom Format
show "(x2)" after the value in the data table */
Add Custom Functions( New Custom Function( "myNamespace", "Times 2", Function( {inputVar}, {Default Local},Char( inputVar * 2 ) || " (x2)"
),
<<Description( "Multiply input by 2. Display (x2) after the new value." ),
<<Formula Category( "My New Category" ),
<<Custom Format Category( 1 ) // enable this as a custom format
)
);
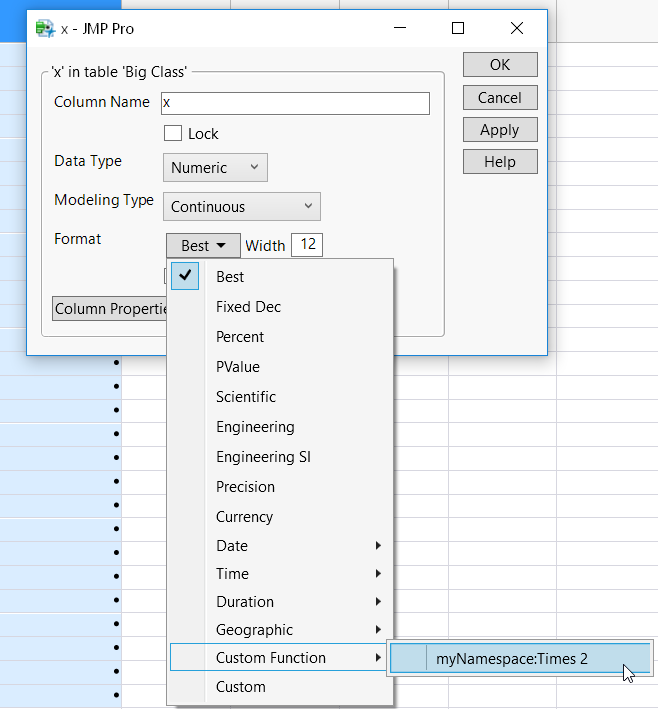
By specifying the Custom Format Category(1) message, this format now persists under the Custom Function category in the Format menu. Here’s what this looks like when applying this new Times 2 custom format in the Column Info window:
Figure 9.16 Custom Format in the Col Info Window
Custom Format Example: Dates
Suppose that you want to display dates in a format that isn’t provided in JMP. The following script formats a data to show the month, year, day, and day of week.
Add Custom Functions( New Custom Function( "myNamespace", "DateYMD_Day", Function( {inputVar}, {Default Local}, Char(Match( Month( inputVar ),
1, "January ",
2, "February ",
3, "March ",
4, "April ",
5, "May ",
6, "June ",
7, "July ",
8, "August ",
9, "September ",
10, "October ",
11, "November ",
12, "December "
)
) || Char( Year( inputVar ) ) || ", Day#" || Char( Day( inputVar ) ) || "-" ||
Char(Match( Day Of Week( inputVar ),
1, "Sunday",
2, "Monday",
3, "Tuesday",
4, "Wednesday",
5, "Thursday",
6, "Friday",
7, "Saturday"
)
)
),
<<Description( "Date format showing Month, Year, Day and Day of Week \!nfor example, April 1930, Day#29-Tuesday"),
<<Custom Format Category( 1 )
)
);
After you run the script, you can assign the format to a column of date values. In the Cols > Column Info window, the new date format is in the Format > Custom Function menu. You need to widen the data table column to be wide enough to display all of the characters.
Tip: See Displaying Numbers as Double Digits for another example of creating a custom format.

