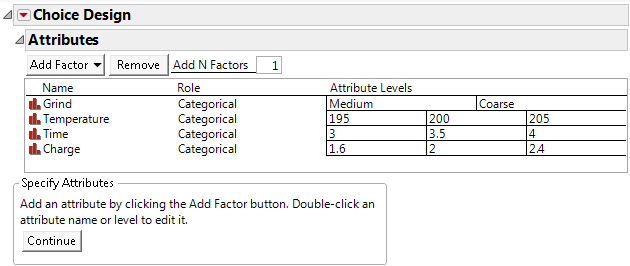
Example of a Choice Design
This example uses a choice design to study consumer preferences.
About the Experiment
In this example, a coffee shop is interested in making an ideal cup of coffee to satisfy the majority of its customers. The manager has asked you to determine which factors affect customer preferences. Specifically, you need to determine which settings of the following factors (attributes) result in an ideal cup of coffee:
• Grind size (medium or coarse)
• Temperature (195°, 200°, 205°)
• Brewing time (3 minutes, 3.5 minutes, or 4 minutes)
• Charge (1.6 grams/ounce, 2 grams/ounce, or 2.4 grams/ounce)
Each combination of factor levels is a profile. Trying to obtain information about preferences by having every respondent sample every possible profile is not practical. However, you can ask a respondent to select a preferred profile from a choice set consisting of a small number of profiles.
In this example, you design an experiment where each respondent indicates his or her preference in several choice sets. Your design will have the following structure:
• ten respondents
• twelve choice sets
• two profiles per choice set
• one survey per respondent containing all 12 choice sets
The experiment results in 12 responses per respondent. Analysis of these preferences can be used to draw conclusions about how to make a cup of coffee that pleases most customers.
Create the Design
You can enter factors either manually or automatically using a preexisting table that contains the factors and settings. In this example, for convenience, you use a preexisting table. But, if you are designing a new experiment, you must first enter the factors manually. For more information about entering factors manually, see Attributes.
1. Select DOE > Consumer Studies > Choice Design.
2. Select Help > Sample Data Folder and open Design Experiment/Coffee Choice Factors.jmp.
3. Click the Choice Design red triangle and select Load Factors.
Figure 18.2 Choice Design Window with Attributes Defined
4. Click Continue.
5. (Optional) Open the DOE Model Controls section.
Notice that there only main effects. In this example, you are only interested in a model that contains the main effects of your four factors. However, if you wanted your design to be capable of estimating additional effects, you add them in this section.
6. In the Design Generation panel:
– Keep the Number of attributes that can change within a choice set at 4.
– Keep the Number of profiles per choice set at 2.
– Type 12 for the Number of choice sets per survey.
In this example, the respondents evaluate 12 choice sets.
– Keep the Number of surveys at 1.
– Type 10 for the Expected number of respondents per survey.
In this example, there are ten respondents.
Figure 18.3 Completed Design Generation Panel
Note: Setting the Random Seed in step 7 reproduces the exact results shown in this example. In constructing a design on your own, this step is not necessary.
7. (Optional) Click the Choice Design red triangle and select Set Random Seed. Type 12345 and click OK.
8. Click Make Design.
There are 12 choice sets, each consisting of two coffee profiles.
9. Select Output separate tables for profiles and responses.
This places the descriptions of the choice sets in a data table called Choice Profiles. A second data table (called Choice Runs) is constructed to facilitate entry of the response information.
10. Click Make Table.
The Choice Profiles table shows the 12 choice sets, each consisting of two profiles. The Choice Runs table enables you to record the preferred profile in the column Response using the profile ID. Enter 1 if Choice 1 is the preferred profile or 2 if Choice 2 is the preferred profile. Alternatively, if the respondent has no preference, leave the response missing.
The Choice script in the Choice Profiles table facilitates analysis of experimental results. It opens a completed launch window for a Choice Model. For information about Choice Models, see “Choice Models” in Consumer Research.
The DOE Dialog script in the Choice Profiles table relaunches the design dialog.

