Example of a One Table Format with a No Choice Option
Use the Choice platform to analyze a choice experiment where the data are in one data table. In this example, some respondents do not make a choice. When a respondent does not make a choice, the respondent’s choice indicator is entered as missing.
Note: Use a missing entry, “None”, or “No Choice” to indicate a no choice selection.
1. Select Help > Sample Data Folder and open Pizza Combined No Choice.jmp.
Choice sets are defined by the combination of Subject and Trial. Notice that there are missing values in the Indicator column for some choice sets.
2. Select Analyze > Consumer Research > Choice.
The One Table, Stacked data format is the default.
3. Click Select Data Table.
4. Select Pizza Combined No Choice and click OK.
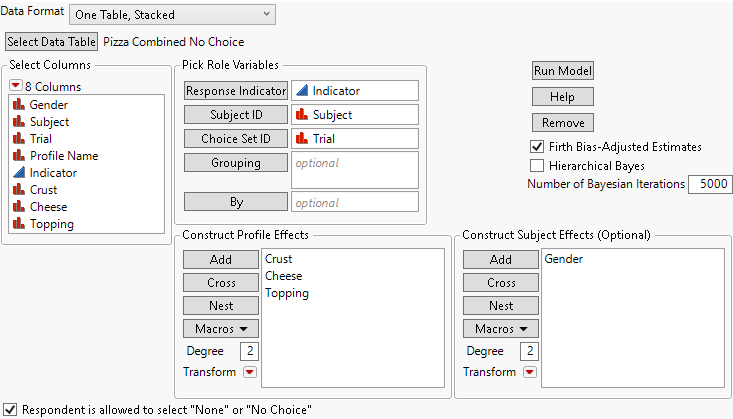
5. Complete the launch window:
– Select Indicator and click Response Indicator.
– Select Subject and click Subject ID.
– Select Trial and click Choice Set ID.
– Select Crust, Cheese, and Topping and click Add in the Construct Profile Effects panel.
– Select Gender and click Add in the Construct Subject Effects (Optional) panel.
Figure 4.2 Completed Launch Window
6. Check the box next to Respondent is allowed to select “None” or “No Choice”.
7. Click Run Model.
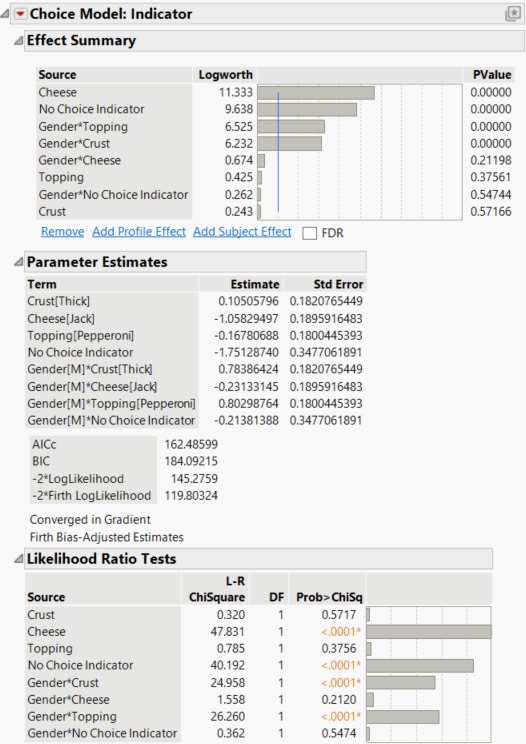
Figure 4.3 Report Showing No Choice as an Effect
The Effect Summary report shows the effects in order of significance. Cheese is the most significant effect, followed by the No Choice Indicator, which is treated as a model effect. The subject effect interactions Gender*Topping and Gender*Crust are also significant, indicating that preferences for Topping and Crust depend on Gender market segments.
To get some insight on the nature of the No Choice responses, select and view those choice sets that resulted in No Choice.
8. In the data table, right-click in a cell in the Indicator column where the response is missing and select Select Matching Cells.
9. In the Rows panel, right-click Selected and select Data View.
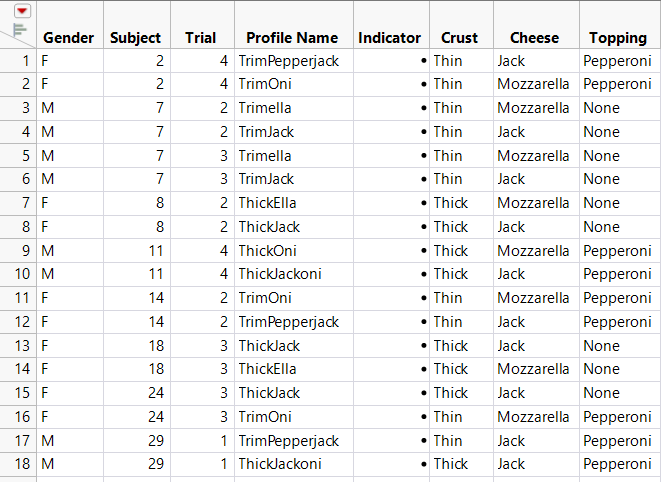
Figure 4.4 Choice Sets with No Choice Responses
In the table in Figure 4.4, consider the profiles in the first seven choice sets, which are defined by the Subject and Trial combinations in rows 1 to 14. The only difference within each choice set is the Cheese. There is an indication that some respondents might not be able to detect the difference in cheeses. However, the analysis takes the No Choice Indicator into account and concludes that, despite this behavior, Cheese is significant.
To see how to further analyze data of this type, see Find Optimal Profiles.


