Launch the Marker Statistics Platform
To calculate the marker statistics for your experimental data, launch the Marker Statistics platform by selecting Analyze > Genetics > Marker Statistics.
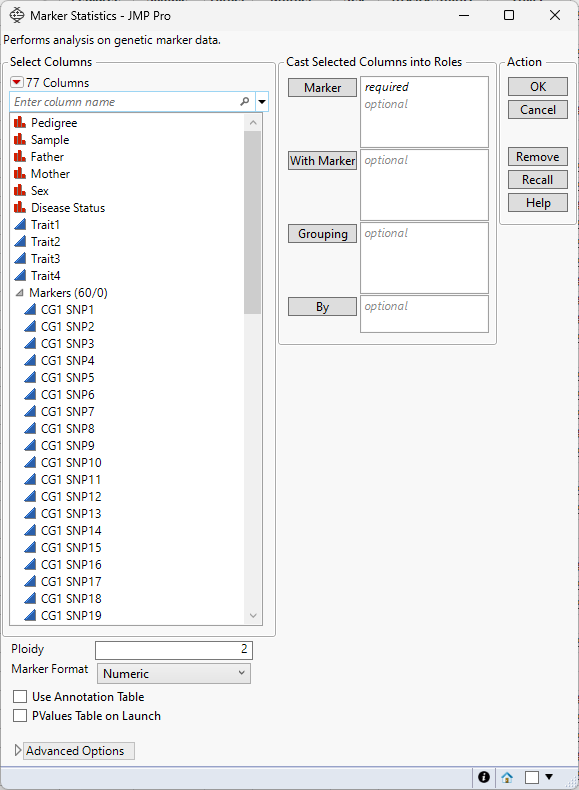
Figure 3.3 The Marker Statistics Launch Window
For information about the options in the Select Columns red triangle menu, see “Column Filter Menu”in Using JMP.
Marker
Select desired marker columns and click Marker to specify the markers that you want to analyze.
With Marker
Select desired marker columns and click With Marker to specify the markers to use in pairwise linkage disequilibrium comparisons with the markers specified in X, Marker above.
Grouping
Analyzes the rows assigned to each level of the specified column separately. All results are presented in a single table and report.
By
Produces a separate report for each level of the By variable. If more than one By variable is assigned, a separate report is produced for each possible combination of the levels of the By variables.
Ploidy
Enables you to specify the ploidy level of the experimental organism under investigation.
Marker Format
Use this option to specify the type of measurement to use to assess the relationship between samples (rows).
This new Marker Format option enables users to use non-numeric marker columns as input. Once the platform runs with non-numeric marker columns, it recodes these columns in place and returns an updated data table with non-numeric columns recoded to numeric. This new data table with numeric marker columns can now be used in other Genetics platforms that require numeric marker columns as well as in any other JMP platform that requires numeric columns.
• Select Numeric when markers are encoded in numeric format. Typically, in this format, diploid individuals homozygous for the least common, or minor allele, are represented in the table by a 2, whereas the heterozygotes are represented by a 1. Homozygotes for the most common allele are represented by a 0. For polyploid samples, genotypes in the columns are expected to be 0,1,2, …, p (where p = ploidy number)
• Select Single-Character when diploid samples are coded as A, B, or H (A= AA, B= BB, and H=AB ).
• Select Character when p-ploidy samples are coded as ApBp, where p= ploidy number (e.g., AABB for a tetraploid sample).
• Select Single-Code Nucleotide when diploid samples are coded according to the IUPAC codes (A,C,G,T,R,Y,S,W,K,M,+,0,-,N).
• Select Nucleotide when diploid samples are coded with two letters (AA, CC, GG, TT, AC, AG, and so on).
Use Annotation Table
Enables you to access annotation information contained in a separate data table. After you click OK, a window appears, prompting you to specify the name and location of the annotation table.
PValues Table on Launch
Creates a data table for the p-values of the associated estimated marker statistics. This data table is linked to the Result Table in the Marker Statistics report.
Unthreaded
Suppresses multithreading. Deselect this option for improved computational speed.
Required Data Format for the Marker Statistics Platform
Most of the processes in JMP assume that the input table has a particular data structure. JMP distinguishes between tall and wide data sets. A tall data table has samples as columns and molecular entity (for example, marker, gene, clone, protein, or metabolite) as rows, whereas a wide data table is the transpose of the tall data table, having the samples as rows and molecular entity as columns.
When specifying the input data set for a process, it is important to know the required form. Marker Statistics requires a wide data table. Use the Transpose option in the Tables menu to transform your data tables between tall and wide forms.
