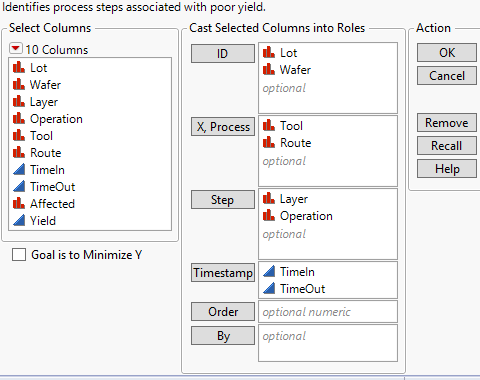
Launch the Process History Explorer Platform
Launch the Process History Explorer platform by selecting Analyze > Screening > Process History Explorer.
Figure 27.3 Process History Explorer Launch
For more information about the options in the Select Columns red triangle menu, see “Column Filter Menu” in Using JMP.
Launch Window Roles
ID
Specifies one or more columns that identify a unit in the process.
Note: The ID columns must have corresponding columns in the yield table.
X, Process
Specifies one or more columns that identify the components or specific details that make up the steps of the process.
Step
Optional columns that specify the steps and sub-steps that a unit goes through. For example, the layer and the type of operation within the layer.
Timestamp
Specifies the time of the operation. The time can be specified as a single time point or as a pair of time points that indicate the times that the operation started and ended.
Order
Optional column that specifies the order that a batch of units went through the components specified in the X, Process role.
By
Produces a separate report for each level of the By variable. If more than one By variable is assigned, a separate report is produced for each possible combination of the levels of the By variables.
Launch Window Options
Goal is to Minimize Y
Specifies that the goal of the analysis is to minimize the response. By default, the analysis seeks to maximize the response.
Note: The response is specified in a second data table, not in the data table used to launch the platform.
Data Format
The data for Process History Explorer must be specified in two data tables. The first table is used to launch the platform and contains the steps and details of the process. The second table contains the response, or yield, for each level of the ID columns.
The sample data tables Quality Control > Lot Wafer History and Quality Control > Lot Wafer Yield provide an example of how the data are specified in two data tables.
