Create Color Themes in Graphs
JMP includes several color themes that can distinguish a range of values in a graph. You can also create your own color themes based on an existing color theme or create custom themes.
When you select a default color theme, the colors are not applied to reports that are open. You need to rerun the existing reports to format them with the default color theme.
See Delete Custom Color Themes in Graphs for more information about deleting custom color themes.
To create a color theme
1. Select File > Preferences > Graphs.
2. To either create a new Continuous Color Theme or Categorical Color Theme, click the appropriate color theme.
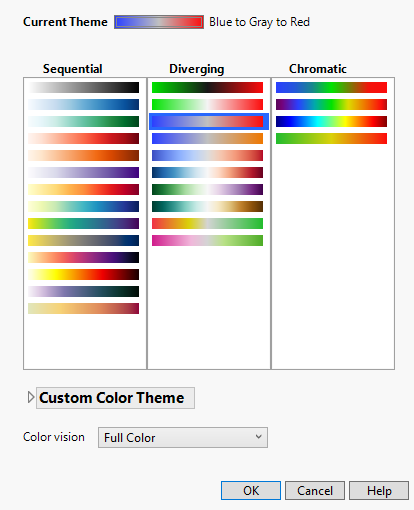
If you are creating a new continuous color theme, the Continuous Color Themes window appears.
Figure 4.30 Continuous Color Themes Window
The sequential color “Cividis” is a form of Viridis that is designed for viewing with color limitations.
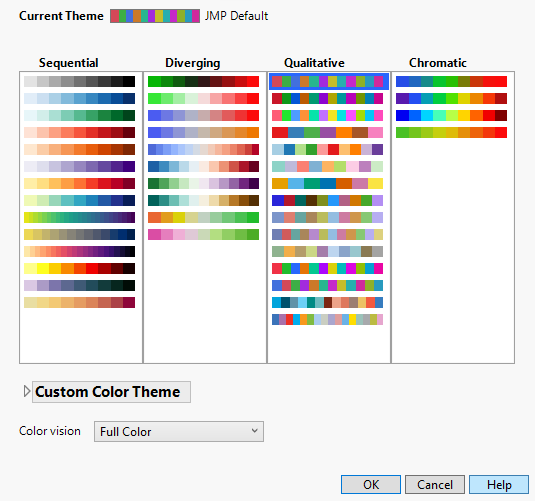
If you selected to create a new categorical color theme, the Categorical Color Themes window appears.
Figure 4.31 Categorical Color Themes Window
3. (Optional) To base the theme on an existing theme, select a color themes from the available themes.
4. Click the Custom Color Theme disclosure icon to show the Custom Color Theme panel.
Figure 4.32 shows the color theme panels for both continuous and categorical themes (respectively).
Figure 4.32 Custom Color Theme Panel
5. Click New to create a new theme.
A new color theme is created based on the selected color theme. A temporary name is assigned to the theme.
6. Type a new name in place of the temporary label. On Windows, do not press Enter. The window closes if you do so.
7. To modify the color theme, do any of the following:
– To modify the missing color, click the missing color to open a color palette. Select the desired missing value color and click OK.
– To modify the gradient of continuous color, move the sliders left or right.
– To add more colors to the gradient, click the color bar to choose a color. A new slider is displayed under the color bar.
– To change the color of a slider, click the slider to display the Color window and choose another color.
– To reverse the order of the colors on the gradient, click Reverse.
– To distribute the colors evenly on the gradient, click Space Evenly.
– To list the custom theme in the Sequential pane, select Sequential from the list.
– To list the custom theme in the Diverging pane, select Diverging from the list.
– To list the custom theme in the Chromatic pane, select Chromatic from the list.
– To prevent a theme from appearing in lists of color themes, select Hidden.
– To remove a color from the color theme, click the color’s slider and drag the slider above or below the color bar.
– To discard your changes, click Cancel.
8. Click Save to save the custom color theme.
The new custom color theme is appended to the contents of the selected pane.
9. Click OK to close the color theme window.
To adjust color themes for color blindness
In the Continuous or Categorical Color Themes window, choose an option based on the type of color blindness from the Color vision menu.
Continuous and Categorical Color Themes
The following figure shows examples of the two types of color themes in JMP, continuous and categorical. When a color theme is selected for continuous data, the colors are graduated (as shown on the left). When the same color theme is selected for categorical data, the color consists of distinct blocks of color (as shown on the right).
Figure 4.33 Examples of Continuous and Categorical Color Themes
Custom Color Themes
Custom color themes can be applied in the same way as built-in color themes:
• You can select custom color themes as defaults from the Continuous Color Theme and Categorical Color Theme drop-down menus in the Graphs preferences. Only continuous color themes are available for continuous data. All color themes are available for categorical data.
• You can apply the custom color themes to components such as markers and data table rows. See Assign Colors or Markers to Rows Based on Column Values.
• In certain reports, such as treemaps and surface plots, you can select specific custom color themes. See Essential Graphing.
Use Custom Color Themes on Multiple Computers
In Windows, the color themes that you create are defined in the JMP preferences file called JMP.PFS. If you use JMP on more than one computer (for example, at home and at work), you can copy the color theme definitions from one JMP preferences file to another. Custom colors are then available on both computers.
In the preferences file, the code for a custom color theme looks like this:
Add Color Theme(
{"Pink to Blue", 2051, {{255, 168, 255}, {255, 0, 255}, {0, 128, 255}}}),
In this example, the name of the color theme is “Pink to Blue.” The Red/Green/Blue (RGB) values for each color slider are located in brackets. The first slider defines the RGB values 255, 168, and 255. The second and third groups of brackets define colors for the second and third sliders.
Note: The second value (2051) is the category of the color theme, such as Categorical or Continuous. You can omit the category, but JMP always includes the information in the preferences file or when Show Preferences() is run.
In a text editor (such as Microsoft Notepad) add this color theme to the preferences file on your other computer. The preferences file is located in your Users folder within the JMP or JMPPro folder.
C:\Users\<user_name>\AppData\Roaming\JMP\JMP\18
C:\Users\<user_name>\AppData\Roaming\JMP\JMPPro\18
Note: To see the preceding folders, you must configure Windows Explorer to show hidden files and folders. For more information, refer to the Windows help.
To transfer color themes to another Windows computer
1. On the computer that contains the customized JMP preferences, select File > New > Script.
The Script window appears.
2. Type the following JSL function:
Show Preferences()
3. Click Run Script ![]() .
.
Your customized preferences are written to the log.
4. Select View > Log (or display the open log).
The custom color theme that you created appears, for example:
Add Color Theme(
{"Pink to Blue", 2051, {{255, 168, 255}, {255, 0, 255}, {0, 128, 255}}}),
This definition might be in the middle of other customized preferences that appear in the log.
5. Save the log as Log.jsl and open the file on the computer whose preferences you are updating.
6. On the computer whose preferences you are updating, close JMP.
7. Make a backup of JMP.PFS, and then open the original JMP.PFS in a text editor.
8. Copy and paste the custom color definition from Log.jsl to JMP.PFS. The definition goes after Preferences( as shown in the following example:
Preferences(
Add Color Theme(
{"Pink to Blue", 2051, {{255, 168, 255}, {255, 0, 255}, {0, 128, 255}}}),
);
Note: Be sure to include the closing parenthesis and comma. The code does not need to be indented. You can put the code in any valid location. Pasting it after Preferences( helps ensure that you do not delete any necessary parentheses or commas.
9. Save the file.
If you open JMP and the new color definition is not displayed in the preferences, delete the updated preferences file and add the definition to the original preferences file. Make sure that you copy and paste the definition in the correct location.


