Output Options
Use the Output Options panel to save your custom design X Matrix, simulate responses, or customize your design data table. You can perform the following tasks:
• specify how you want the custom design data table to appear
• construct the design table
• return to a previous point in the Custom Design window
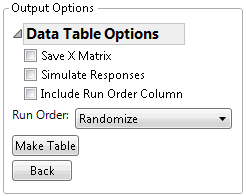
In most cases, the Output Options panel appears as shown in Figure 4.24.
Figure 4.24 Output Options Panel
The Output Options panel contains these options:
• Back
Data Table Options
The Data Table Options includes the Save X Matrix option (Save X Matrix), the Simulate Response option (Simulate Responses) as well as an Include Run Order Column option.
Include Run Order Column
Adds a column to the design data table that corresponds to the design order in the Design section.
Tip: Use the Include Run Order Column when you save your data with a sorted run order. This provides a column of the randomized run order from the design section.
Run Order
The Run Order options determine the order of the runs in the design table. Choices include the following:
Keep the Same
Rows in the design table are in the same order as in the Design outline.
Sort Left to Right
Columns in the design table are sorted from left to right.
Randomize
Rows in the design table are in random order.
Sort Right to Left
Columns in the design table are sorted from right to left.
Randomize within Blocks
Rows in the design table are in random order within the blocks.
Make Table
Click Make Table to construct the custom design data table. In the Custom Design table, the Table panel (in the upper left) can contain scripts, as appropriate given your design. The Model, Evaluate Design, and DOE Dialog scripts are always provided. To run a script, click the green triangle next to the script name. If your design includes covariates, the design table includes a covariate row index column unless all covariate rows are used in the design.
Figure 4.25 Custom Design Table Showing Scripts
Possible scripts include the following:
Model
Runs the Analyze > Fit Model platform. The model described by the script is determined by your choices in the Model section and by the type of design.
Evaluate Design
Runs the DOE > Design Diagnostics > Evaluate Design platform. The model described by the script is determined by your choices in the Model section and by the type of design.
Constraint
Shows model constraints that you entered in the Define Factor Constraints section using the Specify Linear Constraints option.
Disallowed Combinations
Shows model constraints that you entered in the Define Factor Constraints section using the Use Disallowed Combinations Filter or the Use Disallowed Combinations Script options.
DOE Dialog
Re-creates the Custom Design window that you used to generate the design table. The script also contains the random seed used to generate your design.
Back
The Back button takes you back to where you were before clicking Make Design. You can make changes to the previous sections and regenerate the design.
Note: If you attempt to remove all factors after clicking the Back button, one continuous factor remains. You can delete the continuous factor after new factors are added.

