Create Drill-Down Graphs
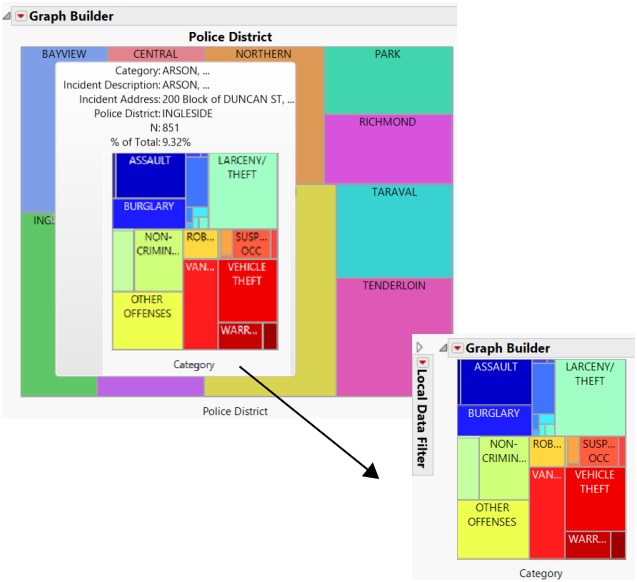
A drill-down graph is created when you click on the thumbnail. Clicking on the hover graph opens it in a new window, enabling you to see the graph in more detail and also make modifications such as changing the data filter. For example, you can press Ctrl and click a cell on a treemap to see details about the data (Figure 12.48). Press Alt to replace the contents of the last launched window instead of opening a new one.
• The Next in Hierarchy column property enables you to define the behavior of categorical drill downs in preset graphs. This column property defines only one level of the drill down, from a category in a grouping role in the current visualization to the category in the grouping role in the next one, launched by the graphlet.
• If the Next in Hierarchy column property is not defined, the list of categorical or nominal columns from the data table that have not been added to a filter is used.
Notes:
• The Next in Hierarchy column property is not supported in graphlets defined using Paste Graphlet. See 定制图形 in Using JMP for details about the Paste Graphlet command.
• If there is no measurement, JMP tries to get one from the data table and uses Count (or no measurement) if there are no numeric columns in the data table.
Figure 12.48 shows drilling-down on a cell in a treemap.
Figure 12.48 Example of a Drill-Down Graph on a Hover Label
The following script creates the simplified versions of the treemap presets shown in Figure 12.48.
Names Default To Here( 1 );
/* traverse the given list of column names, defining the Next in Hierarchycolumn property so that it creates a chain to enable the drill down */
setHierarchy = Function( {dt, cols}, {Default Local}, nCols = N Items( cols ); If( nCols < 2,Write( "\!NsetHierarchy: Insufficient number of columns!" ),
col = Column( dt, cols[1] );
For( i = 2, i <= nCols, i++,nextCol = cols[i];
Try(
Column( dt, nextCol ),Write( "Invalid column name: " || nextCol );
Throw(););
// Eval() is needed for nowcol << Set Property( "Next in Hierarchy", Eval( nextCol ) );
nih_name = col << Get Property( "Next in Hierarchy" );
col = Column( dt, nextCol ););
);
);
// open San Francisco Data.jmpdt = Open( "$SAMPLE_DATA/San Francisco Crime.jmp" );
// add a Next in Hierarchy chain to the data tablesetHierarchy( dt, {"Police District", "Category", "Incident Description"} );/* Graph Builder treemap based on the first level of our hierarchy, "Police District" */gb = dt << Graph Builder(Size( 495, 440 ),
Show Control Panel( 0 ),Variables( X( :Police District ) ),
Elements( Treemap( X ) ));
// get a handle to the graph frameboxrpt = gb << Report;frame = rpt[Framebox( 1 )];/* configure the graphlet -- a hover label extension that adds a visualization thumbnail to the hover label. Clicking on the thumbnail launches the associated visualization in its own window (or replaces the graph in the current window on a Ctrl-click). */frame << Set Graphlet( // define the thumbnail and launch treemapPicture(
// next-level grouping is retrieved from the Next in Hierarchy propertylocal:propColName = local:_groupings[1] << GetProperty( "Next In Hierarchy" );
local:nextGrouping = Column( local:_dataTable, local:propColName );
// define the Graph Builder graph for the thumbnail Graph Builder(Size( 200, 250 ),
Show Legend( 0 ), Show Title( 0 ), Show Footer( 0 ), Show Control Panel( 0 ),Variables( X( local:nextGrouping ) ),
Elements( Treemap( X ) ));
)
);
// add a pinned annotation to display the graphletframe << Add Pin Annotation( Seg( TreeMapSeg( 1 ) ), Index( 2 ), Index Row( 7033 ), UniqueID( 581248018 ), FoundPt( {52, 248} ), Origin( {27.6544421487603, 200.14987244898} ), Tag Line( 1 ));
